I know, I’m on a roll, two new tutorials in a row! This one is another pure beadweaving tutorial – I’ve been doing a lot of bead embroidery and goldwork as part of other projects, so I’ve returned to beadweaving as a break from the stress of very creative work, spending some time refining some samples made a little while ago and writing them up.
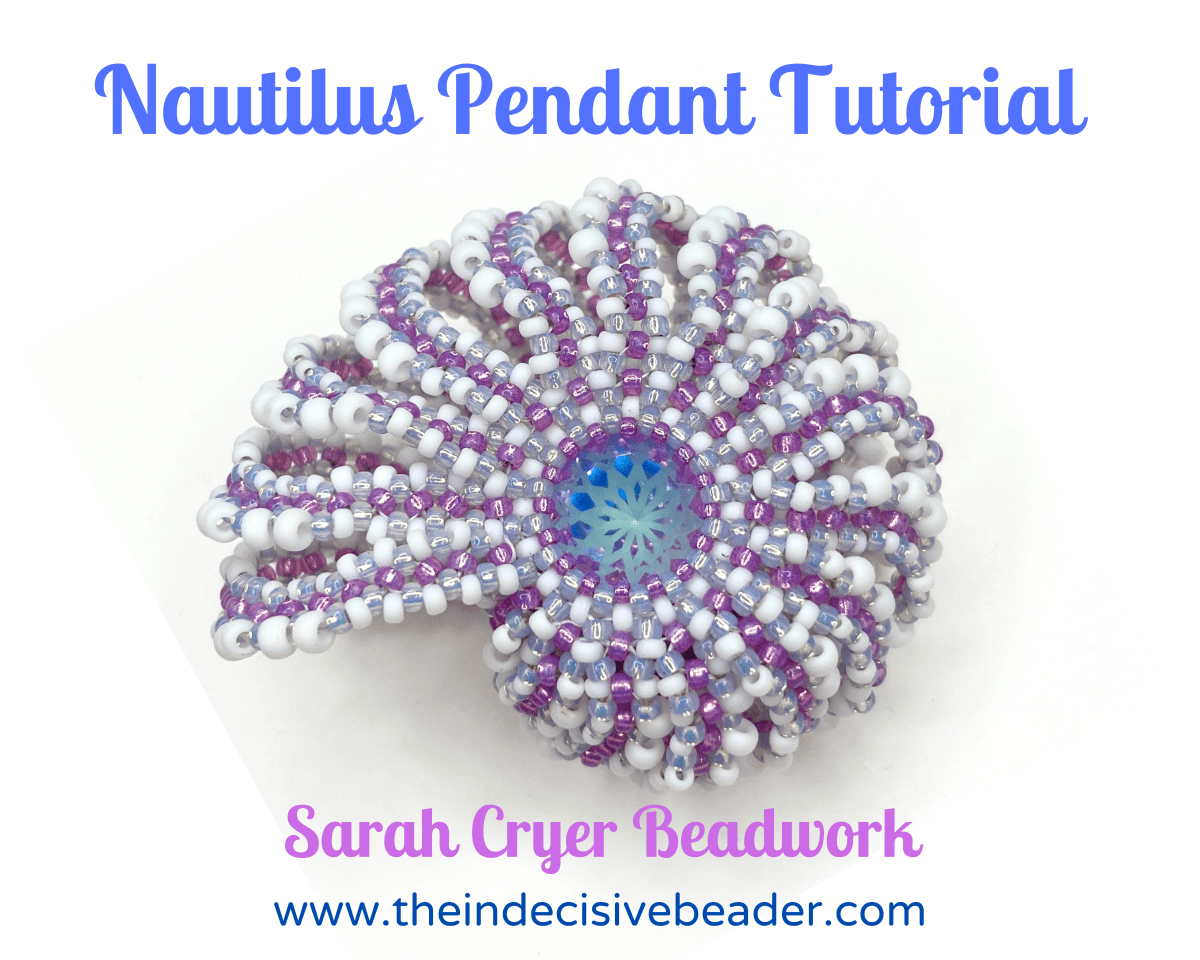
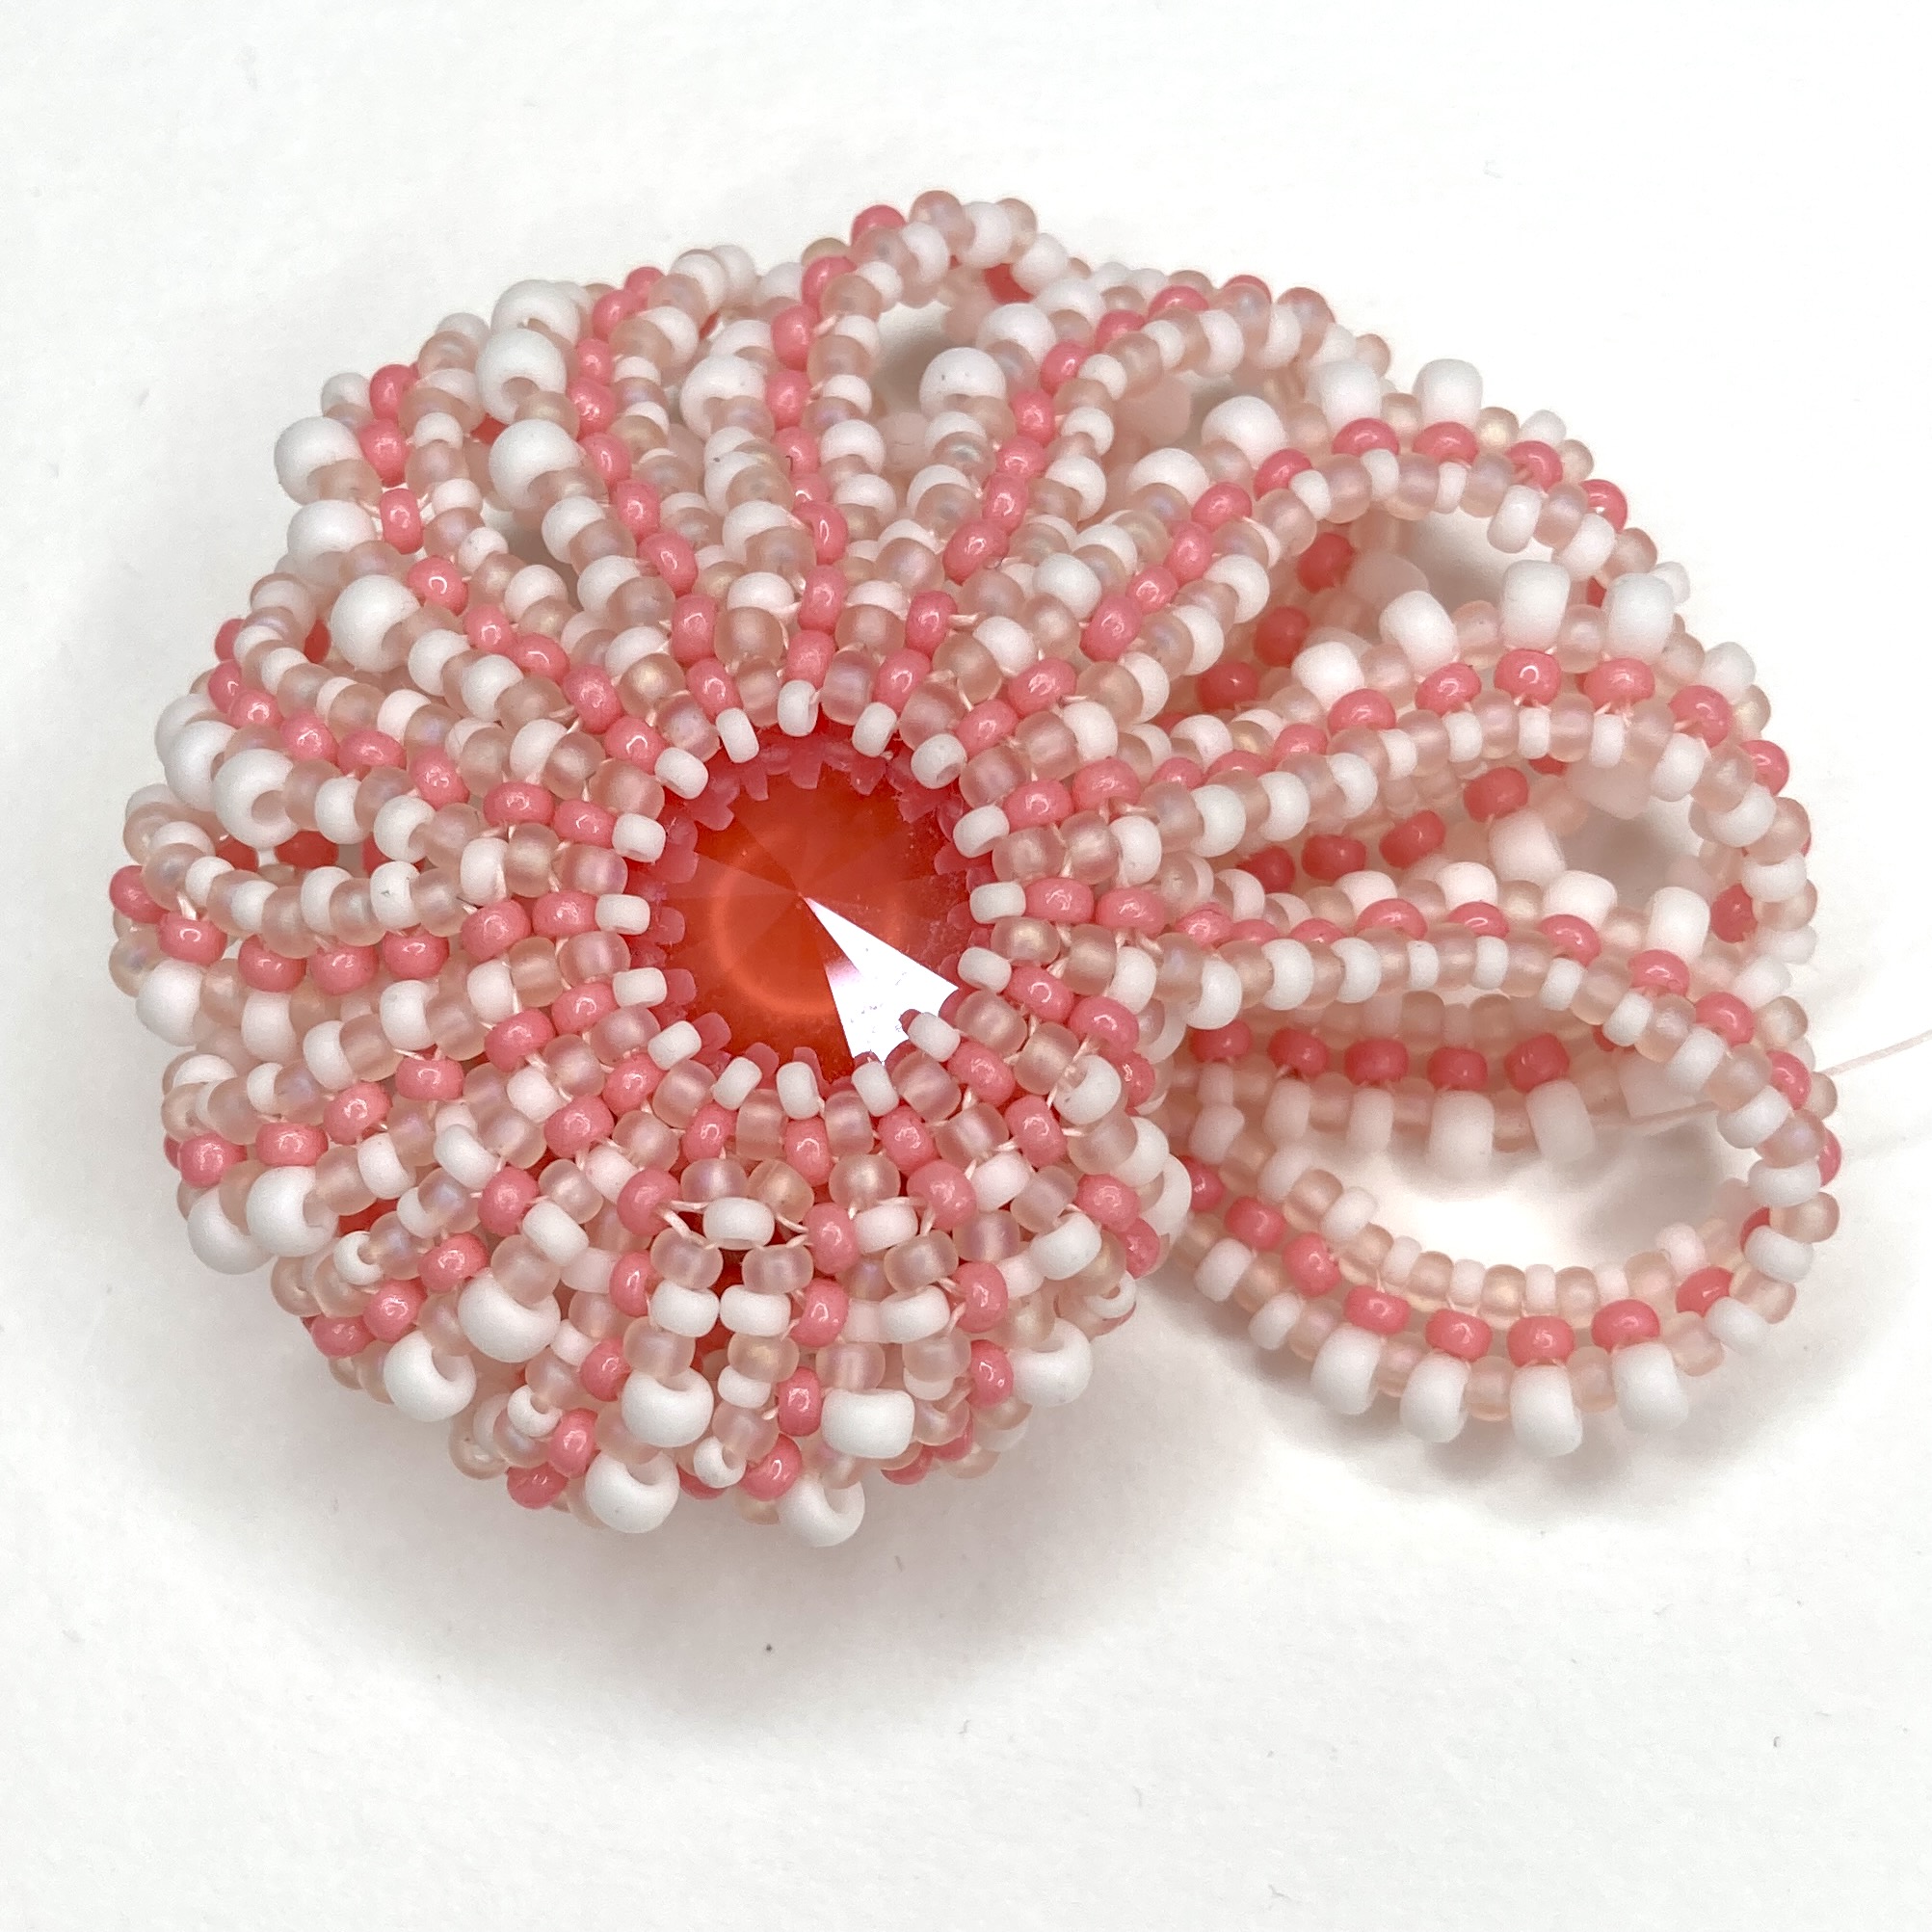
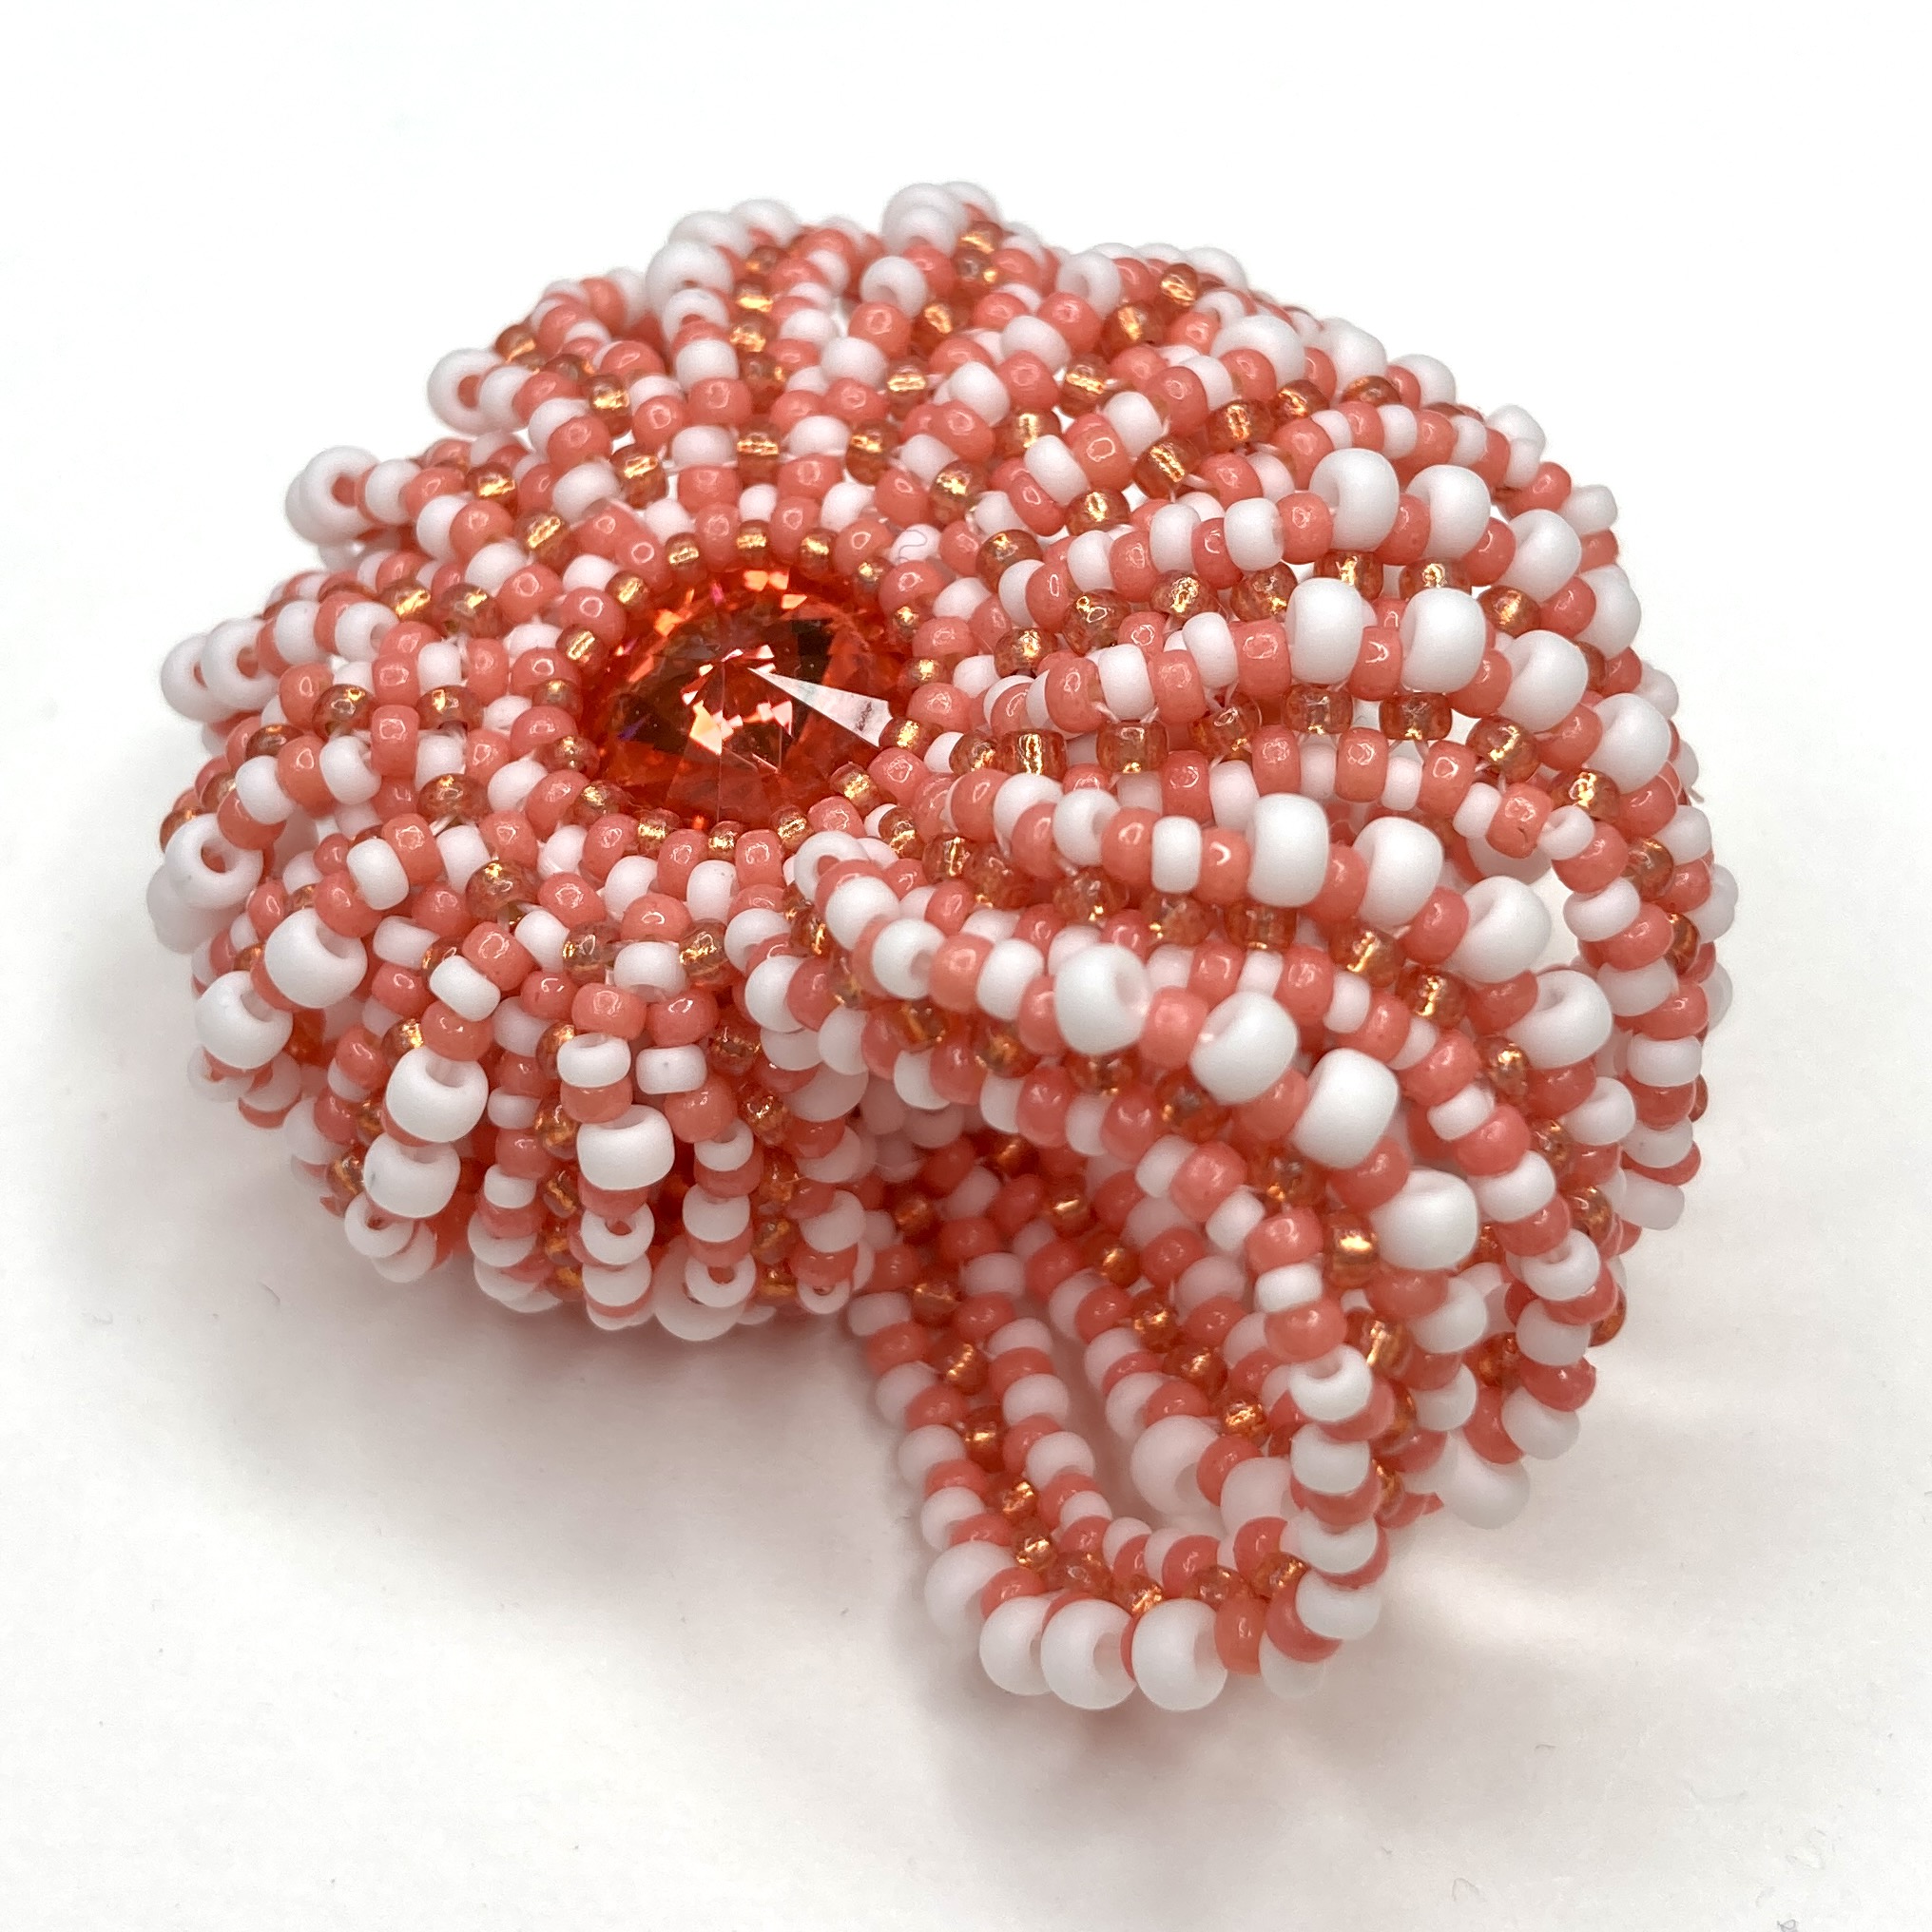
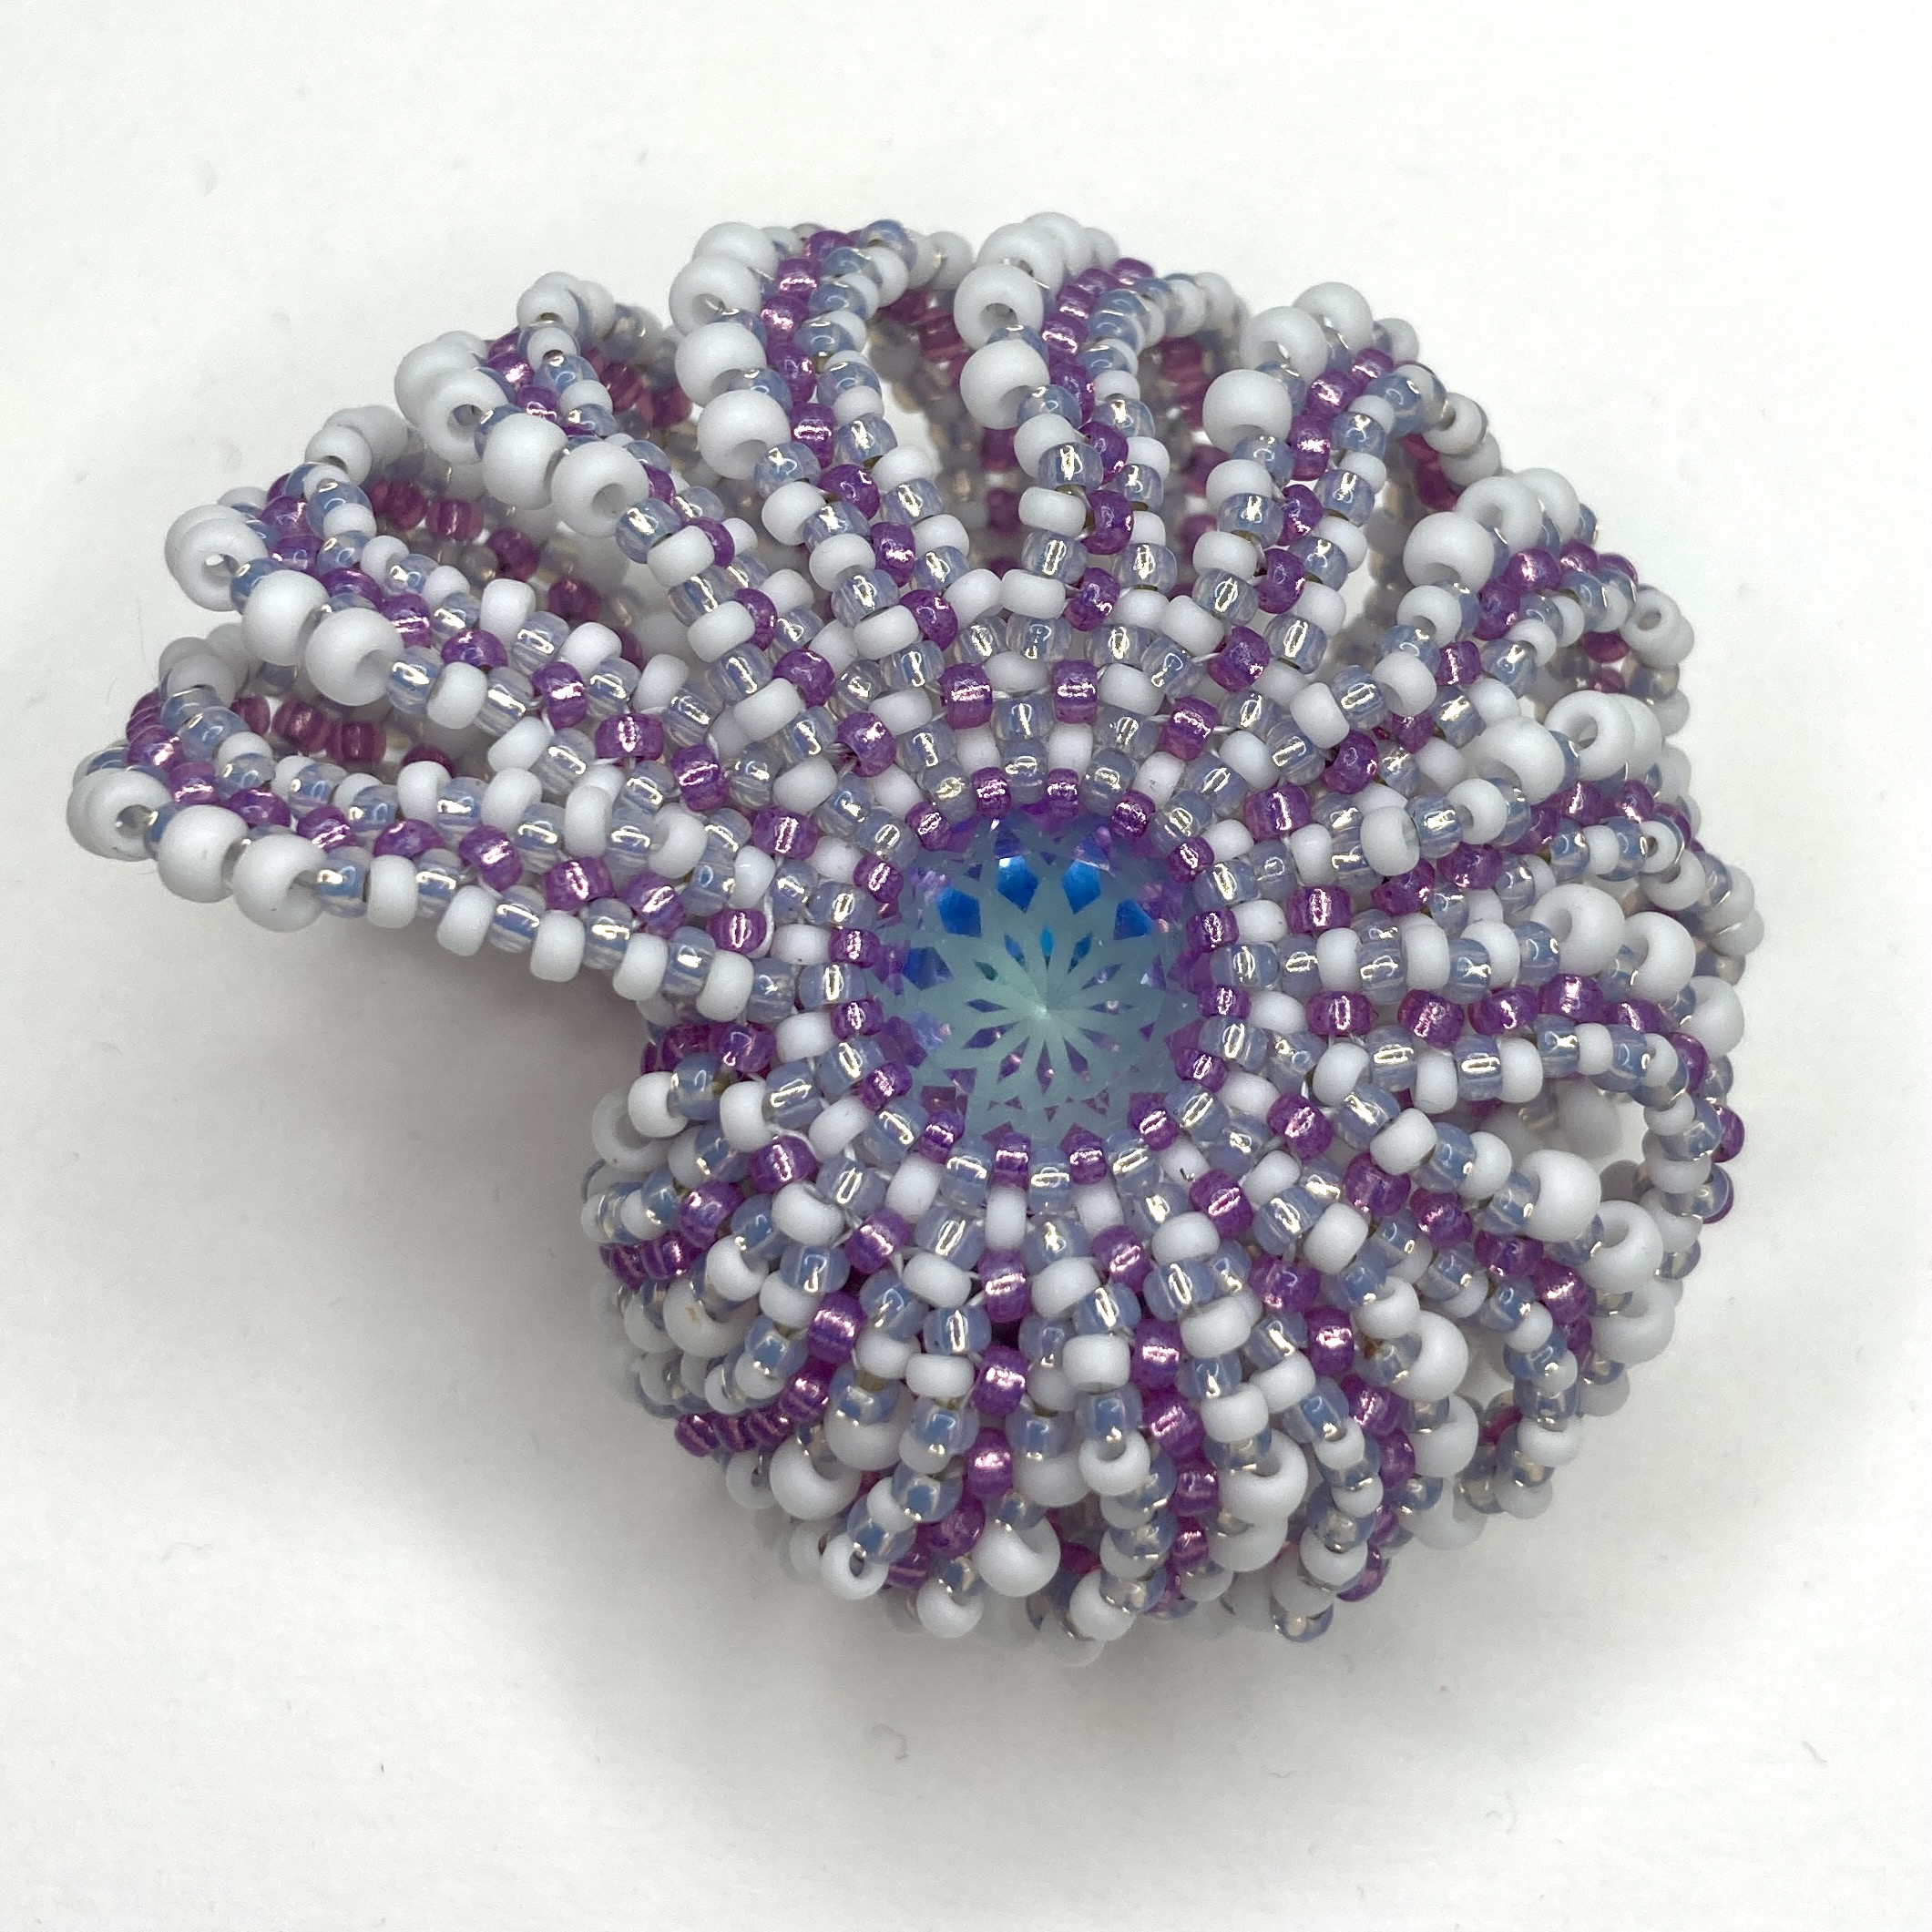
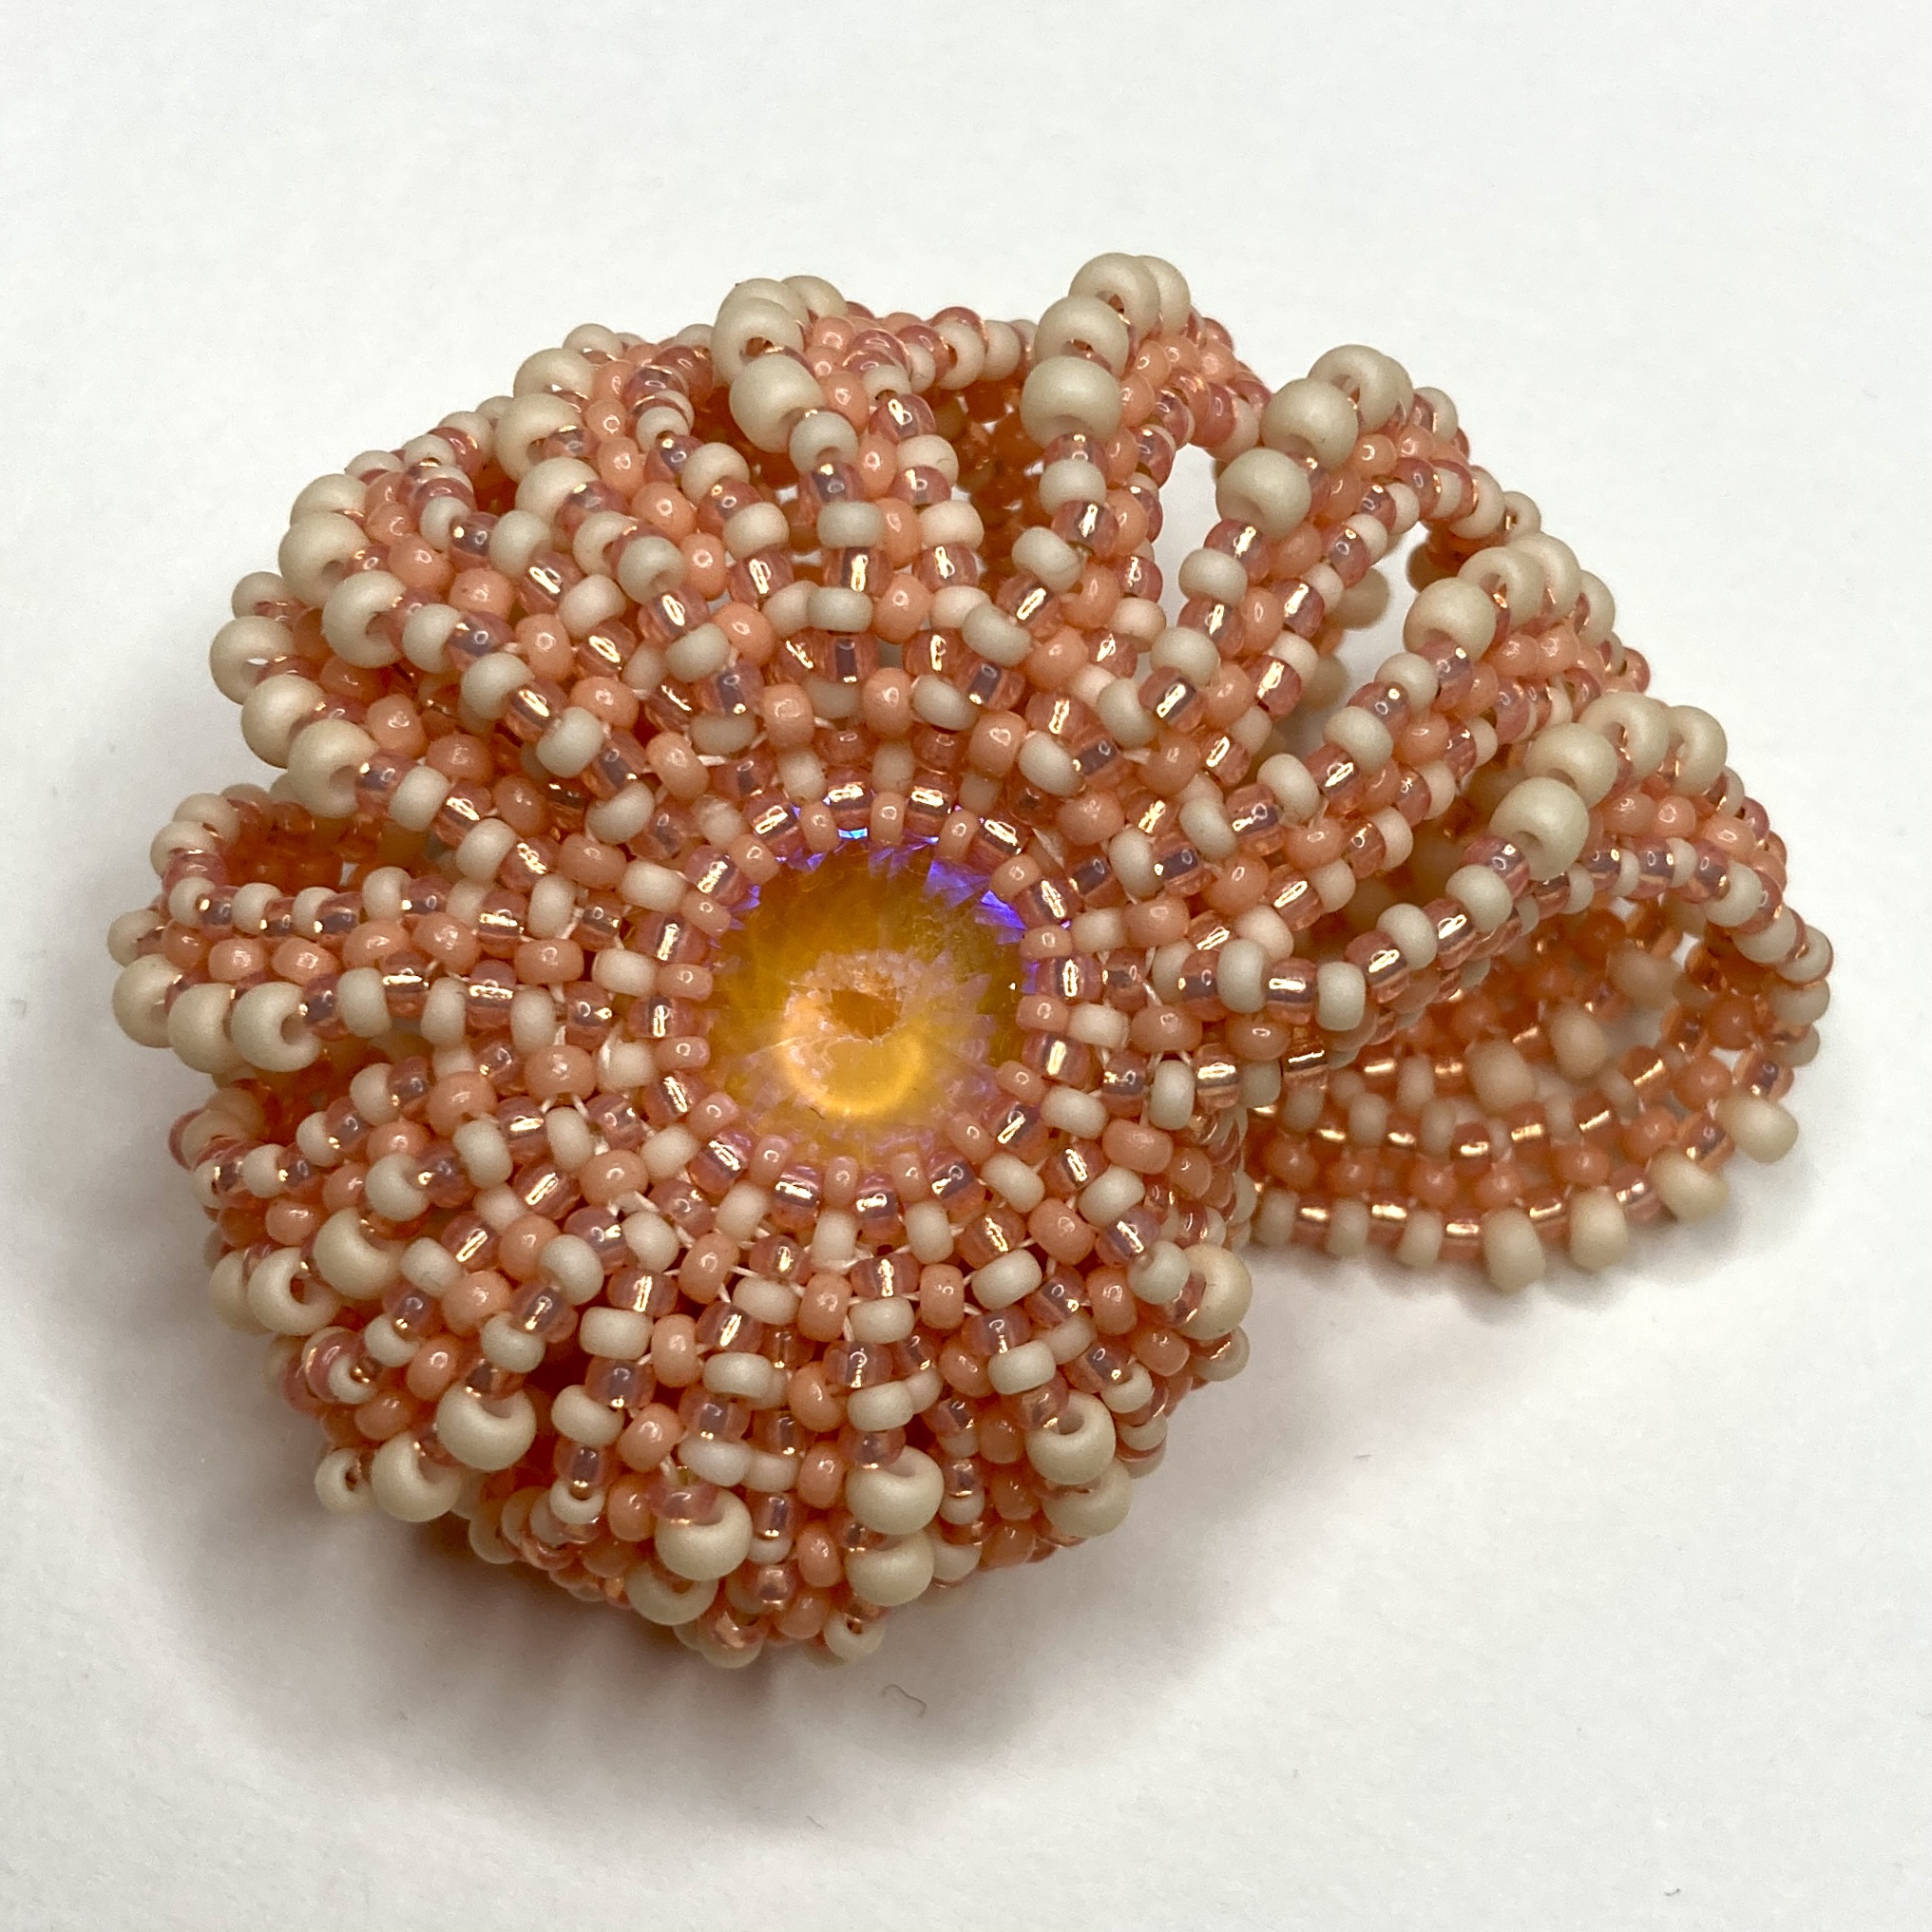
This piece was started last year as an attempt to create a shell shape in beads.
The original idea was to work with CRAW, and whilst that came out as I’d planned, it wasn’t really shelly enough (you definitely had to be told what it was supposed to be!!). CRAW is also not a universally popular stitch – some beaders love it and some completely hate it, so I moved on…….
The idea of increasing strips seemed sensible, but there needed to be more of them to give a clearer shape, and they needed to not be CRAW – so I had a go with RAW, using twice as many strips and something altogether more shell like emerged.
There were a few mis-steps along the way – early versions had a terrible wobble in the middle until I changed the central join to make it more rigid, and I had a lot of trouble getting the spines rigid enough without busting needles weaving through (and getting bored as well as annoyed in the process). A offset version was hopeless but did give me some ideas. Overall the set up was a little plain – still not shelly enough, and the metallic beads weren’t helping either.
Then I had the idea to add Cellini to the spine edges – that immediately gave a beautiful S shaped curve and an instantly rigid shape, but I was still having issues with getting through some of the beads to get the spines in place and to make them rigid enough. That meant lots of new versions, trying different bead sizes, thread paths, even altering the bezels. Colours became less metallic, sometimes a little bright (for clarity) but mainly staying in a ‘shell’ palette.
After all that fiddling and frogging I had a breakthrough, managing to come up with a cunning trick to improve the thread path at a critical point to save needles, remove the need to weave through to strengthen and best of all, preventing bad language! Ironically the diversions were all red herrings – the final piece is very close to the two first Cellini versions, just with that slight critical adjustment. Brighter colours to help with picture taking at this stage……
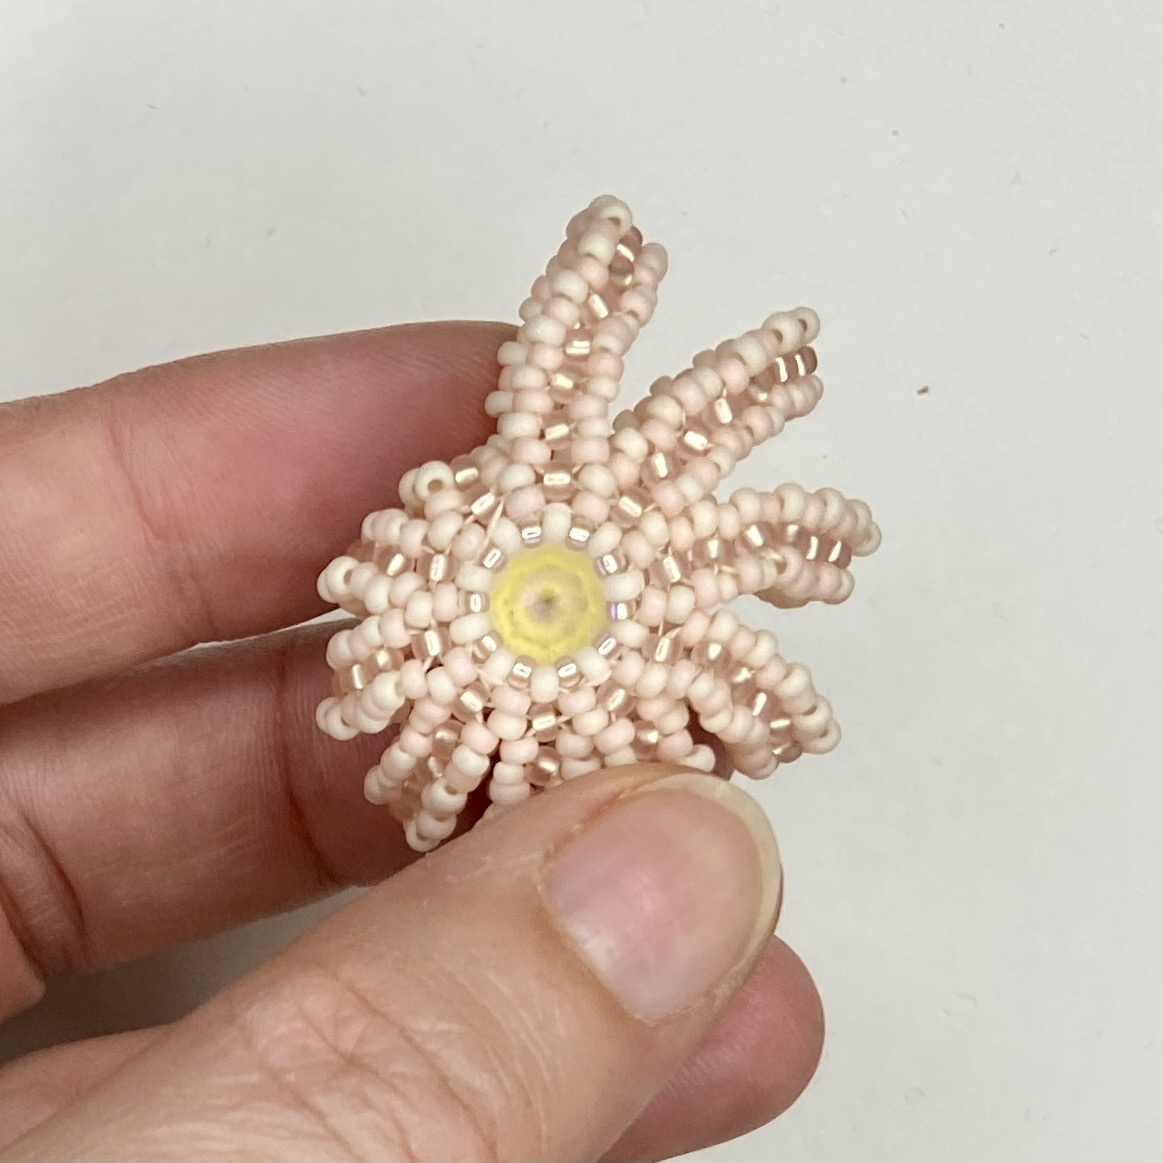
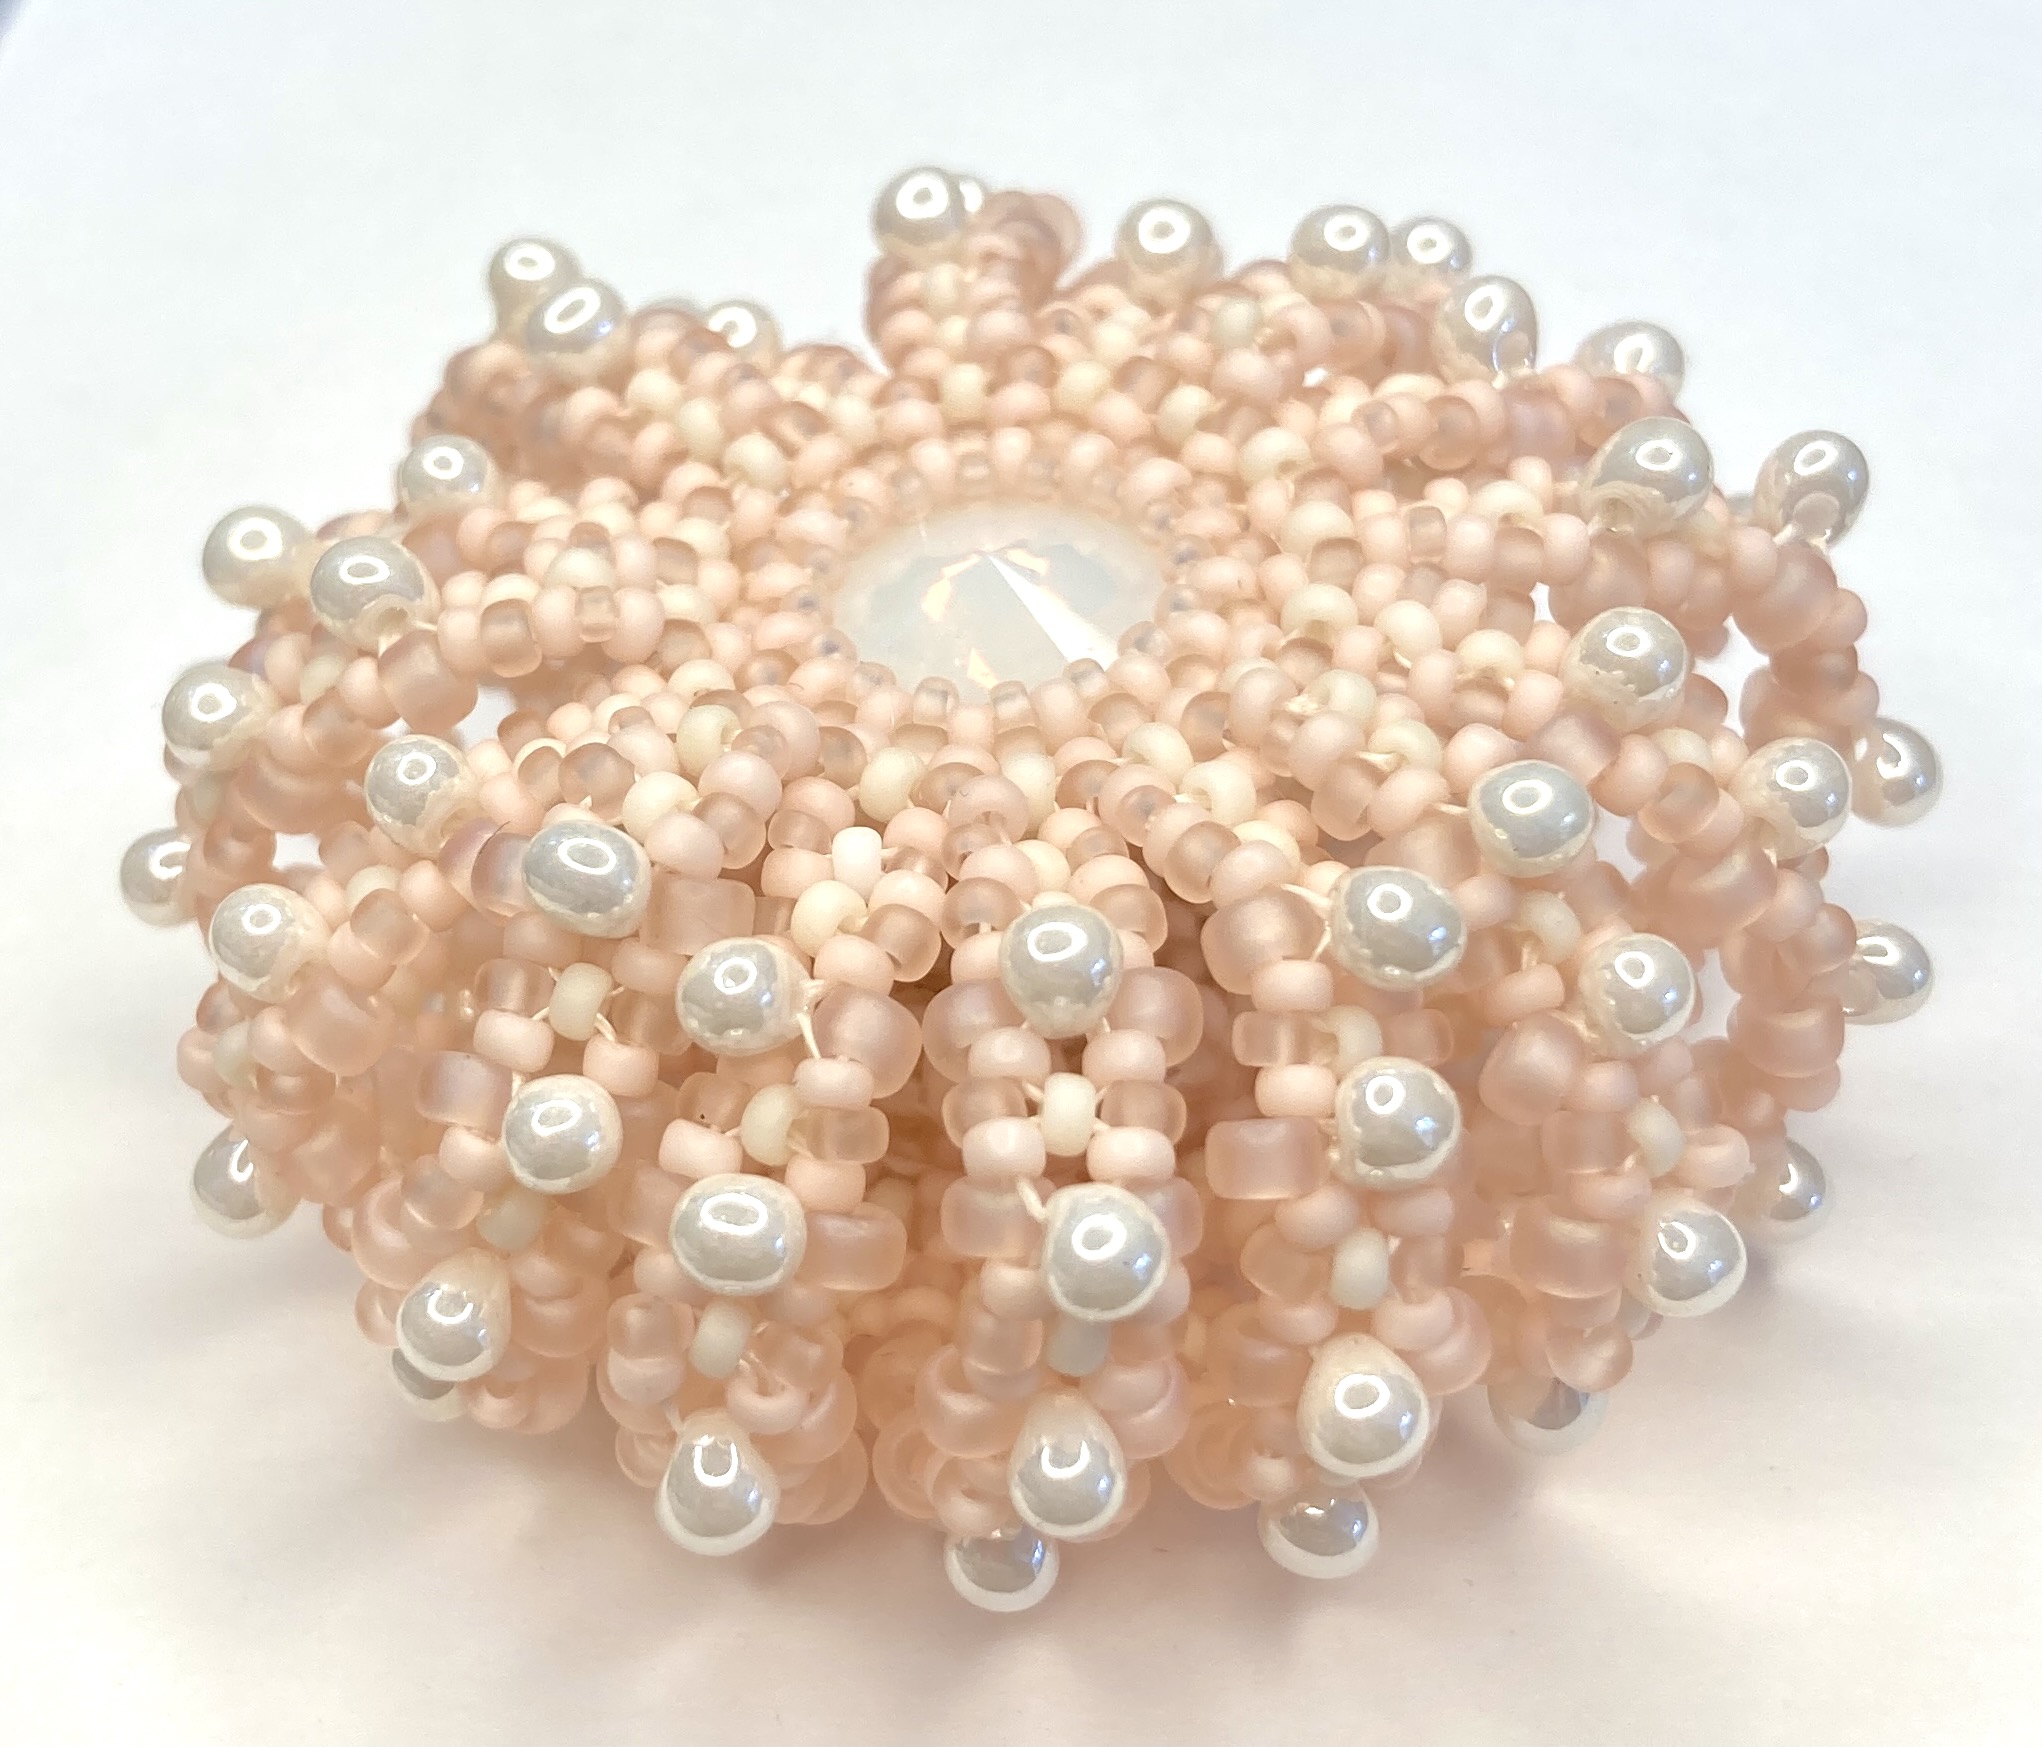
Along the way I made another plain version (no Cellini, but refined from the earlier plain versions), and after some useful comments on Instagram when I showed some in progress pieces, I added a baby variation using an 8mm chaton, and a Sea Urchin variation using the 14mm and some 3.4mm drops. These are in my favourite colour palettes for this piece – warm palest peachy pinks and soft creams or whites (very pretty and an indulgence after having to work with more distinctive colours for tutorial images).
So here it is – Nautilus, made with just Miyuki seed beads and 2 14mm Rivolis or Chatons (any brand will do), using RAW, MRAW and Peyote stitches.
Intermediate level, suitable for anyone who is confident with RAW strips in particular (there are 16!), and fully illustrated with both diagrams and photos, written out steps and even some listed out colourways (with bead numbers) or your own colouring in sheets if you’d like to plan your own colours. A full detailed list of bead requirements is available on the usual page here.
Available in my Etsy or PayHip shops as a PDF download. Etsy don’t like my decent quality illustrations or photos so force me to turn it into 3 PDFs to meet their teeny file limit- if that annoys you as much as it does me, the PayHip version is a single PDF and exactly the same price.
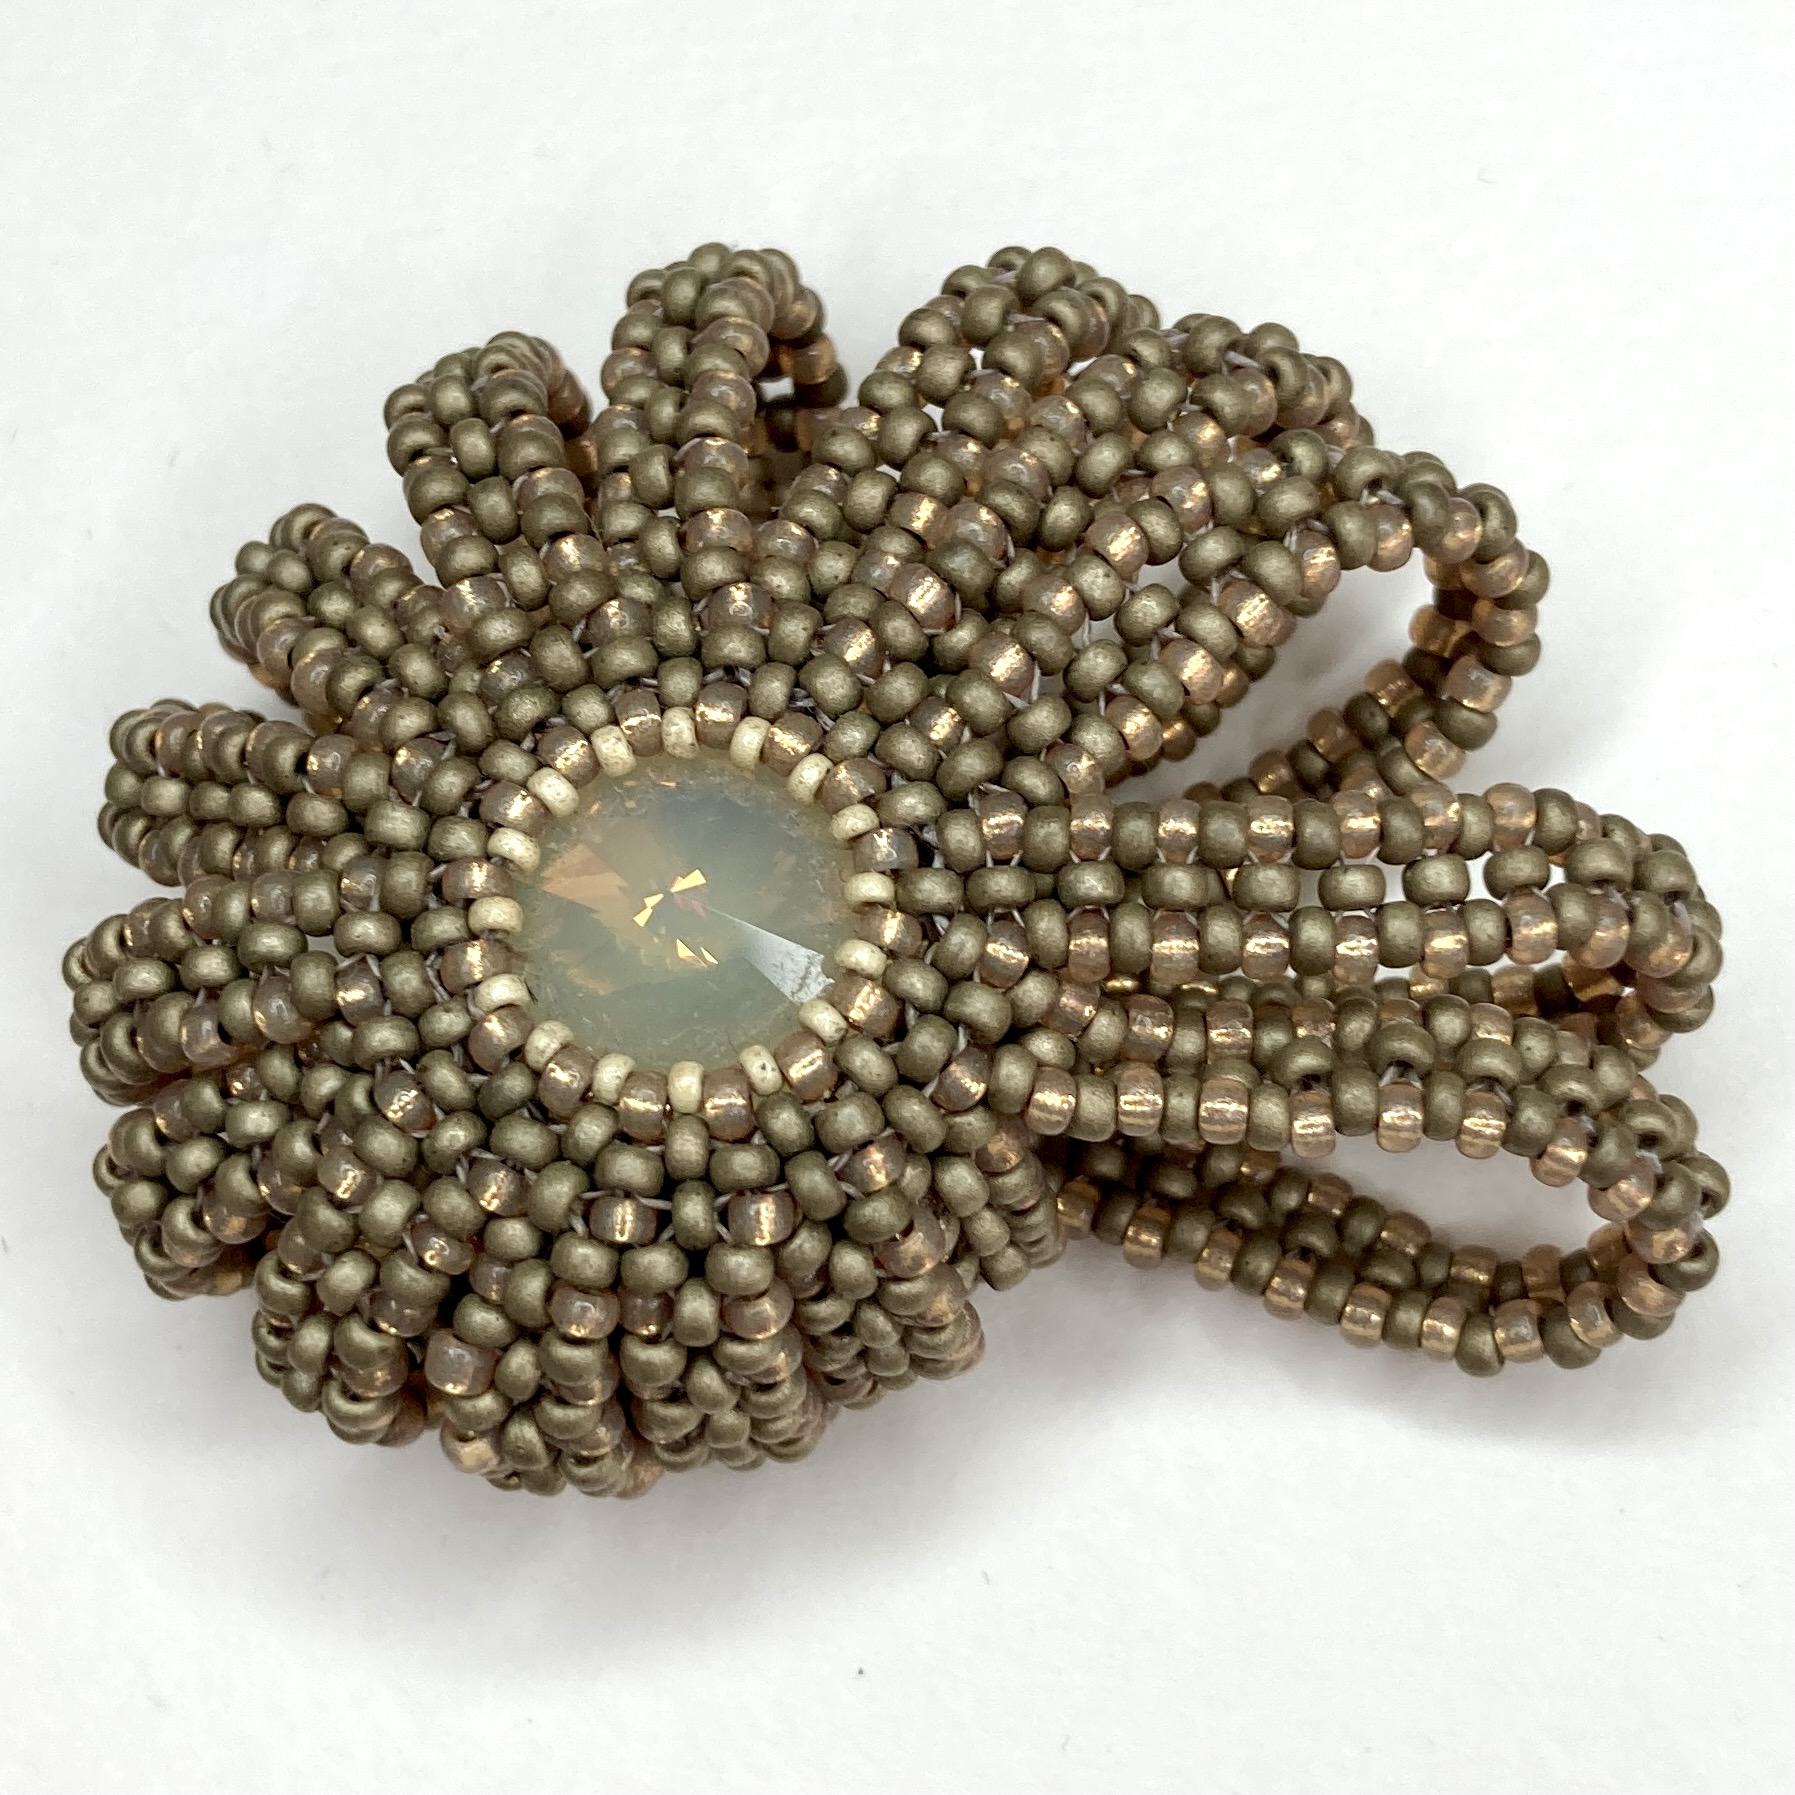
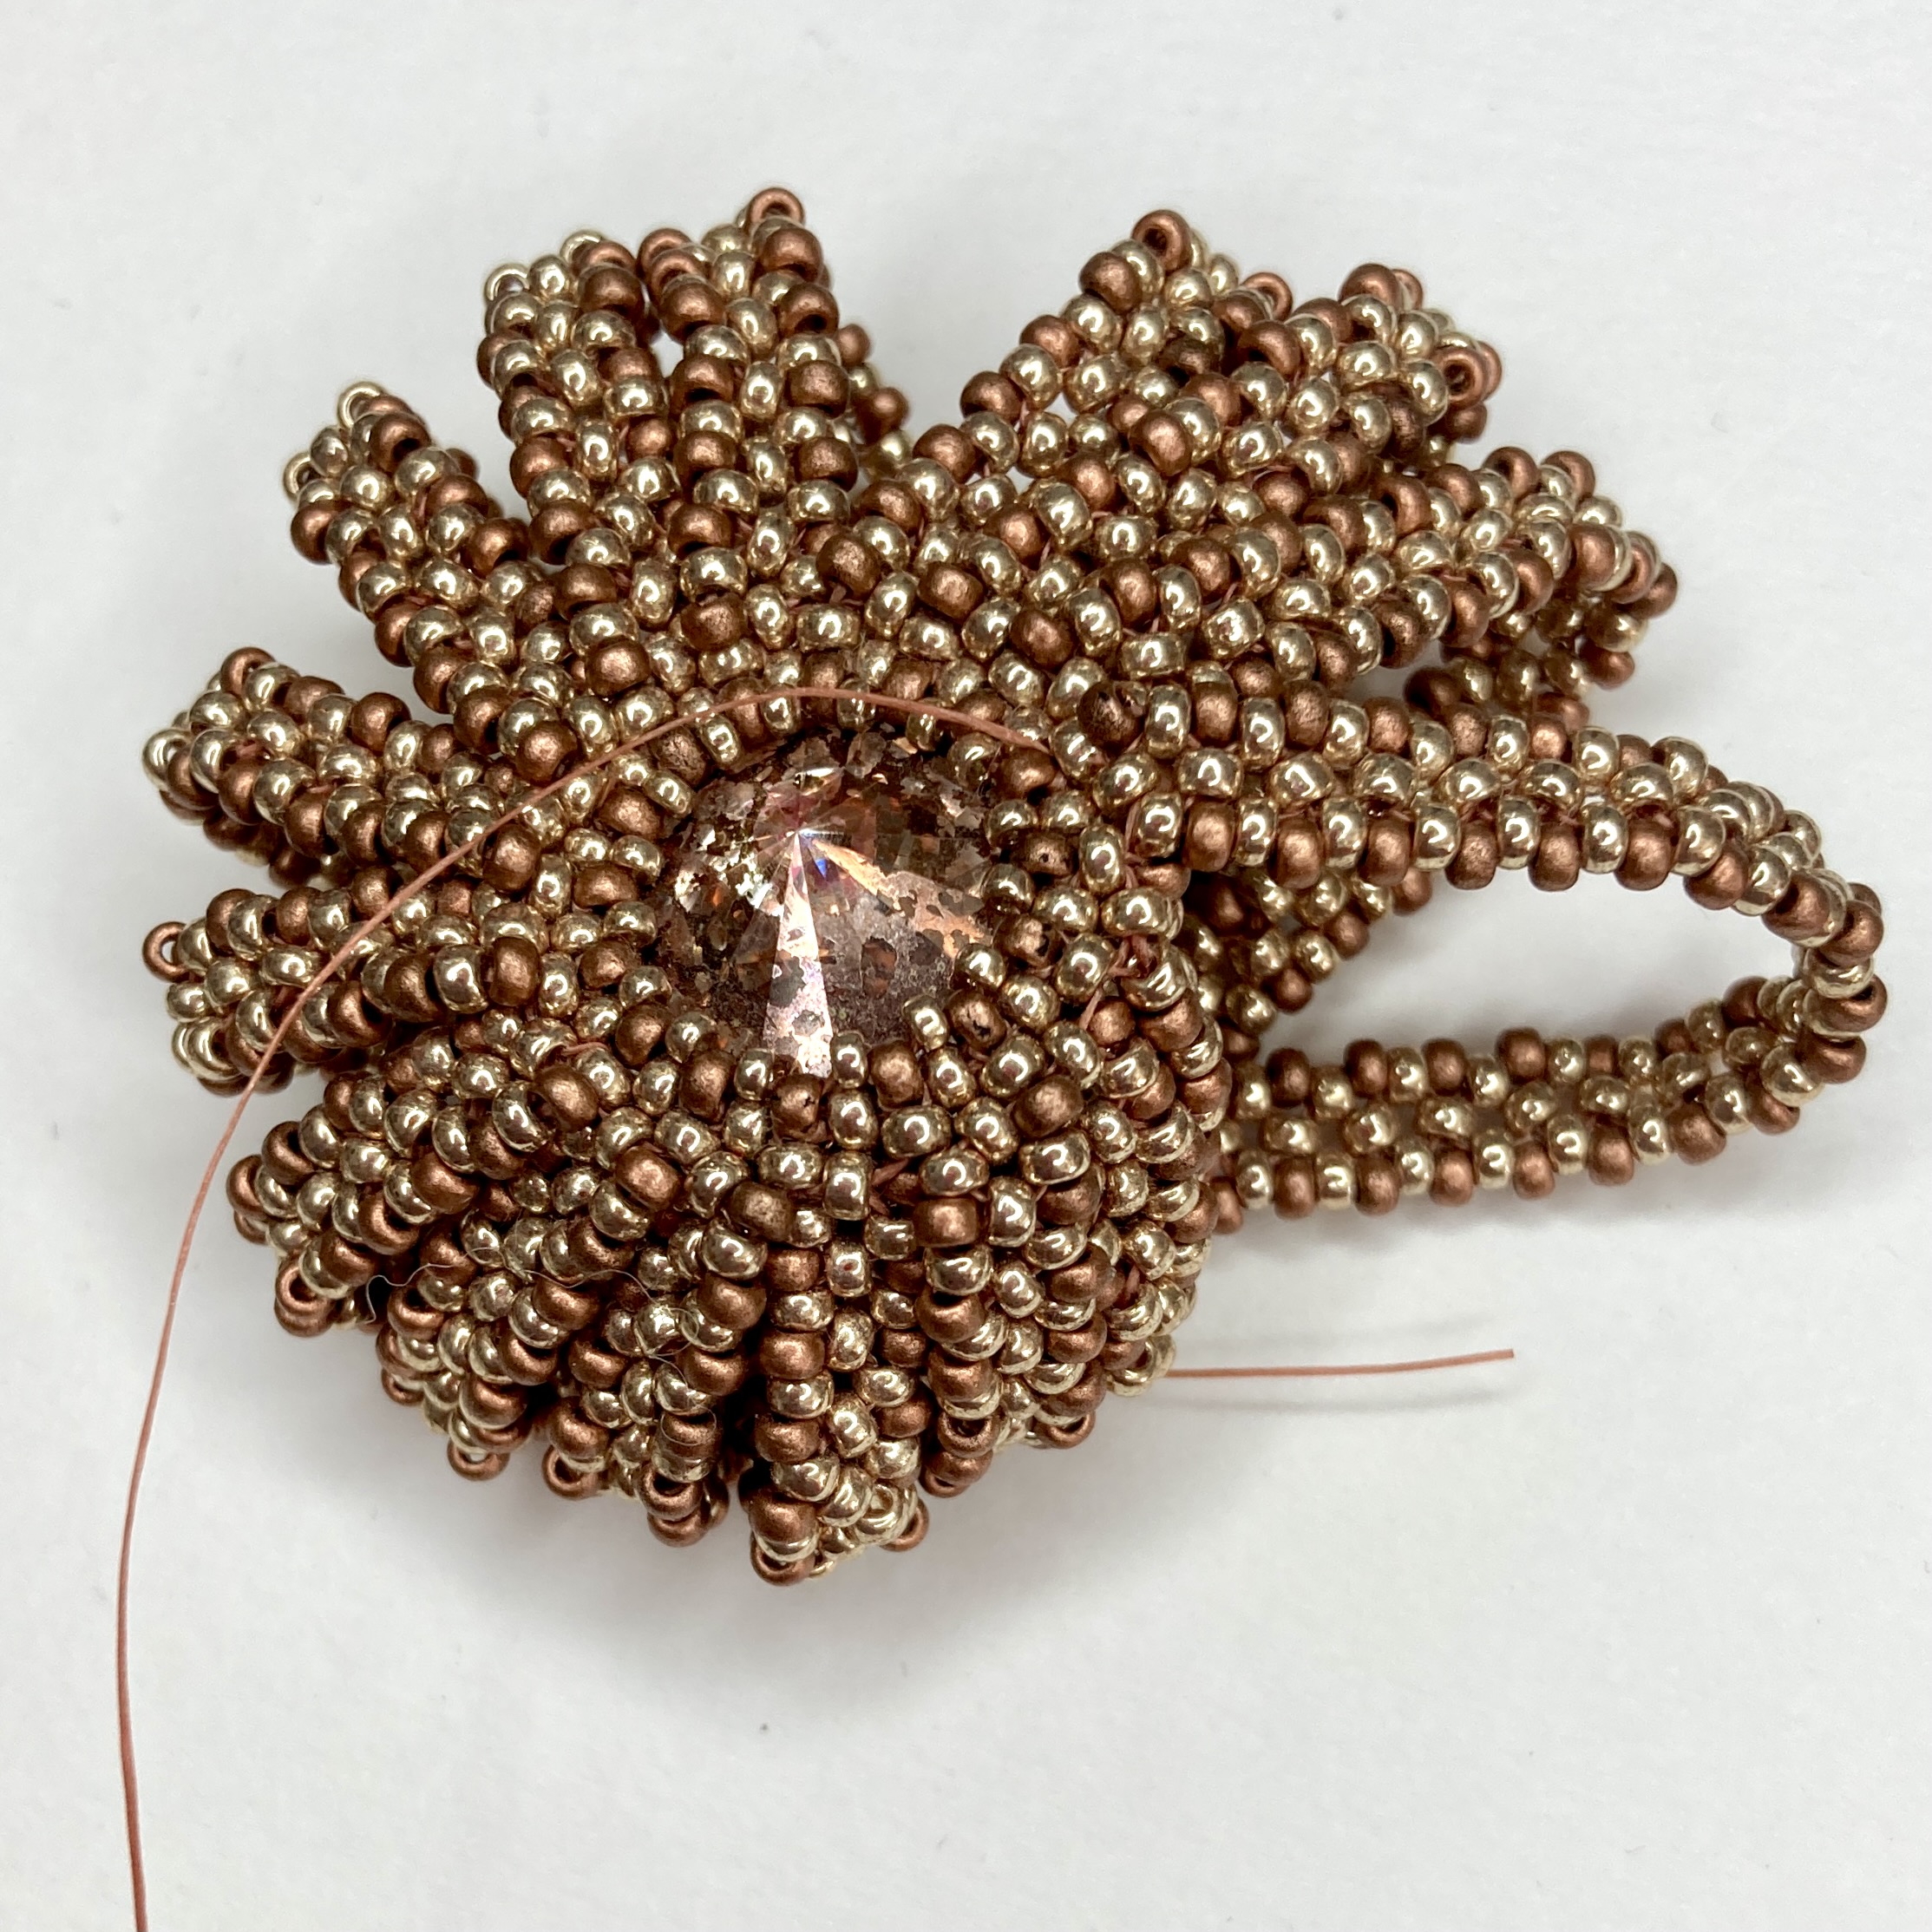
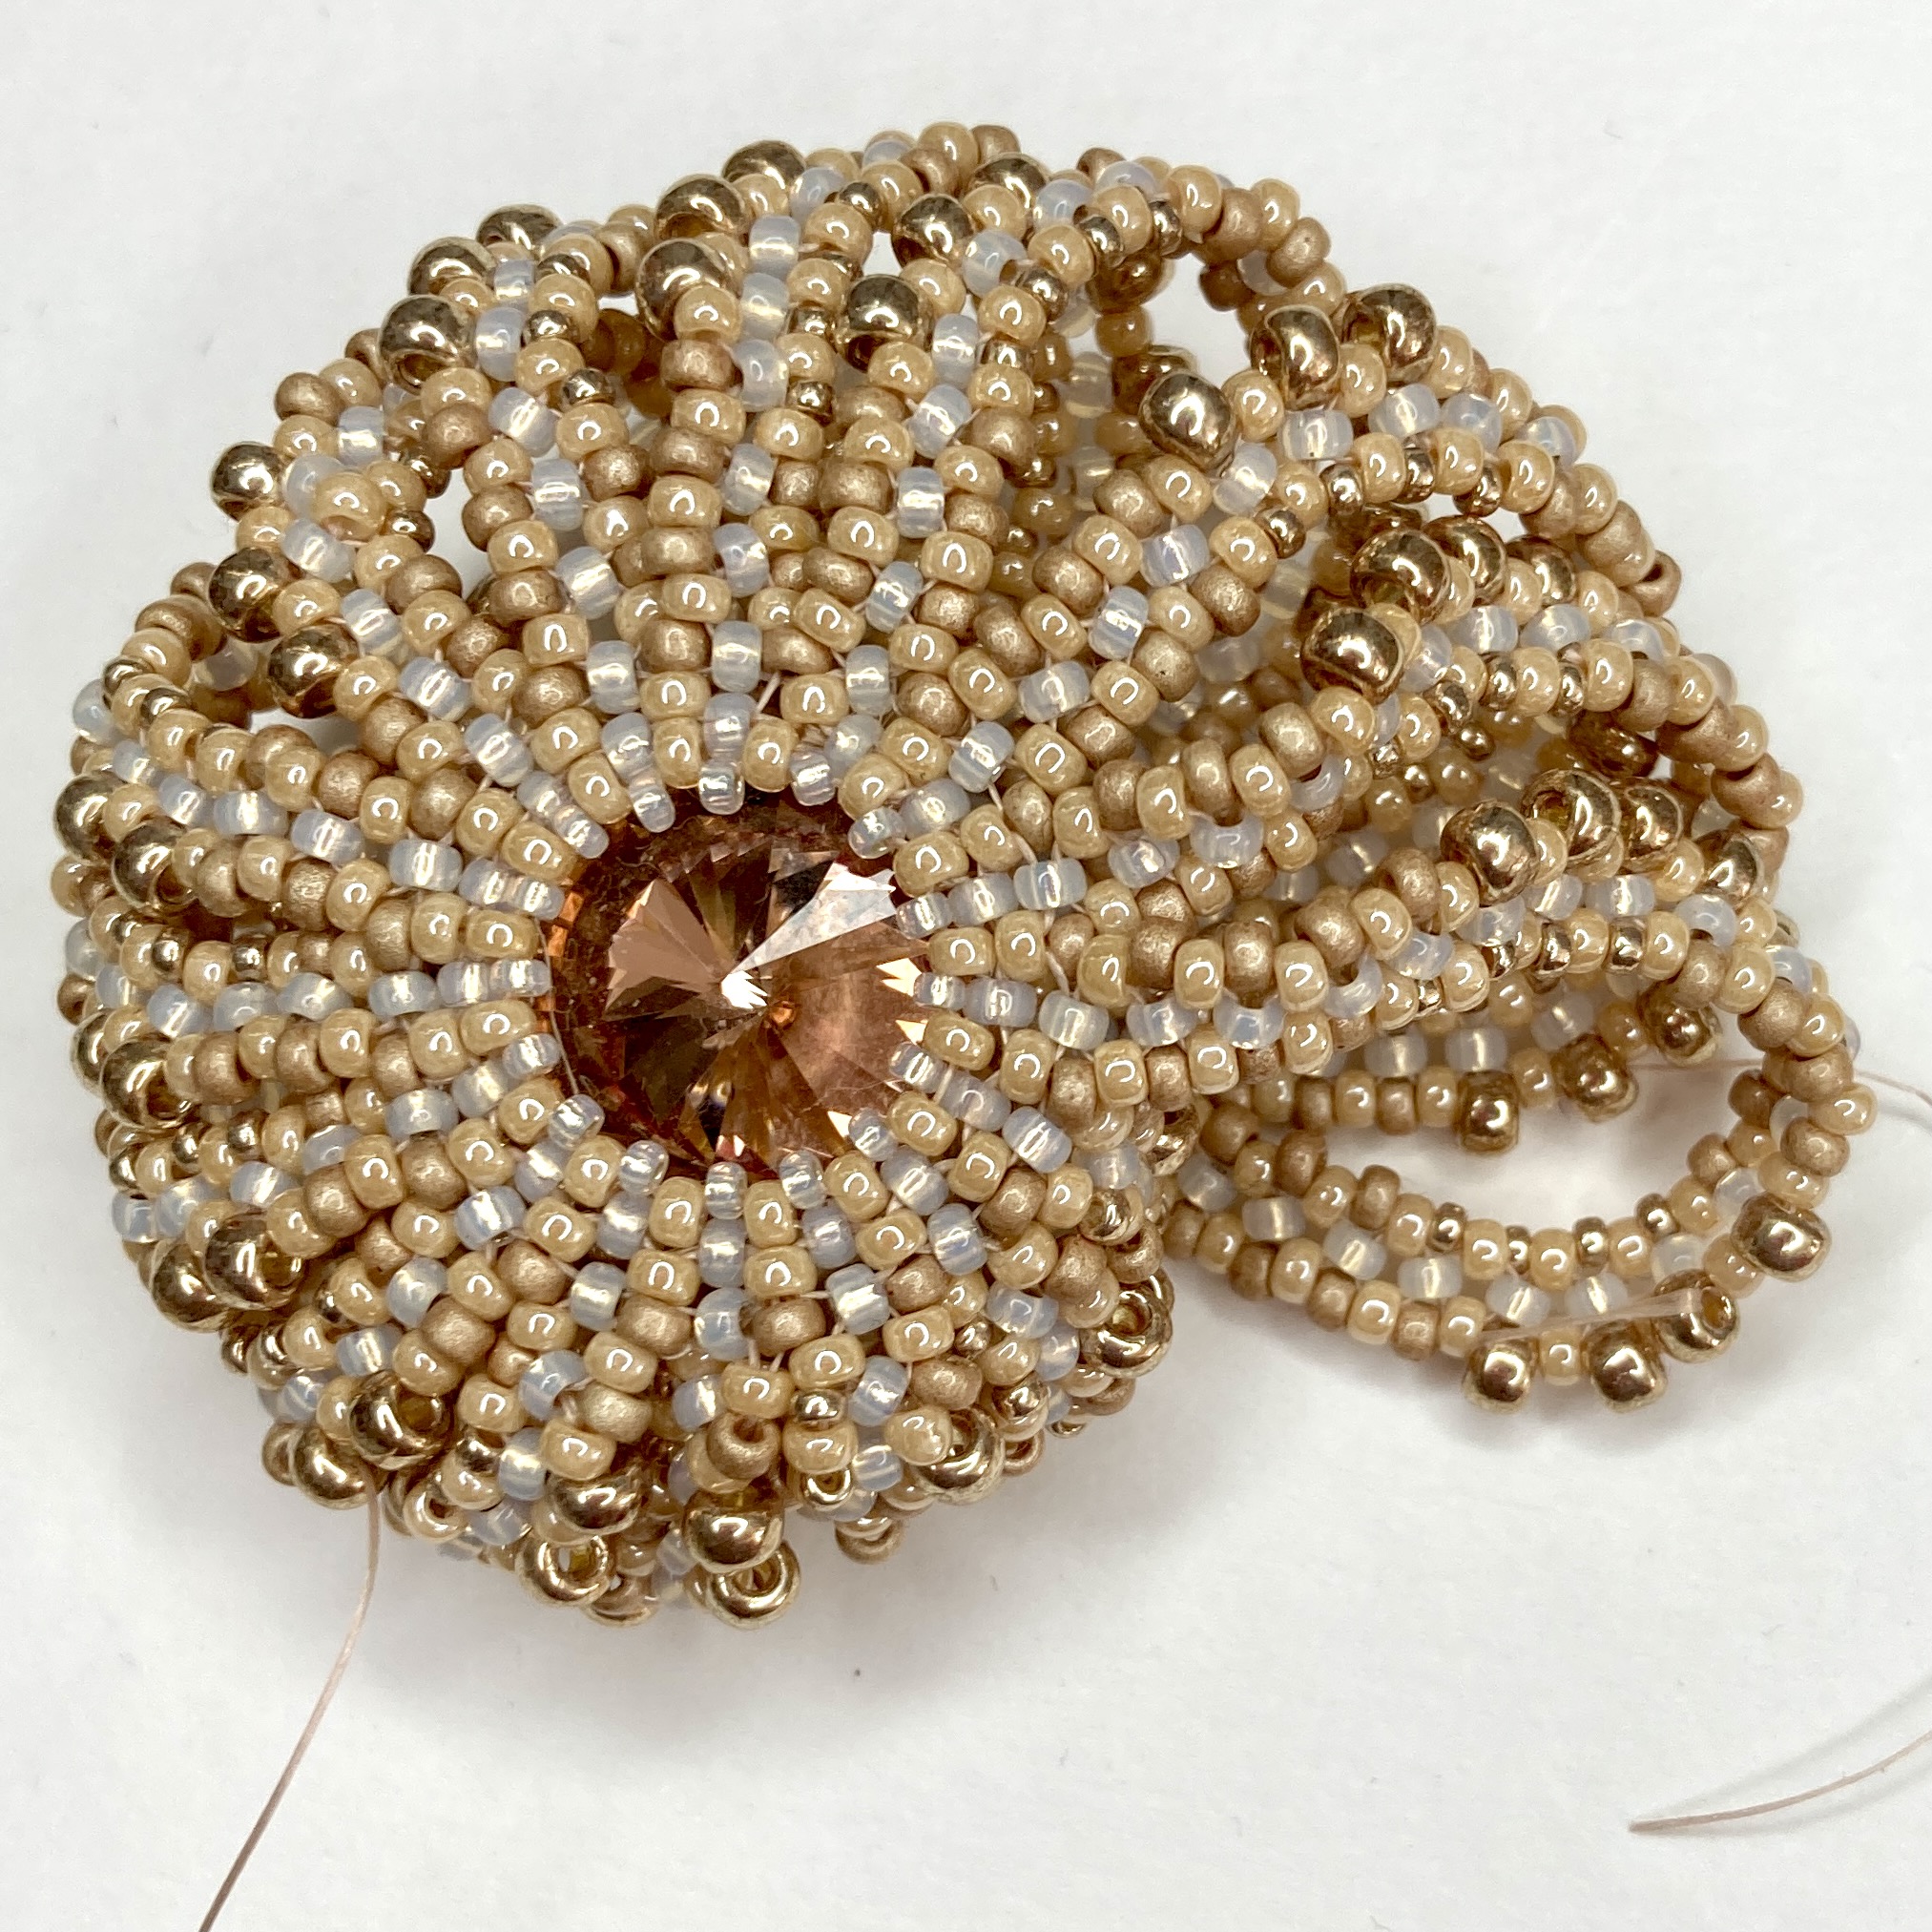
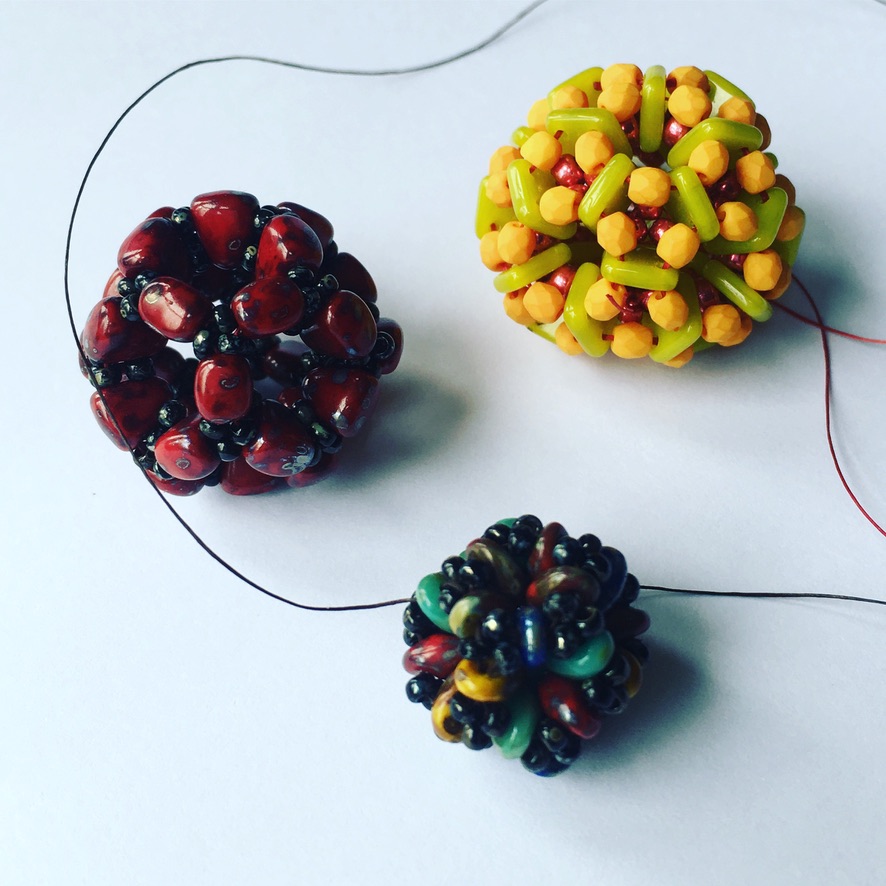
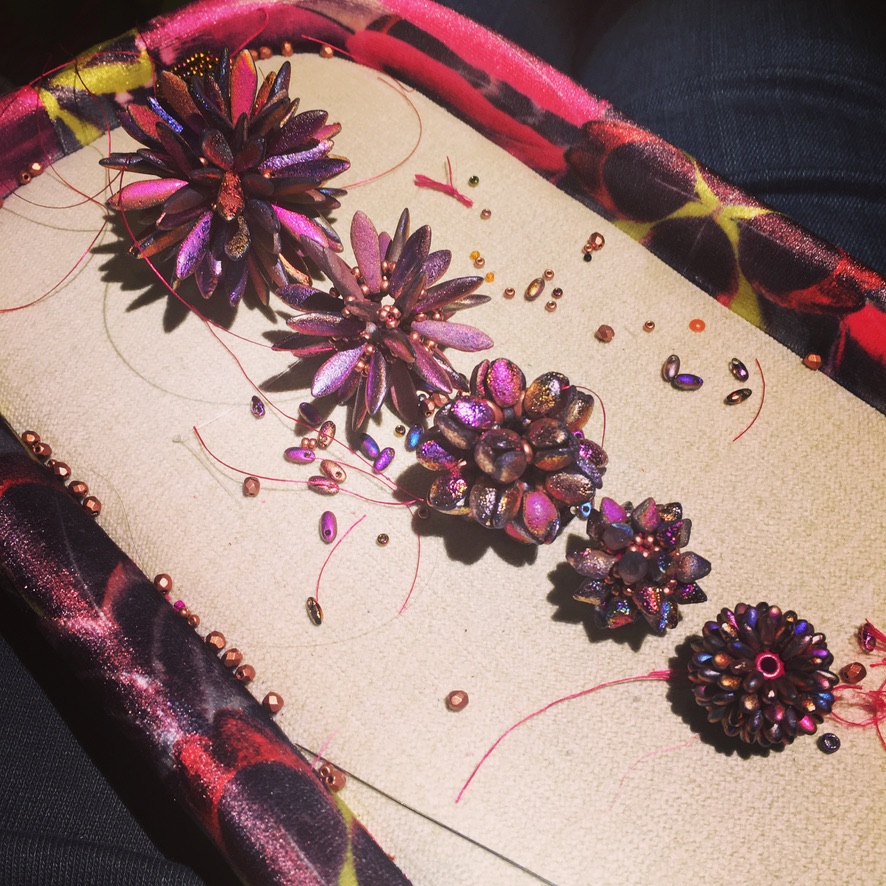
Earlier this year I started making a set of beaded beads. I love beaded beads, they’re something I come back to time and time again when I need a beaded piece for an outfit, when I’m stuck creatively, or when I want to really dig into some new 3D techniques and ideas. I went back to geometric solids and started playing with some methods and ideas I’ve been back and forth with over many years. I was trying to put together ’99 Red Balloons’ for a competition (Bead a Song) – that didn’t work out (I’ll tell you what did another day) but returning to such a versatile method made me realise I needed to get this one published and out of my system.
About 10 years ago I started making dodecahedra a lot, first using well known methods to do single layered versions alongside icosahedra. Those can be self supporting if you weave through enough (and you’ve picked the right bead size), and I loved that. A self-supporting beaded bead is hollow, often see through, and you don’t have to faff around finding exactly the right size and colour of inner support bead. 2 holed beads were starting to become mainstream, so I made double layered versions using Twins and SuperDuos and found that if I used the right combinations of beads I could make rigid 2 layered beaded beads, and also use (if I wanted) feature beads to the outside layer. The first of these were made with Twins and Pips and I used them a few years later to enter a Preciosa competition in 2017. The Pip versions were pretty good but at this stage the naked Twins were still a little wobbly.
So far fine, but nothing revolutionary. I played around a bit and worked out that other 2 holed beads worked, made a few pretty solid sets with Nib Bits, and even started playing with 4 holed beads with limited success (I need to go back to that one day). Other beaders were doing way better things with multi-holed beads and geometric builds and my efforts were cute but not really clever enough on their own compared to work being done by others, so I put them away.
Then I started working with etched beads more, and at the same time, buying wholesale for my Materials Packs. I treated myself to packs of all sorts of Etched Slipperit beads in different shapes as this was my favourite finish at the time, and suddenly found myself with big enough bags to really delve and experiment. I tried different feature beads such as the Tulip Petals, and even 2 holed daggers (sometimes with single holed ones too for extra daftness) and at last something more interesting seemed to be coming.
I was still as you can see above also pursuing the supported bead options – the right hand two have wooden centres, and they were nice but the hollow beads were really starting to be an obsession. I worked with whatever shaped beads I could get in that colour/finish in wholesale packs, and I even started adding Bucky Balls (Truncated Icosahedra) to the Dodecahedra.
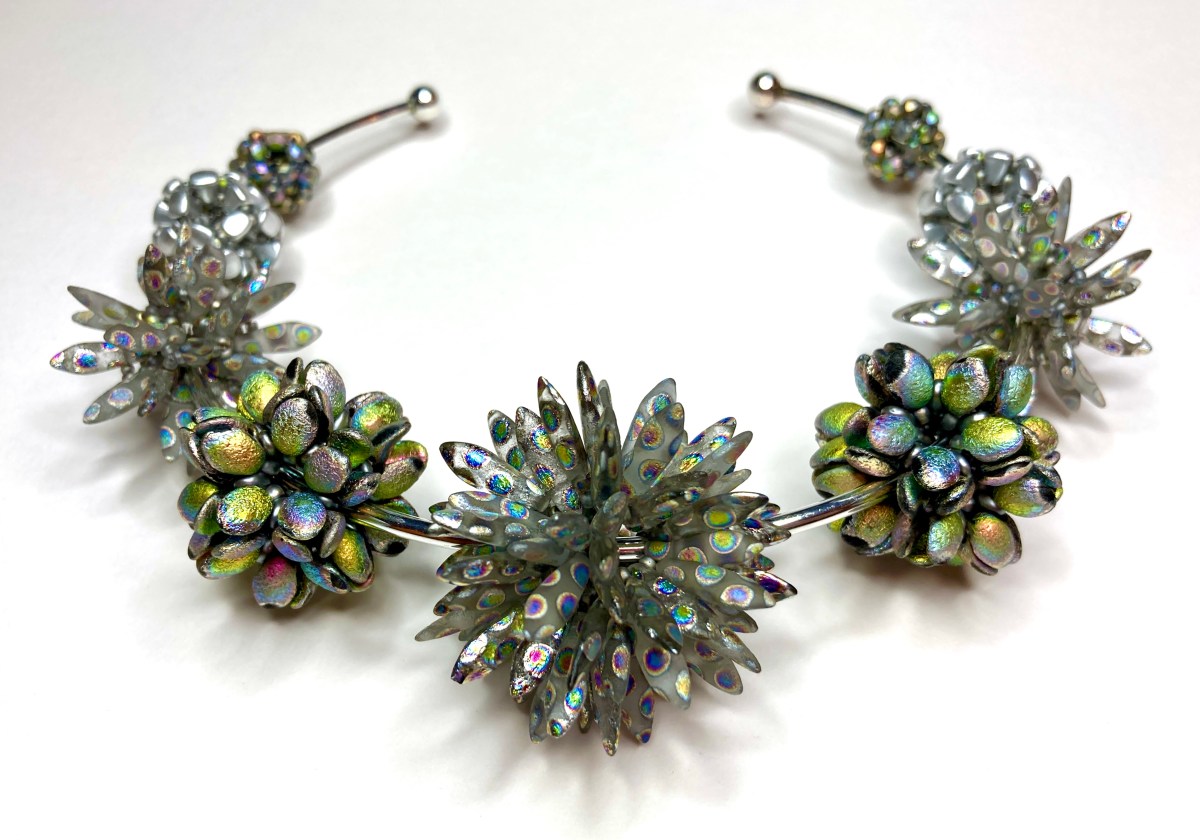
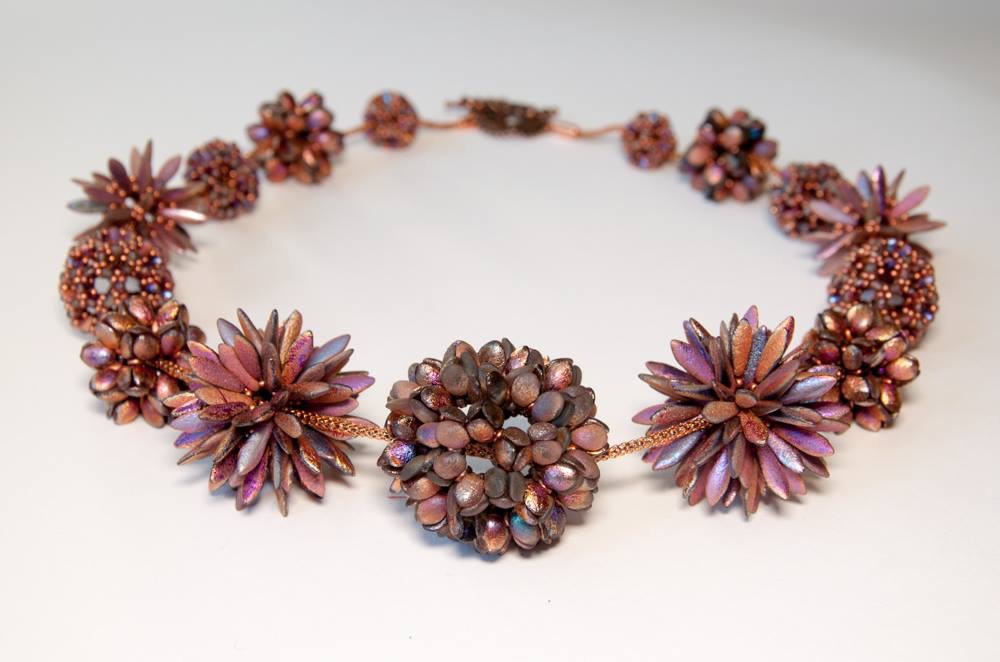
The result of that obsessive period was this necklace (along with some pretty awesome Christmas Baubles).
But the trouble was, I couldn’t work out how to write this up. I hate writing up 3d beadwork – it’s just really really difficult, and I know from making these pieces that it’s really easy to get lost as you bead, which means not only do you have to deal with multiple layers as you draw, you have to help your beader know where she is. Even something like CRAW is hard for many beaders to follow, so how on earth could I extend that to this and not make them feel defeated? So I looked at the lovely necklace, felt proud, and put it away. Every so often I’d make some more, ponder the write up and give up again.
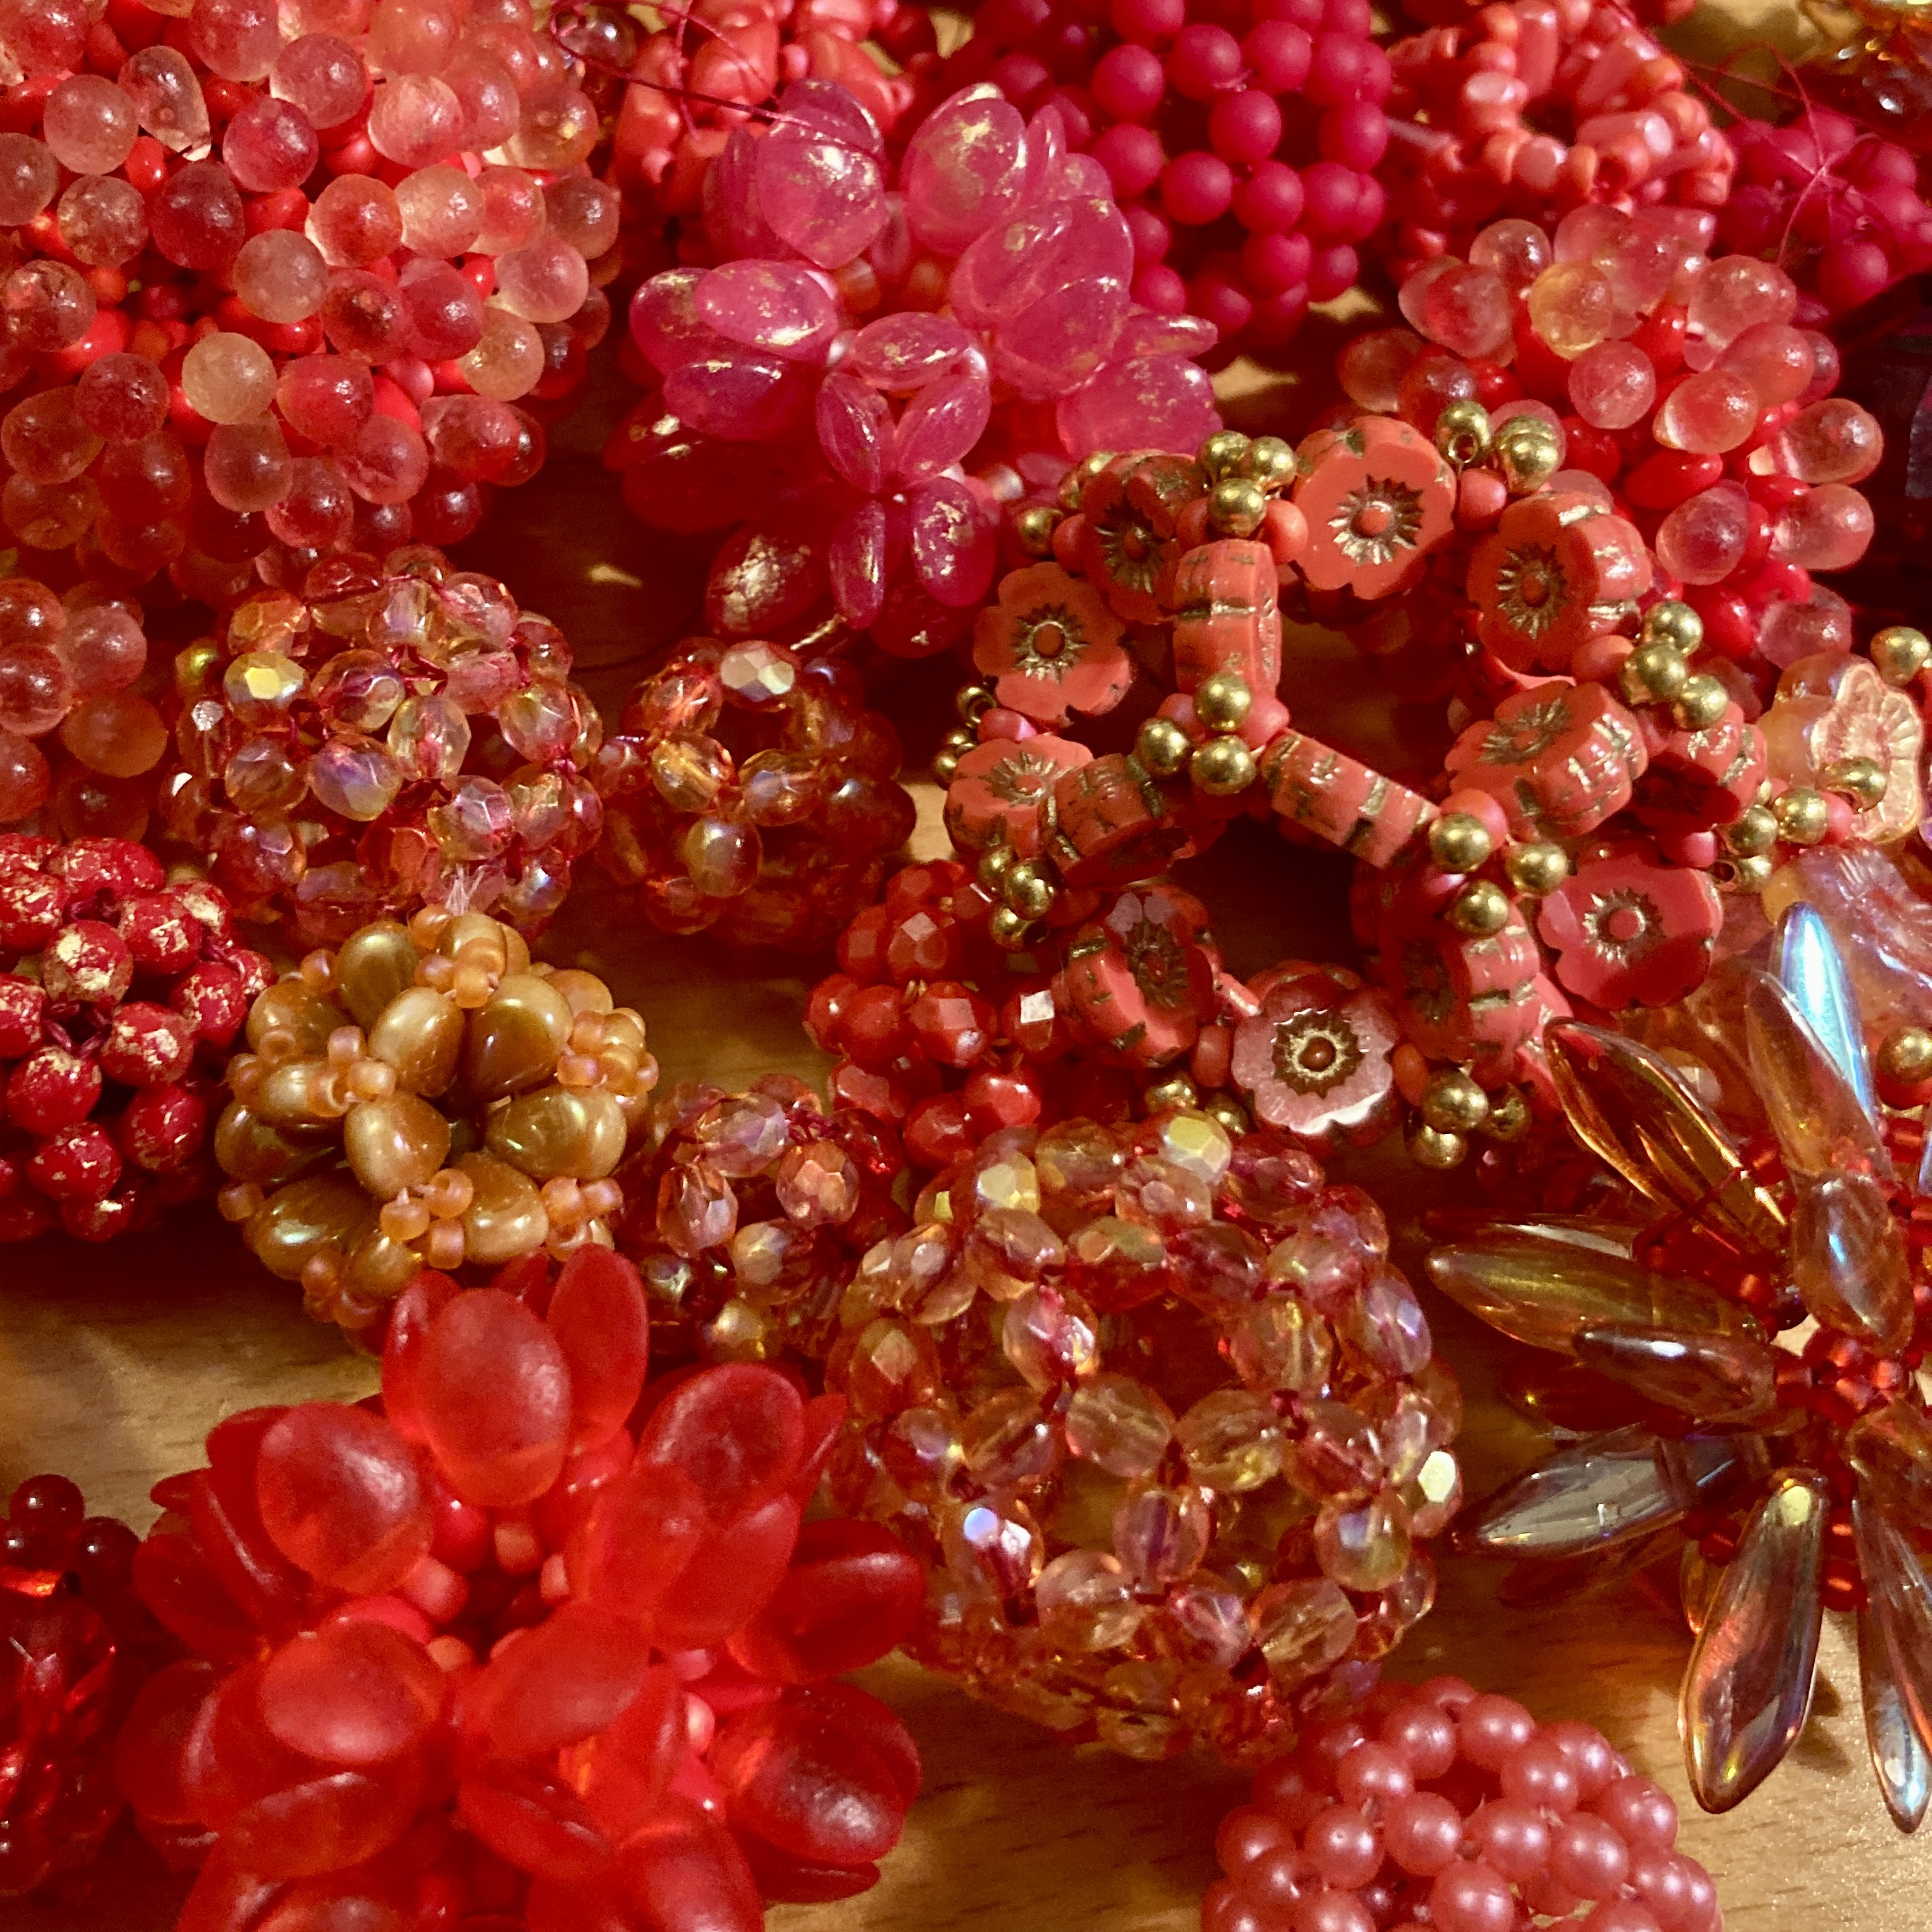
Fast forward to this year and the 99 Red Balloons. I made about 44, decided I would go mad if I made 99, and also that the song itself, being about accidental nuclear war probably wasn’t best represented in a long string of jolly red beaded beads (however much I tried to play up the ‘atomic’ structure). I made my competition piece about a completely different song, using completely different techniques and colours, and then once that was posted looked at the huge pile of red, pink and orange beaded beads and thought ‘hmmmmm….I love these so much, I’m so proud of them that I want to show them off, and I have all these extra combinations now – is now the time to make myself work this through?’
In the bead world if you do show off your work but don’t tutorialise some ignorant beaders think it’s then OK to reverse engineer. It’s really not OK, your work is yours whether you commercialise it yourself or not, but more and more I’m seeing discussions where the good guys are having to work very hard to stamp this kind of practice out, and also where the ‘no tutorial’ argument seems to be trotted out more and more often even by the helpful, respectful beaders. If I want to show these off, I run the risk of copying if I don’t also publish as a tutorial. I’ve been bitten before, bullied by other beaders who’ve ostensibly asked for ‘permission’ to reverse engineer a piece I’ve chosen not to publish for valid and important reasons (too close to the work of other beaders I wanted to protect) and then even when I’ve begged them not to have big fat done it anyway, and then against my wishes shared their methods (just because you don’t charge doesn’t make that OK – you know who you are). So I’ll be honest, me forcing myself to work out how to teach this is as much about protecting my own ideas and techniques as it is about wanting to share them. I absolutely do want to share them – these are completely addictive and a joy to make once you’ve properly learnt how, and I want other beaders to be able to knock up these super beaded beads too, and to start to play with their possibilities. So anyway, sorry for the digression, but this is pretty much why I had to get over myself and work out how to write these up once and for all, and here at last we arrive at the finished tutorial:
Difficulty Level – Advanced. Experience with RAW and CRAW/PRAW, good tension control (consistently able to vary from soft to medium to tight as instructed), and experience with following complex instructions for 3D layered beadwork.
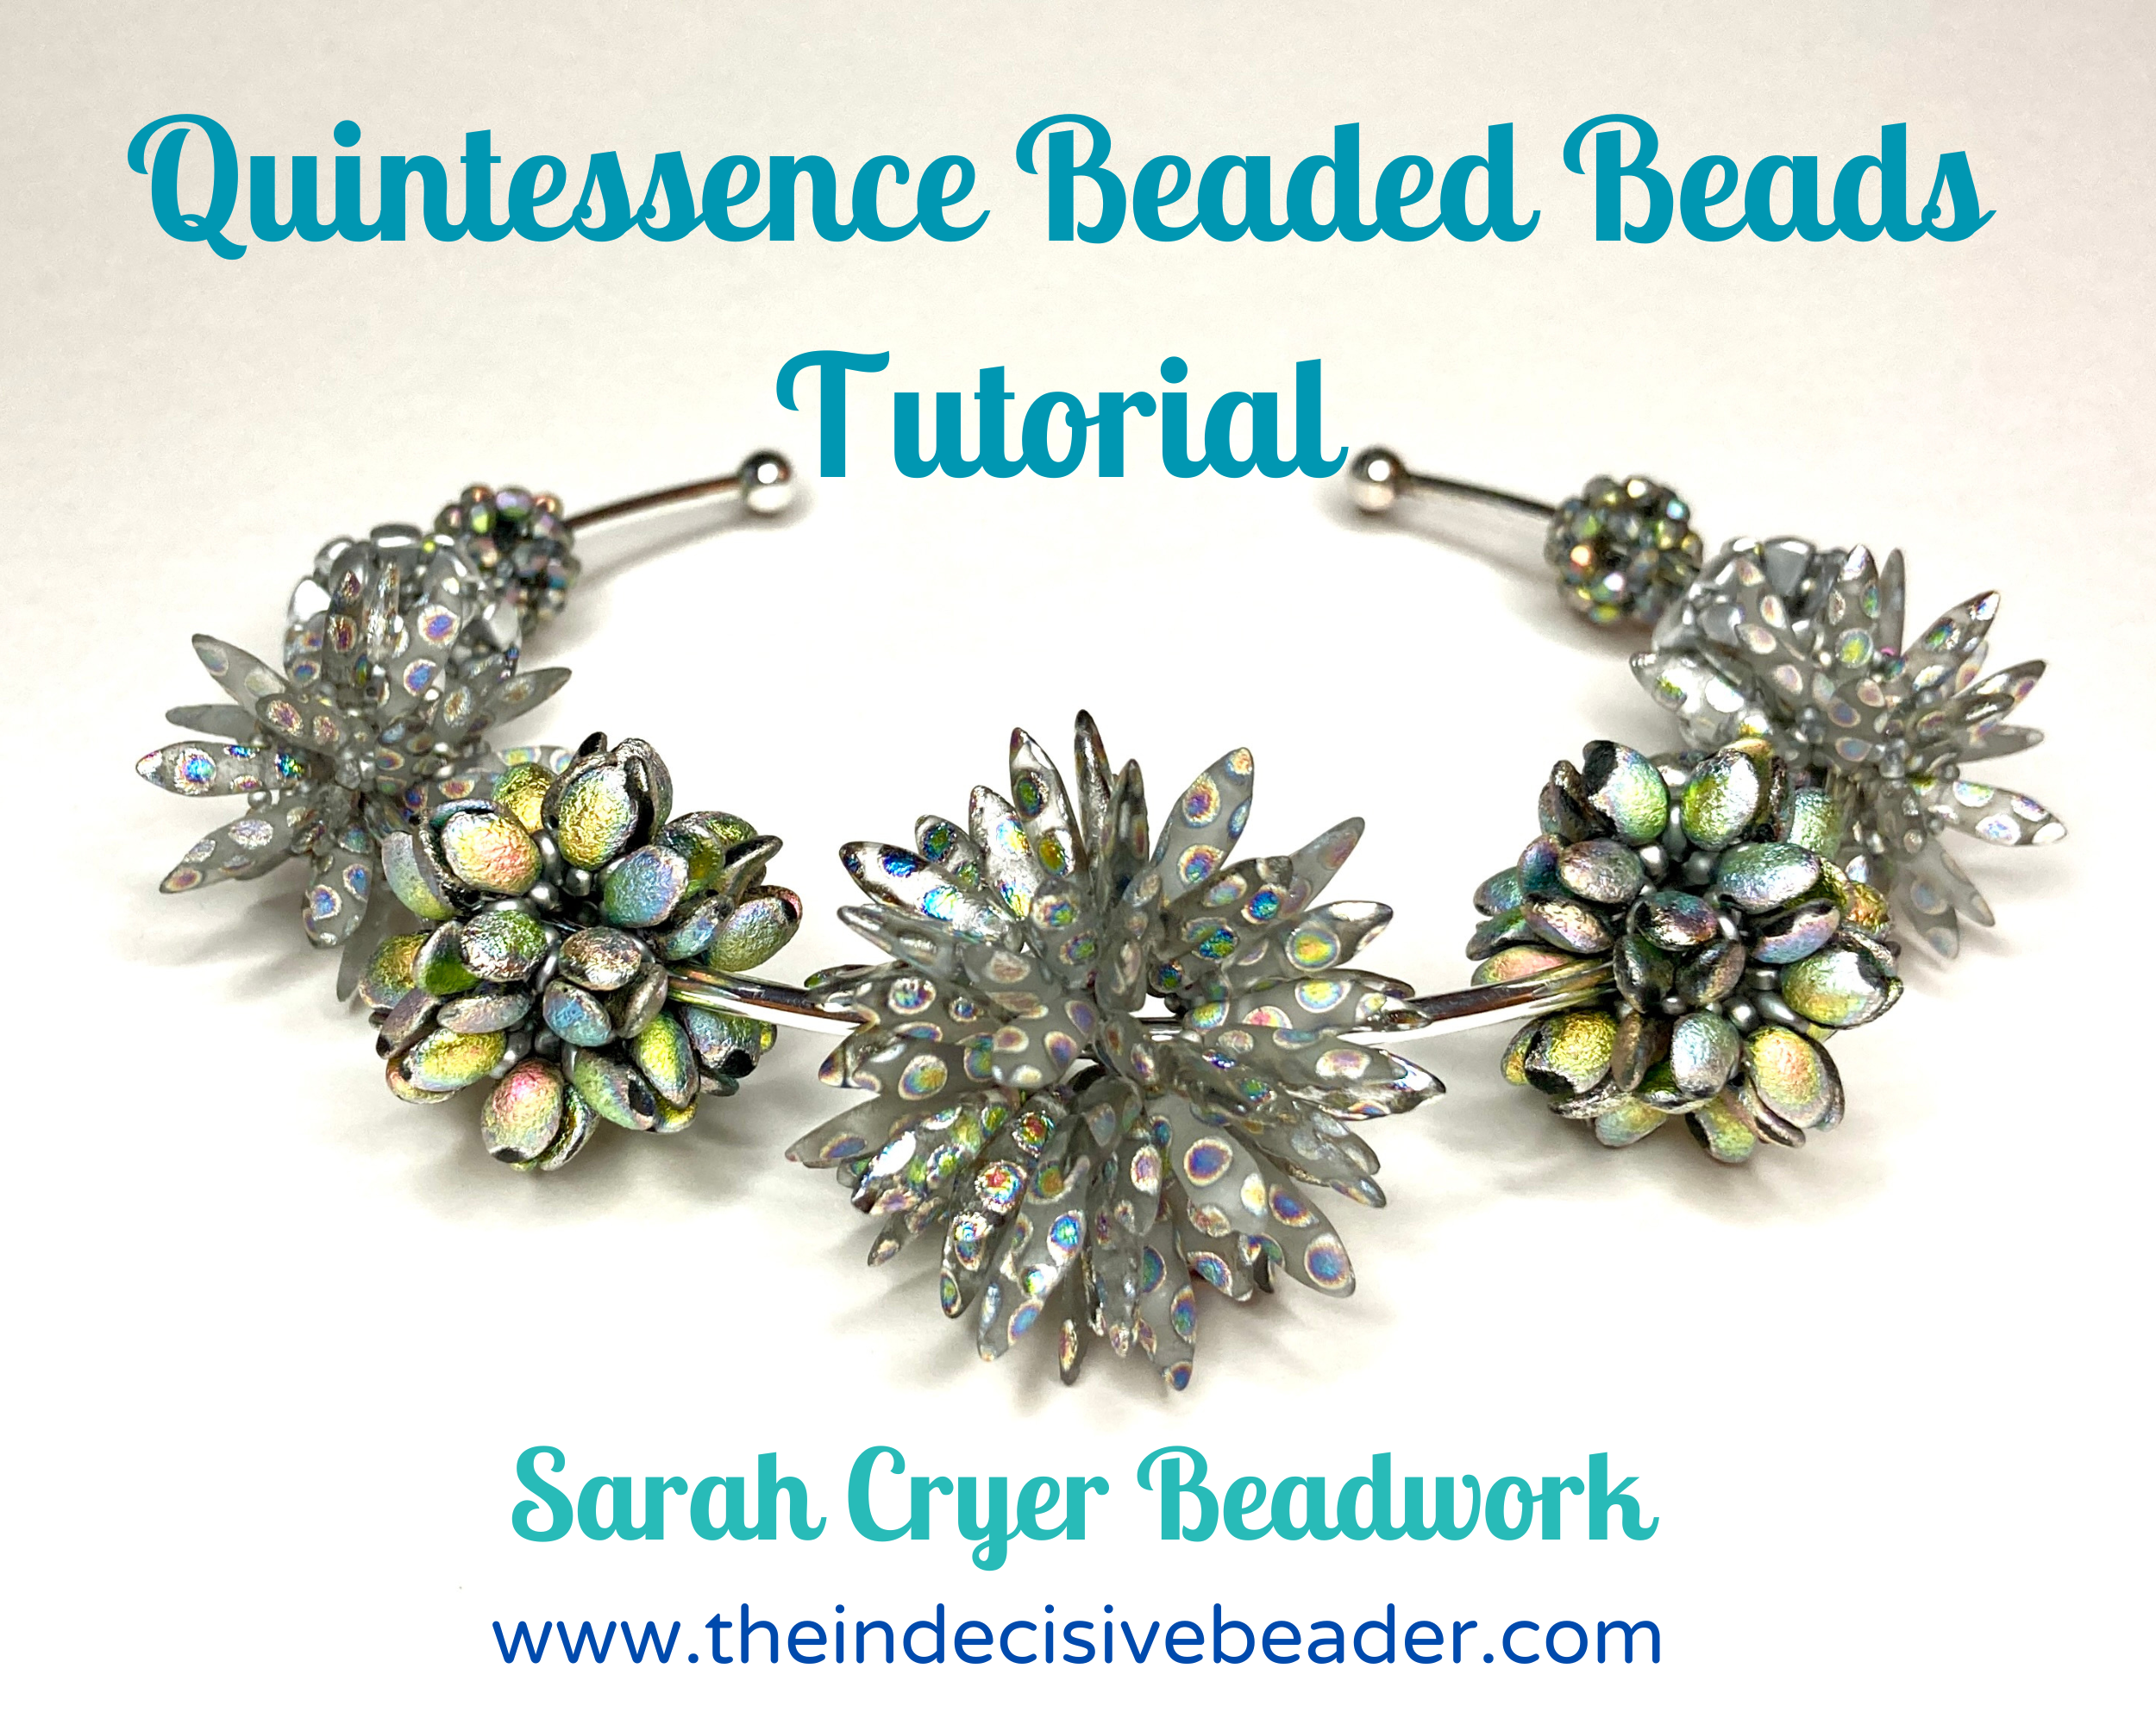
This is a set of instructions to teach a method for building self supporting hollow dodecahedra (the fifth platonic solid or ‘quintessence’), using a variety of layouts or models, each of which can be used with a variety of bead recipes to give endless beaded bead combinations.
The 6 lessons will teach you each model step by step, and focus on learning the techniques, thread paths and understanding the layouts. They need to be done in order to learn the different variations logically. At the end of each lesson you can either try some alternative bead combos, or move onto the next lesson. The masterclass includes lists of the different bead combos you can use in an Appendix, as well as hints and tips for designing new combinations using the 6 methods, and for moving beyond dodecahedra into other geometric solids.
Because I’m planning to continue pushing through the multi-holed bead options, and feature bead options, I’ll inevitably have more recipes to add to Appendix 2 of this tutorial, so I’ve developed a secret formula which is explained there, which you can then use when you look at that page (linked in the tutorial) to decipher which beads and which techniques from the tutorial to use. I’ll also publish a notification when I update the page to my Facebook and Instagram pages. I know it sounds a bit mysterious but again, I want to share as much as possible whilst also protecting my work – if you buy the tutorial it will all make sense (and you can always contact me if it doesn’t!!).
The tutorial is now available in my Etsy and PayHip shops, and I will have ‘orientation bead packs’ available too in my Etsy shop in the next couple of days. If the tutorial sells well I’ll follow that up with some curated bead packs to make sets of Quintessence Beads.
I’ve loved spending more time on this series, although to be fair the write up has been a long slog (51 pages and countless diagrams and photos). The beading has been a delight – at the last count this morning I’d made over 70 this year alone (and that’s not including the ones I frogged because I needed to re-do photos etc) – I took a photo a few days ago but the eagle eyed among you will see I forgot the Lesson 6 samples (among quite a few others!):
I may not do Black Friday or Cyber Monday but I do like to try to offer a discount on my Tutorials in December as a seasonal gift to my lovely customers around the world.
Please note that this only applies to Tutorials, but hopefully that will still keep most of you happy. So, 10% off all Tutorials in my Etsy & PayHip shops throughout December, links below, discount automatically applied at checkout.
OK, I did another one – I skipped a day or so earlier in the week so catching up now! This is nearly the last (I’ve finished one more this afternoon and then I have plans for a completely bonkers one as a final hurrah), and I’ve kept it quite simple whilst trying to include some new touches to keep the experimental spirit going. If you’re at the Bead Embroidery Zoom tomorrow (Saturday) morning you might get to see how that’s progressing when I walk you through some of my work.
As you may have noticed I bought some sheets of metallic pleather recently so I’ve gone back to those for the base and backing here. Nice and simple – here are the steps and the template and stitch guides are as ever in with the new for 2023 IBW patterns on the Guild website.
1) Black hard felt foundation, rainbow metallic heart (cut from the purple/blue area).
2) Ribbon is white ultrasuede with back stitched DMC stranded cotton letters. I did many of the banners in a batch earlier in the week working on a frame, this was an early one and I think the stem stitched ones I’ve used on other pieces were better.
3) 1.25mm black pearl purl around the ribbon and heart.
4) Seeded tiny flower sequins and size 11 and 8 seeds in diagonal bands for simplicity, all with the seeds as stop beads. The pleather makes enough of a statement so I just wanted to get the feeling of a scatter of flowers across it.
5) Backed in the metallic pleather, with an edging of black 11 seeds, then round again to add the 15 seeds as a mini picot edge for a bit of frilliness (and because I’d only used plain edging until this point).
Really nice and quick to make, and I think quite pretty. Looks even better in the flesh because of the shine from the metallic finish.
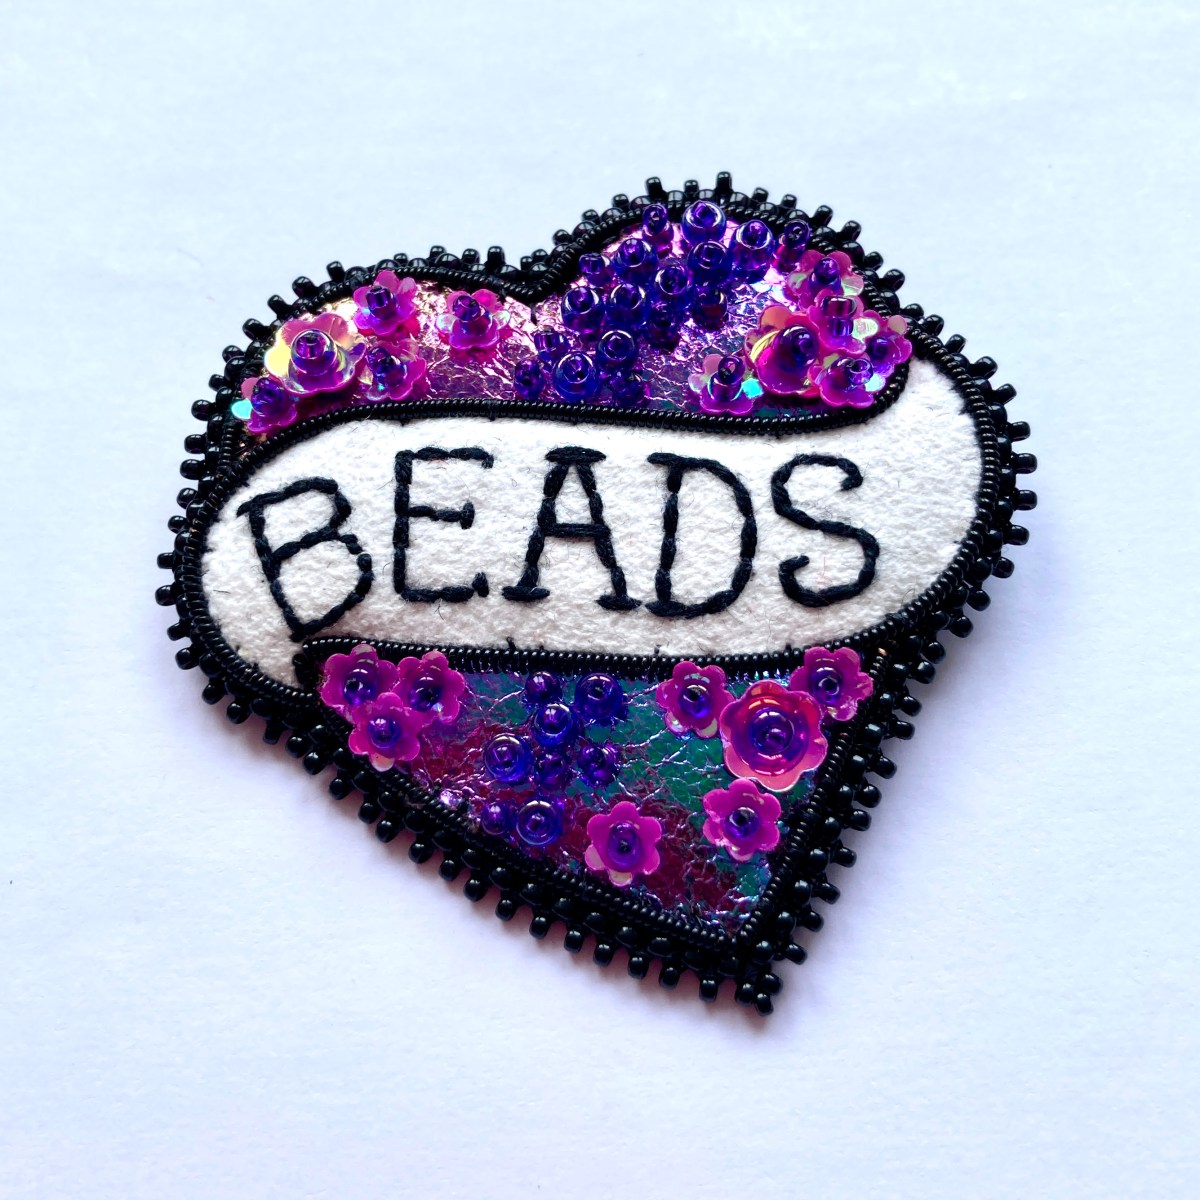
I hope everyone is having a wonderful IBW – I’m certainly enjoying making time to focus on beading. As you know I’m working using my donated ‘exploration’ PDF – a template and set of stitch instructions and ideas for a bead embroidered ‘I Heart Beads’ brooch, and every day or so I’m sharing the results. It’s kind of a week of making samples.
Today I’ve stuck with the heavily beaded style I shared yesterday, but if I’m honest I don’t think this one is as successful. I think it’s probably missing the flat 3 & 4mm sequins I love to use so much – I didn’t have them in the right shade and I wanted to stick with beads as a test. I think some of the bead groupings are also too numerous – this is after all quite a small piece so I need to probably stick to groups of 3, 5 or 7 of anything bigger than an 11. On the other hand I’m still keen on the stem stitched letters (with serifs!) and going back to the cup chain and a beaded sunshine edge worked (the eagle eyed amongst you will notice I didn’t put a black edging on the heart prior to that edging, which was a change and looks fine).
Steps were:
1) Black foundation, purple heart (both hard felt) and white ultrasuede ribbon with stem stitched letters (3 strands DMC). Ribbon edged with couched 2mm Black cup chain from my Etsy shop. No black edging round the heart at this stage.
2) Stacked cup beads, 4mm and 3mm rounds and FPs. Seeded Rizos, and 3.4mm drops (I didn’t have any 2.8mm which I missed – I like using both sizes together). I used to many drops together so I popped a couple of teeny flowers on to break them up (made from shrinkets coloured with acrylic inks).
3) Black ultrasuede backing, then a simple black 11 seed sunshine (brick stitch) edge.
So overall good, but not as good as the red one. I’ll get the sequins back out for the next one – lesson learnt. If you’d like to see what I’m up to or look at the other kindly donated patterns then they are all on the @beadworkers website in the #InternationalBeadingWeek section here – https://beadworkersguild.com/free-patterns/
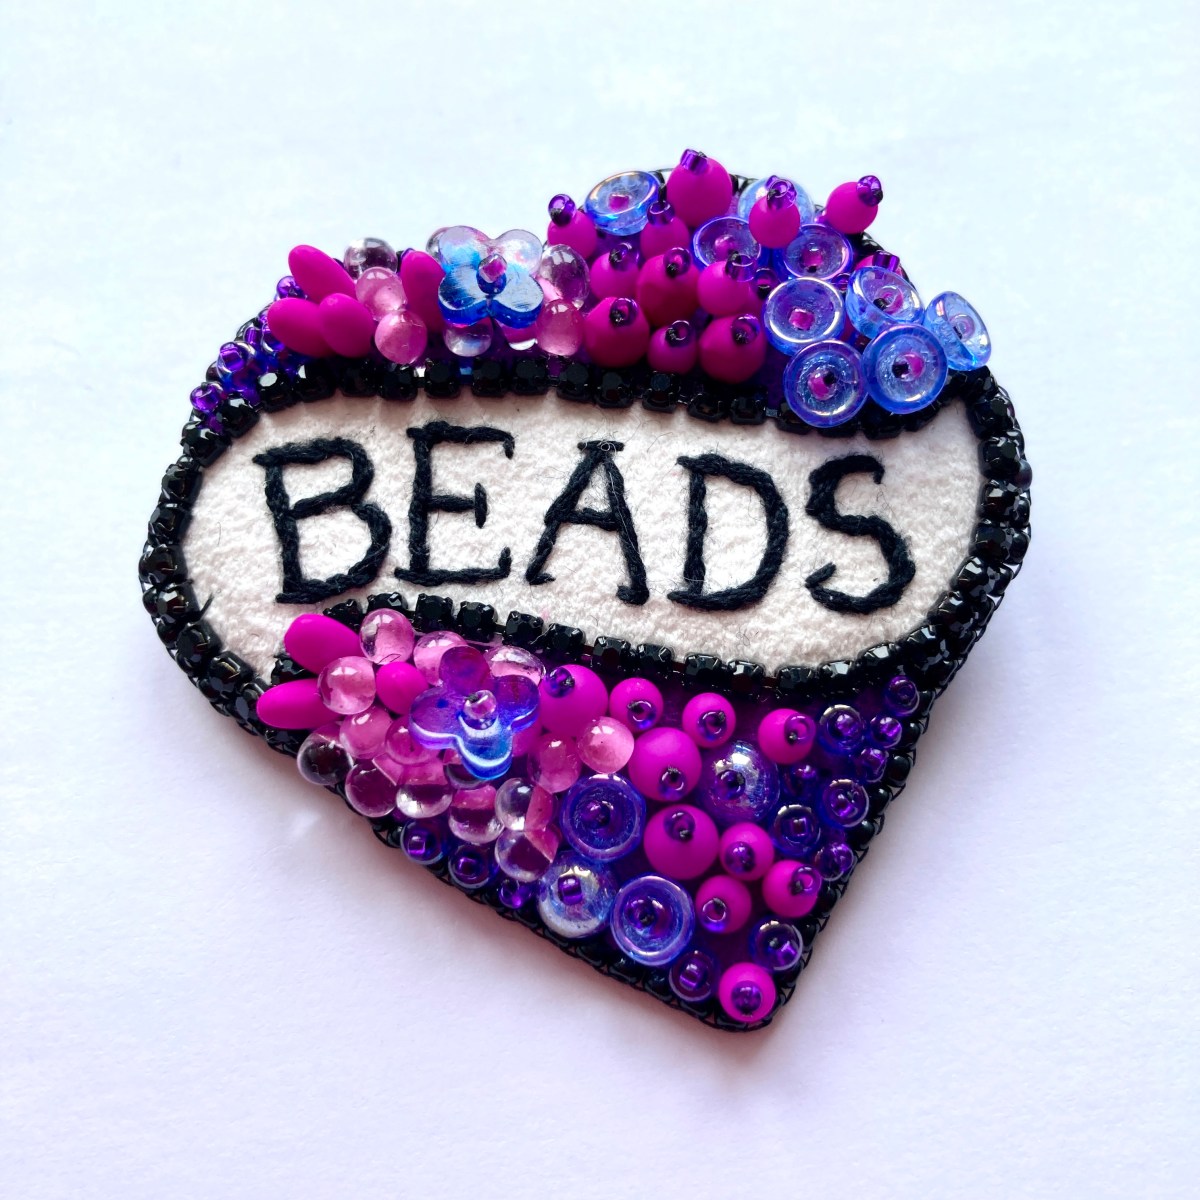
Yesterday’s Barbie version of my ‘I Heart Beads’ brooch may have been a big pink failure, but hopefully today you can see I took what I learnt, made some slightly different decisions and came up with something which is very me and actually works! Whilst the pre-Barbie versions were light on beads, this one brings me back to the heavily encrusted style I usually work with and I was relieved to be able to use it. So, here’s what I did:
1) Back to ultrasuede for the ribbon, and stem stitched letters with 2 strands of black DMC cotton.
2) Red hard felt heart on another piece of black hard felt. No padding. Both heart and ribbon outlined with couched 1.25mm black pearl purl.
3) Beads added with stacking (cup beads on varying height 11 seed stalks, sequins sandwiched with seeds for height and texture, size 8 seeds stacked singly). All with size 15 seed stop beads.
4) Other beads added with seeding – rizos, small czech drops, miyuki 2.8 & 3.4mm drops, and 11 seeds.
Those two combinations allowed me to vary the finished heights for interest and texture – work as if you’re contouring a landscape, with gradual transitions between the higher and lower patches using either the stacking on stalks of fringe or varying sizes of bead.
5) Finally backed on black ultrasuede and finished by couching black 1.25mm pearl purl onto the edge to hide the layers. I’d tried using seed beads but it looked too busy.
So the big lesson today was about getting some balance back – I pared back the black and white elements as far as they could go, and then went wild with the beads. A success!
The trouble with undertaking to publish every version of my ‘I Heart Beads’ IBW project here is that I have to show you the ones which didn’t work. Whilst that’s rather embarrassing for me I guess it’s an important principle to help us all remember that not everything we attempt comes out how we envisioned, but we still learn from trying. So, with a deep breath and some embarrassment (and amusement) I have to tell you that the promised Barbie version totally failed! I made a number of very bad decisions which I hope sharing here will stop you from repeating……….
1) I used a very stiff iridescent plastic fabric for the ribbon. Pretty, but hard to work with, and extra hard to write on with 1mm pearl purl. That might have worked on my usual ultrasuede but not on this stuff, particularly as all needle piercings left a visible hole. I need more practice with materials like this.
2) The ribbon somehow ended up about 1mm too far to the right and 3mm too far up, which has really significantly upset the balance. A silly mistake, and I should have realised as I was working.
3) I attempted to hide the mess with crystal lochrosen in a kind of ‘bubble’ effect which made it look even messier.
4) Something is wrong with the beading too – too many pink rizos, not enough sequins, the groupings are too small on the top section and I probably shouldn’t have bothered with the blue cup beads. What a mess.
5) The black cup chain, which worked really well on the previous versions now looks messy with the heavier beading. I should have gone with pearl purl to pull it back and give cleaner lines to balance it.
6) And finally the pink smooth purl I looped is the wrong shade – daft given the number of shades of pink I stock. Matching an iridescent fabric is tough and what worked in daylight doesn’t work in artificial light.
But all is not lost – I won’t be finishing this one, but I’ve learnt a lot, and I can frog it and re-use the beads and cup chain. And the even better news is that the one I made before I got sidetracked by #barbiecore actually worked, so I’ll show you that later!
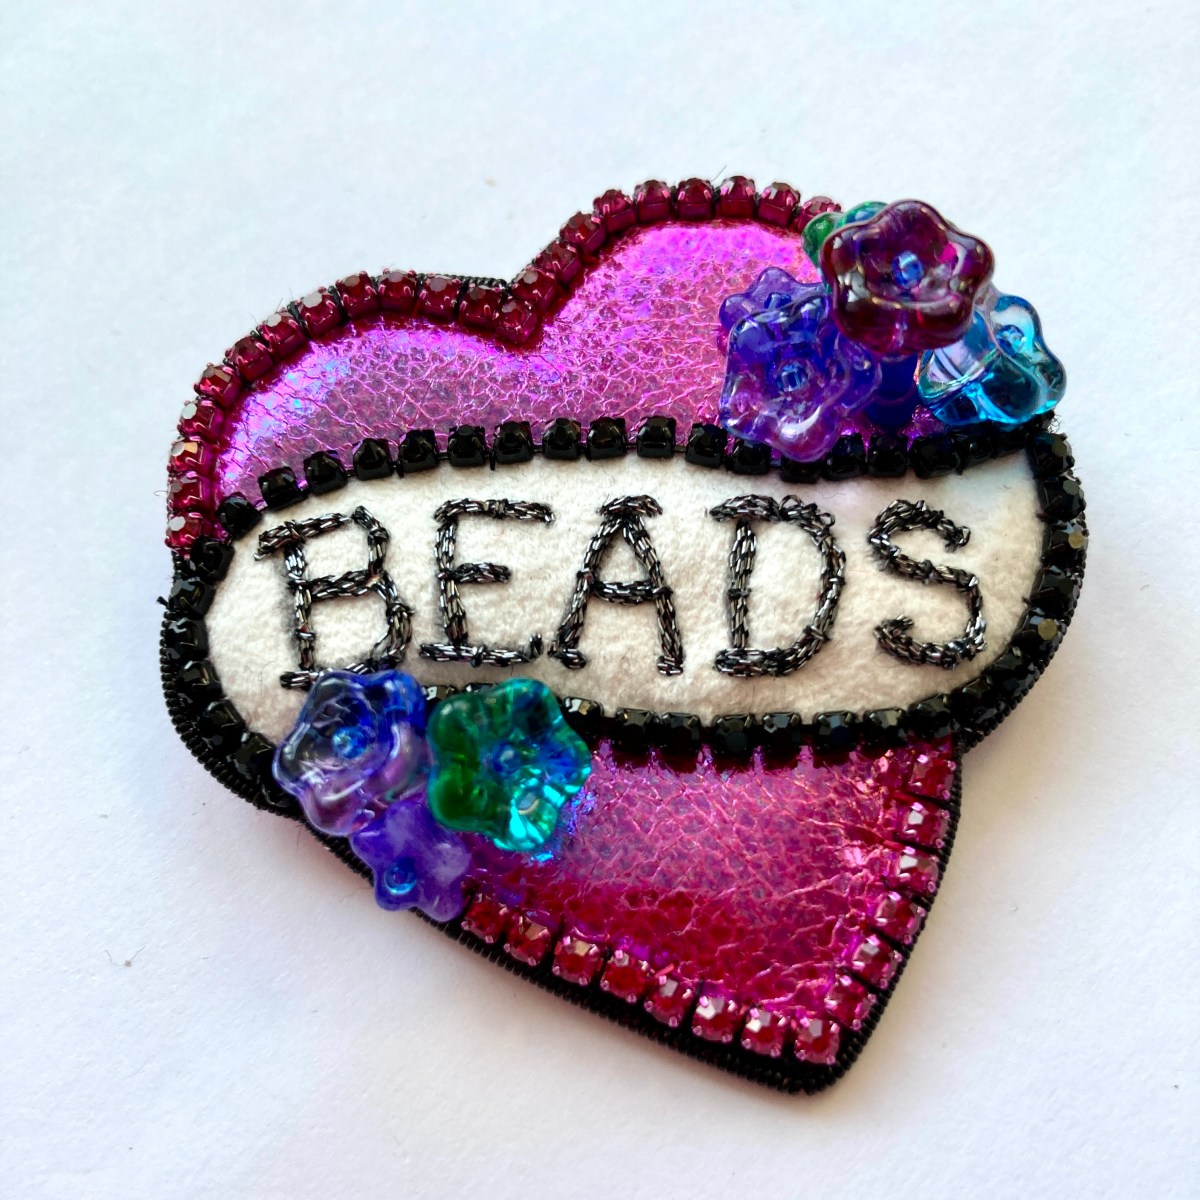
Hello again, here’s my second version of my ‘I Heart Beads’ brooch. I’ve gifted the template and stitch instructions to IBW, but rather than just one final version I’m going to try lots of different combinations of stitches and materials over IBW to show you all how versatile bead embroidery can be and encourage you to experiment (and if that experiment looks like mine that’s fine).
Anyway, this one is quite similar to the first one, with a few tweaks of course. Here are the key steps/ingredients:
1 – Black foundation again (hard felt) with a single layer of felt padding (heart shape 3mm smaller than template), followed by a metallic/iridescent artificial leather.
2 – White ultrasuede with ‘beads’ couched on using metallic DMC embroidery thread. I worked this on a larger sheet on an embroidery frame (I did several at once) and switched to thread as I hadn’t got the accuracy I wanted in my 15 seed backstitch yesterday. It’s better but this thread is a pain to work with and I guess I miss it actually being beads, so I’ll try some other options. The ribbon is again surrounded and attached to the main piece with couched down 2mm cup chain from my Etsy shop.
3 – The heart was also surrounded with couched down 3mm fuchsia cup chain, and I then used stacking to add some clusters of jewel coloured flower beads, with a tiny blue 15 seed as the stop bead, putting the central one on a stalk of size 8 seeds to add height.
4 – Metallic leather again as a backing, plus the brooch back, then used a cross between couching and a brick stitch edge to join the layers and capture a 1.25mm Pearl Purl on the edge. I did try a sunshine (brick stitch) edge in size 11 black seeds but it was too much next to the cup chain, but unfortunately I don’t think the final edge has enough black to get the tattoo look.
Verdict – great quick technique for a fun and flashy piece but considering the theme, definitely not enough beads on it! Also I promised something ‘Barbie’ and this doesn’t take it far enough (needs more pink!). Tomorrow I will be sure to go all in on the beady and Barbie front……
One of the great things about International Beading Week are the gifted patterns from a huge range of designers, beaders and of course the IBW Ambassadors. My gift this year is a little unusual in that it is more of a guide than a set of instructions – I’ve given a template and some detailed bead embroidery stitch guides, but not a ‘put this bead here’ step by step process. Instead I want beaders to embrace the freedom that bead embroidery can give you and strike out on your own – and I’m going to be doing the same, beading as many of the design as I can bear over the week, then posting right here to describe how I did it each time.
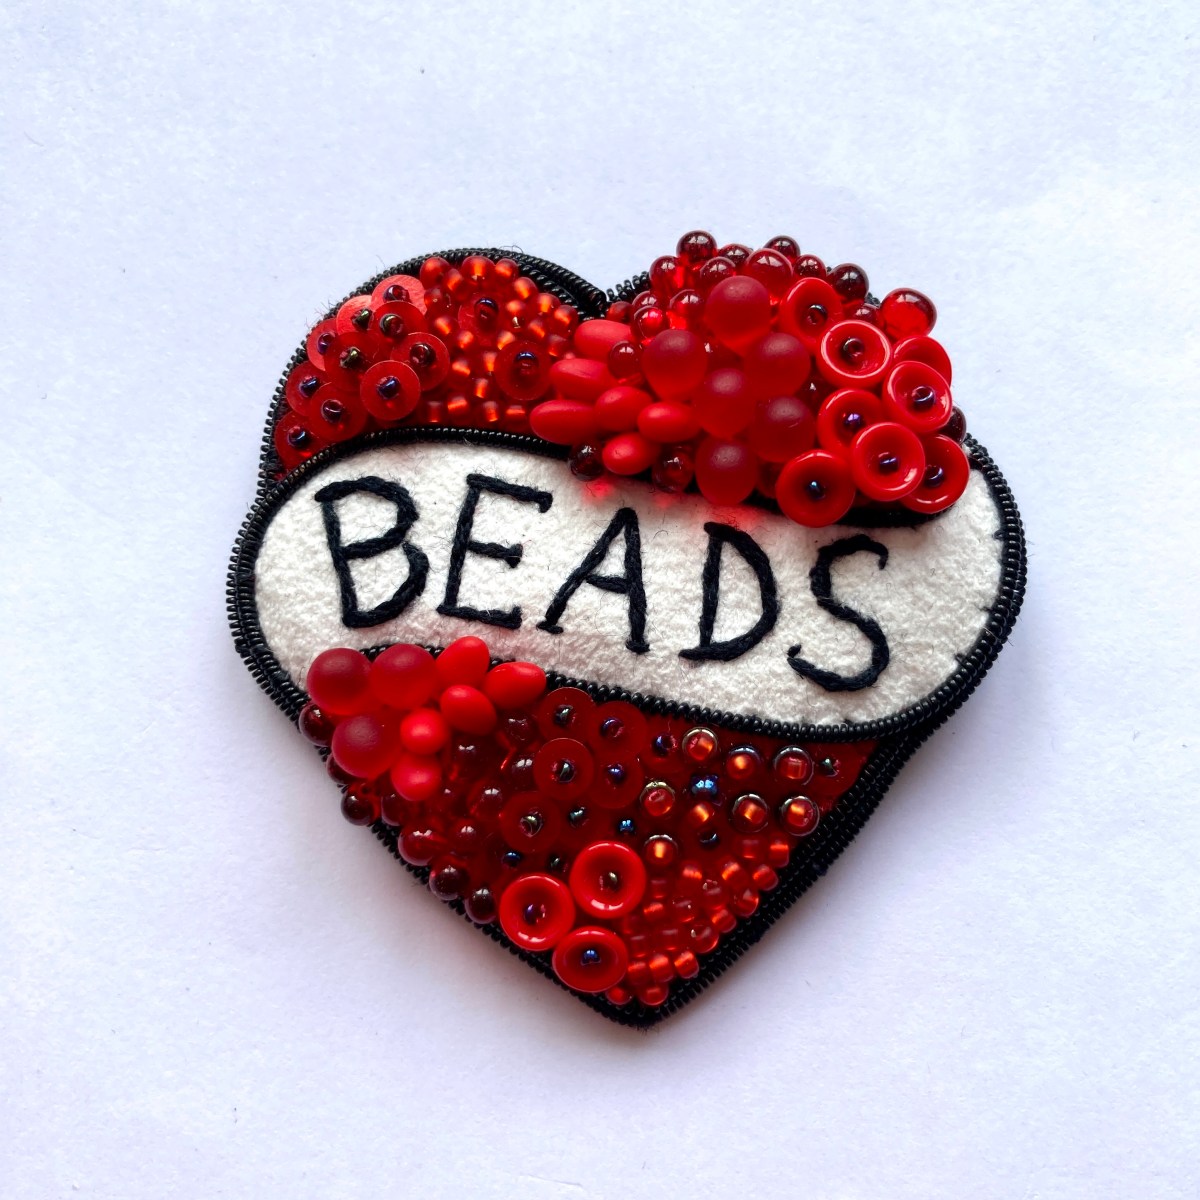
So here’s the first one and the steps to create it (refer to the tutorial for how to’s on stitches etc):
1) Black foundation, then three layers of red soft felt (3mm smaller than the template or previous layer each time) stitched in place. Silk velvet cut into the heart shape stab stitched around edge.
2) White Ultrasuede ribbon, held in place by couching on black 2mm cup chain. ‘Beads’ lettering added by backstitching 15 seeds.
3) Small selection of beads, bicones and lochrosen (crystal sequins) added using stacking and seeding (see tutorial).
4) Brooch back and black ultrasuede foundation added, then a simple ‘sunshine’ beaded edge (all included in the tutorial).
Learns – well if I’m honest the lettering is a bit messy, I’m not sure that I can face using beads for this step again! And the velvet is a bit messy round the edges – overall I don’t think this has the impact I was looking for yet – perhaps it’s too far from my usual style, although it was lovely and quick to work with a visible foundation fabric. Bearing those lessons in mind the next one will be OTT Sarah style I think – very encrusted and probably Barbie pink as that’s everywhere today! Stay tuned……..
It’s been a busy week here – the last week of the school year for the bigger boy (cue endless house competitions and much taxi-ing around the sporting venues of South West London) and the looming deadlines of full on school summer holidays and International Beading Week have rather energised me. As well as listing a whole new batch of beautiful crystals and some beads, I’ve finished writing up a new tutorial. It’s a while since I shared a beadweaving tutorial – I’ve been distracted by bead embroidery so much of the time, but my trip to the Czech Republic earlier this year to visit the bead manufacturers really inspired me. There was so much beautiful Art Nouveau architecture and design around, highlighting that the Northern Bohemian area really was a focus for this beautiful style in the early 20th century, so when I found these gorgeous Tulip Bud beads at Rutkovsky I knew instantly that they needed an Art Nouveau surrounding.
The first version (back right) went together like a dream, as did the second (back left), but the write up process was then slowed down by the third version, which I was using for step by step pictures being just slightly off – the central ‘cathedral window’ section was distorting and twisting. I nearly gave up at that point, but I like a challenge really, so that meant another three versions before I got it back on track – adding a 15 here, changing a thread path there until I had a finished version which worked with different bead finishes, rivoli brands and types of tape measure. Then I was back to the step by step version, which uses a different shade for each size of bead in the two colour groups to make the tutorial more helpful, shown in the front above. All of the colourways I’ve made so far are listed out in the tutorial itself, and as usual I’ll add any more I make to my colourways page here (although after making at least 9 including 4 in the step by step colourway I may take a break for a little while). It reminded me how much work we designers have to put into testing – and how as with software design I must only change one thing at a time (I didn’t always stick to this and I paid a price!). Never mind, at least I got to do lots and lots of beading!
The tutorial is available in my Etsy and PayHip shops as a PDF. It uses Right Angle Weave (RAW), Modified RAW (RAW), circular peyote, and netting. It will suit intermediate to advanced level beaders who have experience with RAW, peyote and netting and who are able to vary their thread tension (some sections need a soft tension and not all beaders can manage that). The twenty-six page tutorial contains a full materials list, with suggestions for colour schemes, and every step is fully illustrated with a detailed diagram showing thread paths etc, as well as being written out clearly (in English) with photos where appropriate.
As I mentioned above, International Beading Week (IBW) is coming up, so if you’re interested in purchasing this tutorial you may want to hold fire until July 22nd, as during IBW I’ll be doing my usual ‘20% off tutorials’ offer to spread the beady love a bit.