Multi-tasking

Yesterday the boys were ‘painting’ and I thought maybe this was an opportunity to make the Tatty Devine kit I bought through Lucky Dip Club last year.   Tatty Devine make fantastic and funny acrylic based jewellery – I lust regularly after their extraordinary dinosaur necklace, gin bottles, and double decker buses.

I’ve previously worked with shrink plastic and am planning to get into that again, and although this used acrylic components they’re pretty much the same at the assembly stage, so I felt that this would be a useful test of whether I enjoy this kind of assembly.  Plus I’ve had it for ages and it will go with loads.

image

It went well to start off with – it’s not a taxing kit as you simply have to open and close a few jump rings. The boys and I created together for a while quite happily – watercolour pencils aren’t too high on the messy play scale or so I thought.

image

And then just as I thought ‘wow this is great, one day I might even be able to bead while they draw’ this happened……..

image
Anyway, once that had been dealt with, I got the necklace finished.

image

It’s pretty, was simple to make and looks like a ‘real’ Tatty Devine piece, so on the whole I’m pleased.

image

The only step that gave me trouble was getting the smaller jump rings into the cut end of the chain – I’d have to say that this was a bit of a squeeze, and although the instructions warned me, and they probably work with this combination in their main product lines every day, I felt for a beginner kit a different chain would have been better.

image

The kit wasn’t cheap at £40. However I’ve ended up with a gift boxed Tatty Devine necklace, and some pliers, and given that their ready made pieces run from slightly less to much, much more, all in all it was a fair price and an enjoyably simple and quick make.  I probably would have preferred something a little less floral, but it’s still nice and it’s sparked some ideas.

Sadly there are no more available, but if you’re in London you can make some similar pieces with them at one of their workshops.

The Sting

I’ve been working really hard on a competition piece recently, and after a month’s solid discipline I fell of the wagon last week and wandered off into other beading.  I’m sure the break will be good for me, but none of the other beading really worked and that made me rather antsy.  When this happens, there are two options – have a night off beading, or do something which can’t fail.  I didn’t want a night off, so I turned to my stash of digital patterns to find something by a designer who never lets me down – Sabine Lippert.  Just before Christmas she had a pattern sale, so I had a little splurge on a few patterns, including her pendant ‘Sting’.  This looked like something which would be achievable in an evening or two, so I pulled some beads and got going.

image

It was a good decision – as always with Sabine’s designs this piece went together very nicely.  It took around 3.5 hours – I’m used to Sabine’s designs so can usually work them up quite quickly, and I found this one pretty easy, with everything just slotting together perfectly for a contented evening’s beading.  It’s given me my beading mojo back, and with some child free time off the day job coming up, I feel refreshed and ready to get some of those long awaited tutorials finished and launched soon.

Recipe

image

  • 15 seed – Miyuki Duracoat Cranberry 4211
  • 11 seed – Miyuki Matte Silver Grey 2012
  • SuperDuo – Jet Gunmetal Pearl
  • Delica – Miyuki Matte Pewter 321
  • 3mm Crystals – Swarovski Paparadscha AB2 (slightly hard to find colour in 3mm – I got mine at a show from Gemstone Boutique)
  • Spikes – Dark Bronze.  I have no idea where they came from!
  • 3mm Round – I didn’t have any in the right colour, so I used some Saturated Fuchsia firepolisheds from Robin’s Beads, which worked well.
  • 6mm Round – I used an orange FP, this can’t really be seen so you just need something that tones in.
  • 14mm Rivoli – Chinese (not as fine a finish as Swarovski or Preciosa, so they don’t work with a tighter bezel, but a fantastic colour which neither of them offer and worked for this project – from the Southampton Bead Shop)

image

The ribbon (I know it needs a press, it’s been lurking in my stash for ages) was hand dyed by Stef Francis, a fantastic space dyer who I came across in my sewing days.

Tips

I usually find my tension too tight for Sabine’s pieces, because of the 3D embellishments and layering.  So I relaxed things a bit, but unfortunately I shouldn’t have done as this is one which requires stiff tension to create a solid rod of peyote, so it came out a bit floppy.  However, I have stuck a head pin down the middle and it’s fine!

Sabine does warn you about this in the blurb on her site, but not in the pattern.  Because I’d bought the pattern a while ago, I’d forgotten what the blurb said, but to be honest a beader of my experience should know that if you want to make a peyote tube rigid you’ve got to do some pretty solid stitching, and use a suitable thread – Sabine recommends Fireline explicitly in the materials list (which should have been another clue) but I’ve gone off it a bit, so I used KO which is clearly not going to give the same rigidity.  So entirely my fault, but a useful learning experience (just when you think you have things sussed…..), and it still looks fine.  If I make this design again, which I probably will, I might perhaps stick a cocktail stick down the middle for extra stiffness anyway (the head pin I used is after all flexible).

Sting - Sabine Lippert - beaded by Sarah Cryer

Colours

One of my resolutions this year is to include more neutral colours in my beadwork – I have a tendency to chuck colour at things, which sometimes gives me an amazing looking piece which is completely unwearable.  I try to avoid beading with black as it’s hard work, and anyway I wear a lot of navy blue rather than black, so I’ve been using a lot of 401FR and similar to give me a navy base.  I’m also getting really into pewter, and other matte, mid greys, as they work well with the etched beads I’m currently obsessed with, so for this piece I chose a selection of those tones for the base beads, and variations on a dark salmon pink for the main colour.  I toyed with a few different spikes (which you can see in the materials picture), but in the end the dark metallic chocolate worked best. This was going against my instincts, which were to pick out the fuschia and orange of the stone, and maybe chuck in some zest, but I think it’s worked well and given me a striking but wearable piece, proving that this is a good resolution!

Conclusion

A lovely piece, well worth buying and trying.  Rock hard tension and the correct thread would have helped keep the main shaft rigid, so always read the instructions.  I’m going to get back to my own work for now, but next time I need a break I’ve got Sabine’s Toggle Ring tutorial to try.


2016 beady to do list part 2 – tutorials

So here we are again – next on the list some pieces which I’ve started the tutorials for:

Oscar’s Bauble

This is a variant on Oscar’s Rattle, which was my winter piece for the 2014 Stitch N Craft Challenge, and I think I’d started work on the instructions in late 2014 but abandoned them as it got too close to Christmas, thinking I’d get them done ready to launch in Sept 2015.  I didn’t, so it would be nice to get this done in time for Christmas 2016.

Oscar's Bauble - Sarah Cryer Beadwork


Art Deco Needle Case

From my 2013 Stitch n Craft Challenge Chatelaine.  I think I even started buying supplies for the materials packs for this one!  This is the one I’m going to publish next, and the aim is to do it by the end of Feb.

Art Deco Needle Case - Sarah Cryer Beadwork

Triangles Bracelet

Not so sure about this one, it has many features that I’m proud of (such as the counter sunk catches in the second version), and I love the rounded spars of the hollow triangles.  I think this one may be changed to become part of a series of hollow geometrics, as I made a whole series of shapes a long while back which I’d like to write up and publish – to be honest the 3D ones maybe more interesting and unusual than this one?

image

And another pieces which I think would work as a tutorial with a bit of tweaking:

CRAW Ring

This was initially started for an Etsy Beadweavers Challenge with the theme ‘Game of Thrones’, but wasn’t done in time, and although I’m pleased with the design, the execution was flawed (mainly because I used too light a thread) so it wasn’t suitable for sale in this incarnation.  It’s all 15 seeds, so not for the faint hearted but will I think evolve into a tutorial as it’s a nice wearable piece and useful for those looking to improve their CRAW and add some new CRAW shapes.  It includes slightly tricky steps (such as splitting the CRAW), but I think if I work on them a bit more I can come up with some teachable thread paths.  Perhaps I’ll do my working out in 8s rather than 15s though……

CRAW Ring - Sarah Cryer Beadwork

Craft not chaos

The lovely people over at Folksy are running an alternative take on the Black Friday/Cyber Monday phenomenon called ‘Craft not Chaos’, with lots of gorgeous shops offering discounts today or over the weekend. So if you’re looking for gorgeous hand made gifts, toys, clothes, jewellery, furniture or just things that are generally lovely why not pop over and have a look here?

Jean Power Bangle

And I’m taking part by offering 10% off finished beadwork until Monday 30th, using the discount code BLACKFRIDAY. Because Folksy can only discount my whole shop, I’ve had to hide my tutorials and materials packs while the discount is in place, but beaders don’t panic, you can still buy them via my Etsy and PayHip shops, and they’ll be back on Folksy on Tuesday.

Kissing Piggies - Sarah Cryer Beadwork
Kissing Piggies – Sarah Cryer Beadwork

How not to succeed in beading……

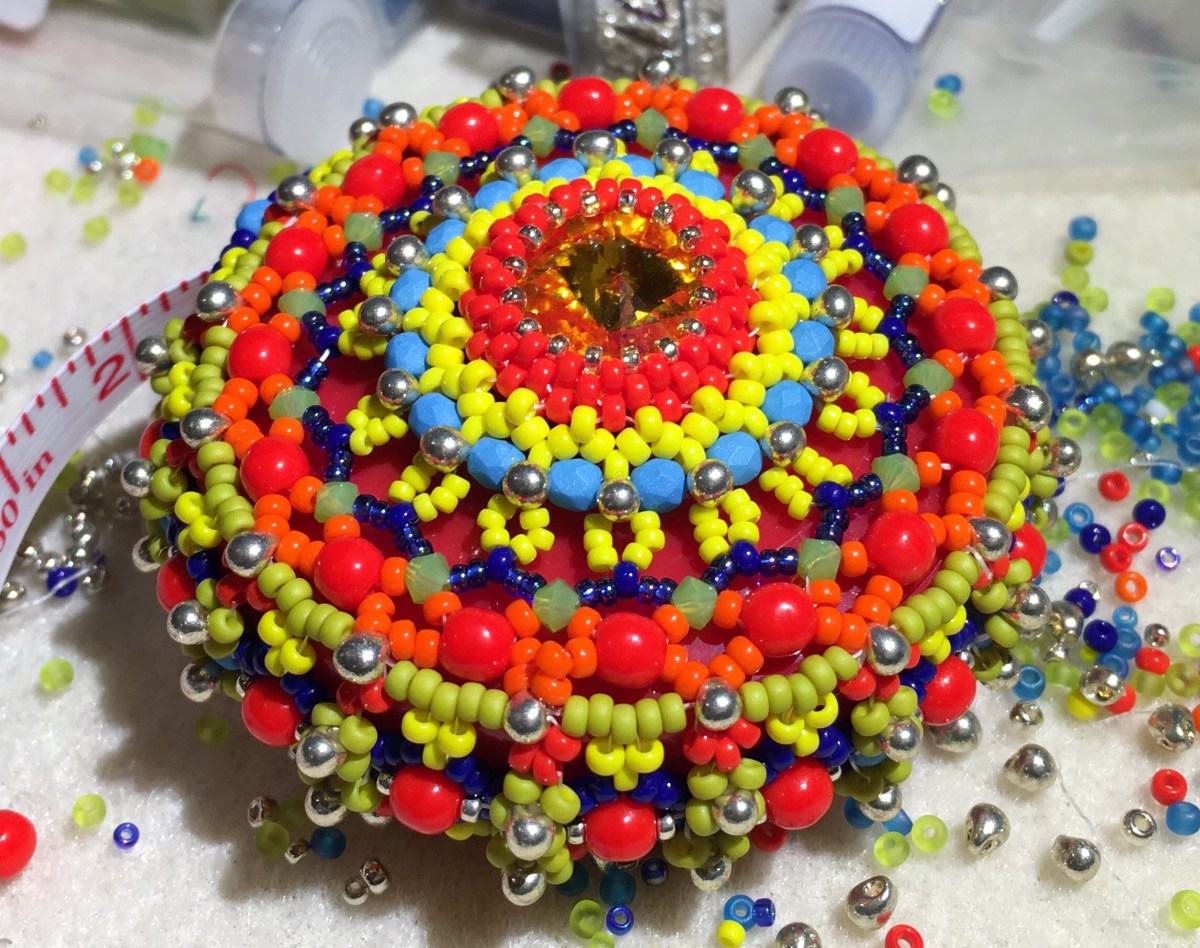
All this talk of tape measures reminded me that I haven’t actually made one of my Baroque Tape measures since I released the pattern. So rather than finishing some more materials packs so other people could make them, I had a go myself. I’ve been wanting to do a more multicoloured version for ages, something a bit huicholly.  So I pulled some beads, got the pattern up on the iPad, and started beading.  It did not go well.
Changing colours this often just doesn’t work with this design – you loose the shapes formed between beads and by the beads themselves.

IMG_3711

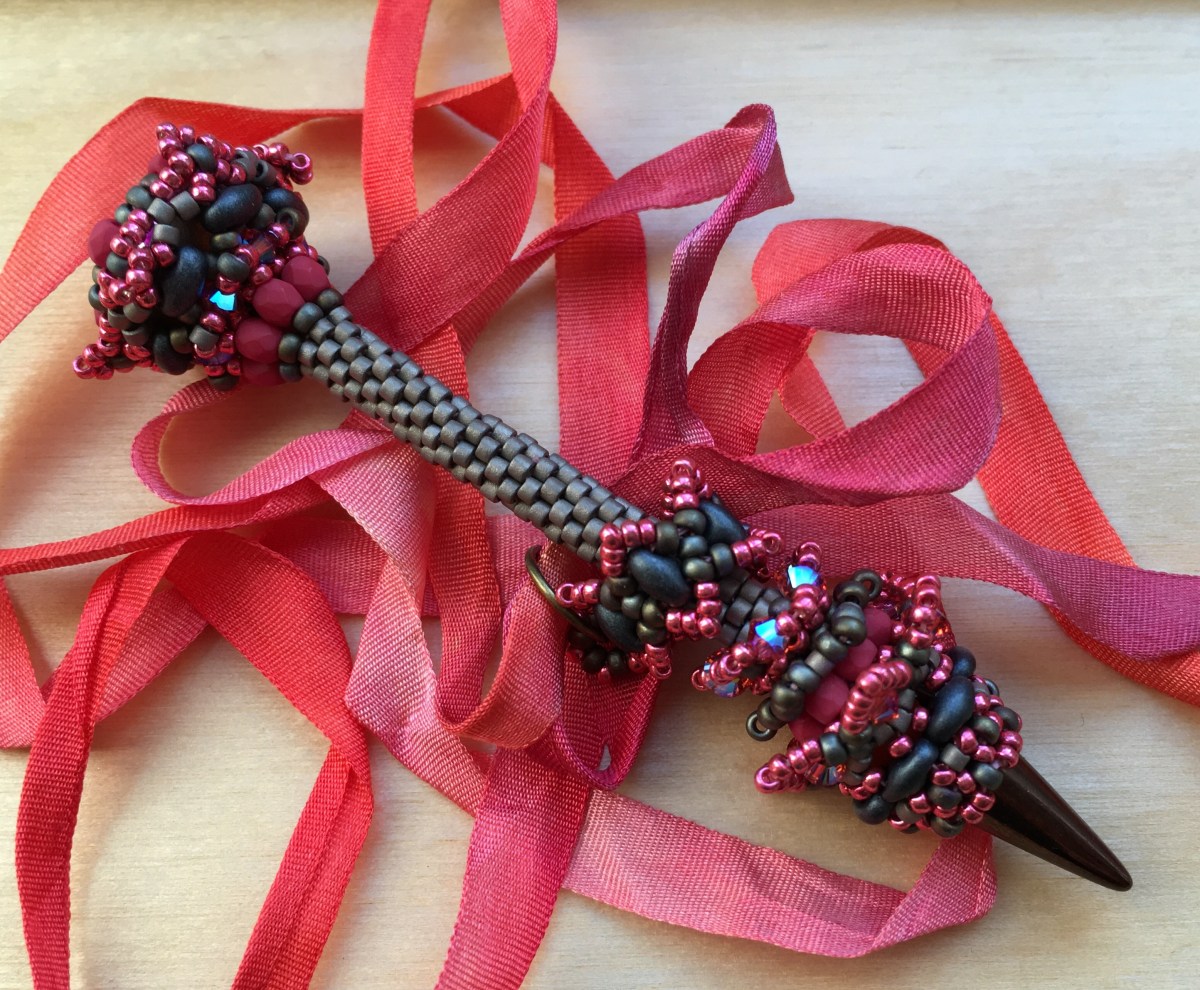
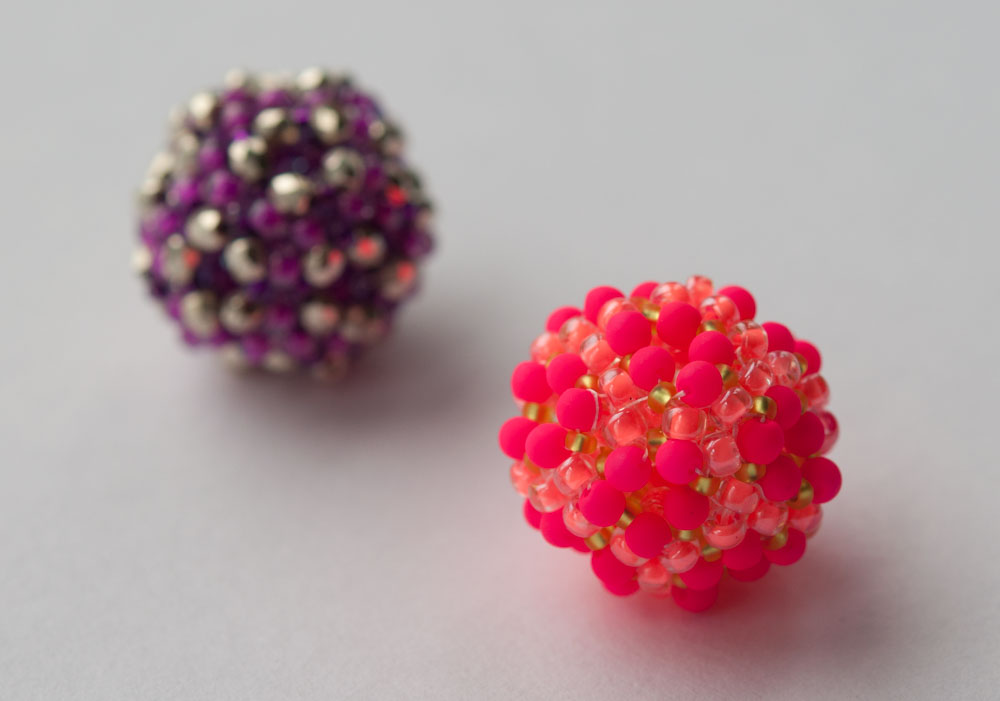
And even worse, I started the netting out of the wrong row of the peyote bezel, meaning the rivoli sticks out way too far, so all in all not good.  Below you can see the ‘wrong’ version next to my later correct version – the rivoli bezel now forms part of the netted surround, rather than the surround looking like it’s been tacked on.

image


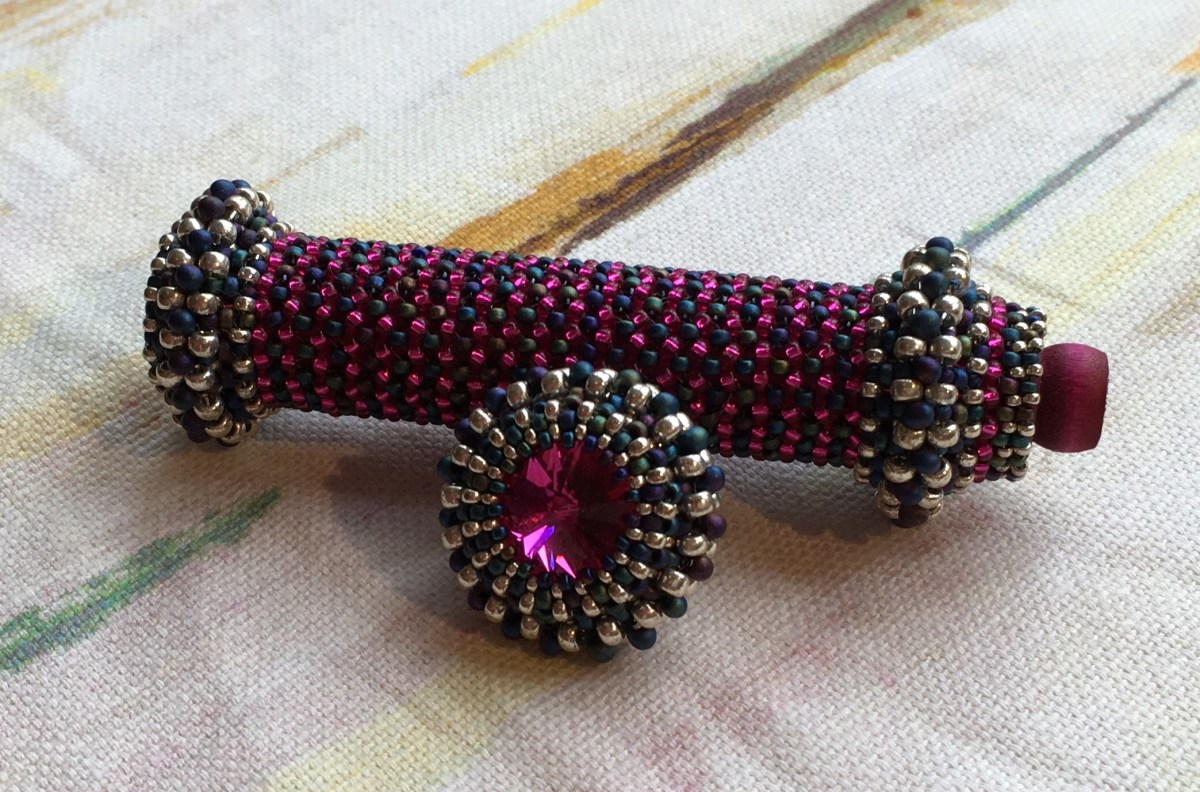
So that version was abandoned, I took an evening  off to make those Materials Packs, and then I tried again.  This time I paid more attention to my own instructions, thus avoiding the bezel error, and I changed seed bead colours only every two or three steps, rather than every step as before.  And hopefully you will agree that this looks much better.

image

There were still a few things I’d forgotten since I’d done the original design:

Firstly, back then I didn’t use Fireline.  Now I do, and it does noticeably alter my tension (to the extent that I’m actually thinking of stopping using it).  This was worsened when I lost the reel I’d been using (small people move stuff), and grabbed another reel which turned out to be one of the faulty ones from a while back.  So lesson learned – netting suits a thread with a bit of give, like the lovely Miyuki threads, and in addition, using  a poor quality thread will slow you down and make a good finish all the more difficult.  So use the best you can, all of the time.  Throw the rest away so you won’t use it by mistake.

Secondly, I should have used a coloured thread that matched the tape measure – that way you can relax your tension without worrying about gaps between the beads exposing the thread, and the pattern will still work fine but be much more pleasurable to bead.  Honestly, it’s all basic stuff………………

Thirdly, I ignored my own instructions to stop adding the firepolished beads when you get to the tape hole – I worked around it (just as I did in the early prototypes, before I worked out how to cope with the hole properly), but I’m annoyed with myself as it’s just not as good.  Read the instructions woman!

Finally, I had a go at working with a messier bead tray – all my beads muddled up together instead of carefully kept in separate piles.  This was partly because I’ve read a few articles recently discussing how different headers like to work, so I thought I’d try the mixed up way, and partly because unpicking the failed first side left me with muddled up beads anyway.  This was not a good move – it drive me completely crazy, I hated not being able to just pick up the bead I needed, and as I had multiple sizes of the same colour out it led to mistakes.  I am quite confident that it would have been quicker to re-sort the beads into piles first, as it really slowed me down.  Never again.

image

I still need to add a beaded bead of some sort for the pull tab, so I’ll have a delve around my stash of previous work and interesting beads (I’m sure I have a red tea pot somewhere – not very Mexican but fun anyway).  But it has been a very useful learning experience going back to it, and I have another one planned as a Christmas gift now (which will hopefully be a bit better).

image


Beaded Bead 6

The eagle eyed among you will have noticed that this isn’t exactly running in order – that’s because some of the beaded beads are easier to blog about than others.  For example beads 4&5 are photographed, but I need to pull out the references and links needed to give the designers proper credit.  Bead 6 is one of mine so less digging needed.

Bead 6 is actually a set of samples which will hopefully evolve into a new tutorial – not quite there yet, as in samples 1 & 2 there’s a size 11 placement which annoys me, and the spikes in sample 3 are rather wobbly.  But I will persevere.

DSC_0439
Sample 1 was born of beading lots of different beaded beads, and getting one of the possible structures so stuck into my brain that I had to try it in spikes.  It uses 12 spikes, woven into a kind of a cube with trios at the corners.  At least I think it is – looking at the finished ones I’m no longer sure (best take some step by step photos of sample 4).

DSC_0433
Sample 2 uses gumdrops (they are often interchangeable with standard size spikes as they have the same size base – 7mm).  It switches to 11s from 15s in some places, but as you can see above still has 11s in the trios and they don’t sit right.

DSC_0425
And sample 3 is back to spikes to try and iron out some flaws in 1&2 by just using 15s.  Still not right though, the spikes are more wobbly than 1.  One more combination left to try I think……..

Anyway, no recipe yet or tips since you can’t try this one at home, but bear with me and it will emerge eventually as a tutorial.

Beaded Bead 3

I think this is actually my favourite so far – simple, striking and a great way to understand the geometry of beaded beads.  I used a free tutorial from Spirala Beading called Zuzana, and will be making more just as soon as I can get my grubby hands on some more pinch beads.

Recipe

90 pinch beads – Matte Watermelon (from Spoilt Rotten Beads)

1g size 8 seeds – 1052 Galvanized Silver (Stitch N Craft)

12 size 15 seeds – 1052 Galvanized Silver (Stitch N Craft)

12 O beads – Haematite (Robins Beads)

A wooden core bead, I’d guess at 20mm but unfortunately didn’t measure it……sorry.

Zuzana by Spirala Beading - beaded by Sarah Cryer Beadwork
Zuzana by Spirala Beading – beaded by Sarah Cryer Beadwork

Tips

  • If you have two colours, use them.  If you don’t have two colours, wait until you do.  Whilst it is possible to do this in one colour (I did), it is infinitely simpler if you can see the five beads which surround each 5 pointed star clearly.  By all means switch to a single colour once you’ve had some practice – these are nice & quick to do so it won’t take you long to progress.
  • Hold your nerve – it’s a bit of a floppy mess even with the core bead in, but the simple embellishment suggested pulled everything together perfectly.
  • You may need to try a couple of different sizes of core bead.
  • Once you’re done beading, roll the bead around between your hands a few times.  This will make the trios of pinch beads which need to sit with a flat side against the core bead turn and lock into place, and is much easier than trying to force them round with a needle!

Now I just need an excuse to order some more pinch beads – and guess what, Ivona, who runs Spirala Beading also has a lovely Etsy shop selling lots of fantastic beads, including a huge range of pinch beads – Beads of Bohemia.  What luck!

Baroque Tape Measure – new Materials Packs at last…..

So at last I have had time to photograph and list the Baroque Tape Measure Materials Packs which I worked so hard to put together a few weeks back.  There are six new colourways, and I’ve re-shot the two I already had in stock as well.  Altogether I have now made over twenty different colourways for the packs, and another five have been beaded into the original and my working samples.  Perhaps not what I expected when I made the original piece for my Chatelaine two years ago.

Baroque Tape Measure Surround

These are my last few tape measures, so I will probably not be listing any more for a while (although if they sell well I may change my mind!), and I’ve been a bit bolder with some of the bead choices because of that.  There are two sets – bright fun colours, including one which uses one of my favourite Miyuki colours – red opaque AB (which gives a fab weird salmon pink), and some really dark metallics, including matte black with the new Swarovski Patina rivolis.  As usual they are available on Etsy and Folksy – links below:

Folksy links

Ruby & Old Gold
Ruby & Old Gold
Aluminium & Scarlet
Aluminium & Scarlet
Dark Metals
Dark Metals
Deep Purple
Deep Purple
Caribbean Sea
Caribbean Sea
Tequila Sunrise
Tequila Sunrise
Lemon & Lime
Lemon & Lime
Dark Plum Iris
Dark Plum Iris

Etsy Links

Metals
Metals
Brights
Brights


Beaded Bead 1

So I had another go at beaded bead pattern number 1 – Conway Beaded Bead by GwenBeads.  And then a few more goes, and finally I’ve got one finished.  Actually I’ve finished two, but the first one is not good so will be fragged………..Interestingly I found this pattern quite challenging, possibly because conceptually it is actually quite simple, and as I was tired I struggled to maintain the absolute accuracy it demands.  An single extra thread pass in the wrong place can mean this one doesn’t work, and as the internal structure is all seeds, rather than building on base of larger beads, it is a bit of a nightmare to unpick if you make an error and don’t discover it for a while.  Looking on the bright side, my sister Susie Hoad (BeadingBySusie) churns these out in a couple of hours, seemingly without any effort, so I think once I’ve made as many as she has (which is quite a few) I should get the hang of it.

Conway Beaded Bead - Gwen Fisher, beaded by the Indecisive Beader
Conway Beaded Bead – Gwen Fisher, beaded by the Indecisive Beader

Anyhow, the pattern is by Gwen Fisher of Bead Infinitum fame, and was my first introduction to prismatic RAW (PRAW).  On reflection this was quite a tricky one to start with – I might have been better with something like her fun looking Tentacle bangle or the Daisy Chain bangle rather than the full on 3D experience.


Conway Beaded Bead - Gwen Fisher, beaded by the Indecisive Beader
Conway Beaded Bead – Gwen Fisher, beaded by the Indecisive Beader

Tips

  • It says ‘advanced’ on the blurb, it means it!
  • And you definitely need to understand the structure of a dodecahedron (and constantly check you’re doing 5 sided units, it’s very easy to loose count).
  • And don’t use colour lined crystal beads for your first go as they seem to confuse the eye – I’d go for something matte (to help you manage the tension), for a good contrast between the 8s and 11s in the structure colourwise to help you see what you are up to, and nothing too dark as you will be working inside the structure a bit.
  • Like any embellished RAW, CRAW or PRAW you should maintain a medium tension for the base – too loose and you’ll get an uneven finish, too firm and you won’t be able to add the embellishment.  My first version, as well as containing a couple of mistakes, was as usual too firm and I’ve struggled to get an even outer finish.  It will be unpicked and redone soon………..

Susie says that this works well in 6s and 8s, and whilst I wouldn’t recommend them for a first go (as maintaining any kind of tension in RAW or netting with 6s is impossible), I’m definitely going to try them next.  She also builds out on the embellishment step using twin holed beads of various types, which helps alleviate my slight reservation about the small size of the finished bead (for all that work I’d like something about half as big again – the 11 and 15 version is under an inch in diameter). And Susie has already tried out lots of colours and embellishments, so have a look at her Facebook piccies of them here for inspiration.  Very kindly Gwen allows limited commercial use, so I may even be able to sell a few as pendants when I finally get the hang of it and get the completion time down.  Overall a very interesting advanced pattern.

Conway Beaded Bead - Gwen Fisher, beaded by the Indecisive Beader
Conway Beaded Bead – Gwen Fisher, beaded by the Indecisive Beader

Beaded Bead 2

The first instalment of my new ‘Beading Beaded Beads’ project, in which I will bead lots of beaded beads and tell you all about it. Beaded Bead 1 was not good – I rather suspect this was my fault rather than the designer’s, so I’ll re-do it and tell you about it later.
Beaded Bead 2 is from a free tutorial by BeadTurtle.  It’s a nice simple tutorial using one of the standard techniques for building a dodecahedron – groups of 3 larger beads linked through groups of 5 smaller beads, and I’m sure some similar ones will appear later in this project.  She specifies size 10 seeds, but I don’t have any, and as this project is supposed to be a bit of a stash buster I had to use what I had already.  I’ve tried the tutorial before with size 11s and it didn’t work, so I went for size 8 seeds and tweaked the embellishment.

Recipe

30 6mm Opaque Turquoise rounds

<1g Seed beads size 8 Miyuki 1427 Silver lined dark violet

<1g Seed beads size 11 Miyuki 352 Fuchsia lined aqua lustre

Don’t worry too much about tension as the final embellishment of the seed bead groups of five tensions and stiffens the ball (up to that point it was alarmingly floppy).  Where she adds the yellow centre to the groups of size 10 seeds, I simply added an 11 between each of my 8s.

This was a lovely quick and comfortable project, and has given me a good base technique which I will use again and embellish.  Although I think these were my only 6mm rounds so there won’t be another one with rounds in this project – it would work equally well with any type of larger bead, and I’ve seen similar techniques applied to fire polisheds, crystals and even spikes.

For my next beaded bead I’m going to try an even simpler version, which omits the smaller groups of 5 and just goes for the triangles of larger beads – hopefully soon!  And then there is Beaded Bead 1 to try again………….