Materials Packs for Great Balls of Spikes

I’ve been meaning to put together some Materials Packs for my Great Balls of Spikes Tutorial for ages, and on Saturday I had the time (well I had the energy to stay up late to make the time).  So here they are – I hadn’t realised quite how many Spikes & Gumdrops I’ve managed to collect whilst ‘meaning to do this’, so there is a nice variety of colours and finishes to suit all tastes.  I’ve really dug around in my stash to find some interesting finishes for the seeds and fire-polished beads, and am parting with some really nice ones which I’ve been hoarding.  My favourite is the Magic Orchid Spike colourway, because the spikes are gorgeous and really sing with the Zest, Fuchsia and Magic Orchid seeds and Magenta Metallic fire-polisheds, and quite frankly if someone doesn’t buy it soon it may mysteriously disappear.

Anyway, here they all are – if you click on each photo it should take you through to the correct listing in my Folksy shop.  If you’d rather use Etsy, then the brights (Magic Orchid, Cornflower, Frosted Crystal) are here, the darks (Matte Black, Jet Copper, Blue Iris) here, and the Gumdrops (Magic Blueberry, Jet Slipperit) here.

Magic Orchid Spikes
Magic Orchid Spikes
Magic Blueberry Gumdrops
Cornflower Spikes
Cornflower Spikes
Dark Blue Iris Spikes
Jet Slipperit Gumdrops
Matte Black & Crimson Spikes
Jet & Copper Spikes
Jet & Copper Spikes
Matte Crystal, Scarlet & Silver Spikes

And finally, the tutorial itself is available for instant download via Etsy here (VAT will be added if you are in the EU), via PayHip here (no VAT), or if you don’t mind waiting for me to e-mail via Folksy here (no VAT).

More UFOs

Last week I was hunting for my wire box (which should have been labelled, but the small people like to take the labels off, presumably to make life more fun), when I happened upon the UFO box. This should really be called the failure box, since this is where I put things I’ve given up on (genuine UFOs which I intend to finish live in a different box in a different room, and I’ve already blogged about them and done nothing to them since).

Amongst a tangle of hopeless failures and technical disaster zones I found several viable pieces, which I think got thrown in there in a hurry when I was clearing my stuff out of the spare room before we had the smallest boy.  As he is nearly two and a half you can see it’s been a while since I looked in there, so it was a pleasant surprise to find so much usable work! There were also some lovely beads and a finished pair of earrings……..

In no particular order we have:

  • The black net base for a Racel Nelson Smith Ootheca cuff.

image

  • Part of another Rachel Nelson Smith piece in lovely earth colours.
  • A finished black and white hollow cube – a sample with more zip beads on the corners than I now do, so an early point in the evolution of this series, but I now think rather fun.
  • Some lovely mushroom beads, and a pair of earrings made from them.
  • A couple of salvageable beaded beads – the giant pewter ones has issues at either end, but can be embellished to hide them, and the blue one was an attempt at using RAW which didn’t go well, but will be fine as an Anenome base.

imageimageimage


  • The teeny ones were going to be part of a big piece, but bored me.  They will now be a nice little pendant, hung as a trio.

image

  • A khaki and copper attempt at a sea urchin design, which failed as an urchin but could make a rather nice hollow beaded bead.
  • A long piece of peyote with graduated delicas that simply needs zipping round a wire core to make a necklace.
  • Assorted beads, stones and bits and bobs.

I did find the wire in the end, but got distracted and haven’t used it yet. Tomorrow…….


The Sting

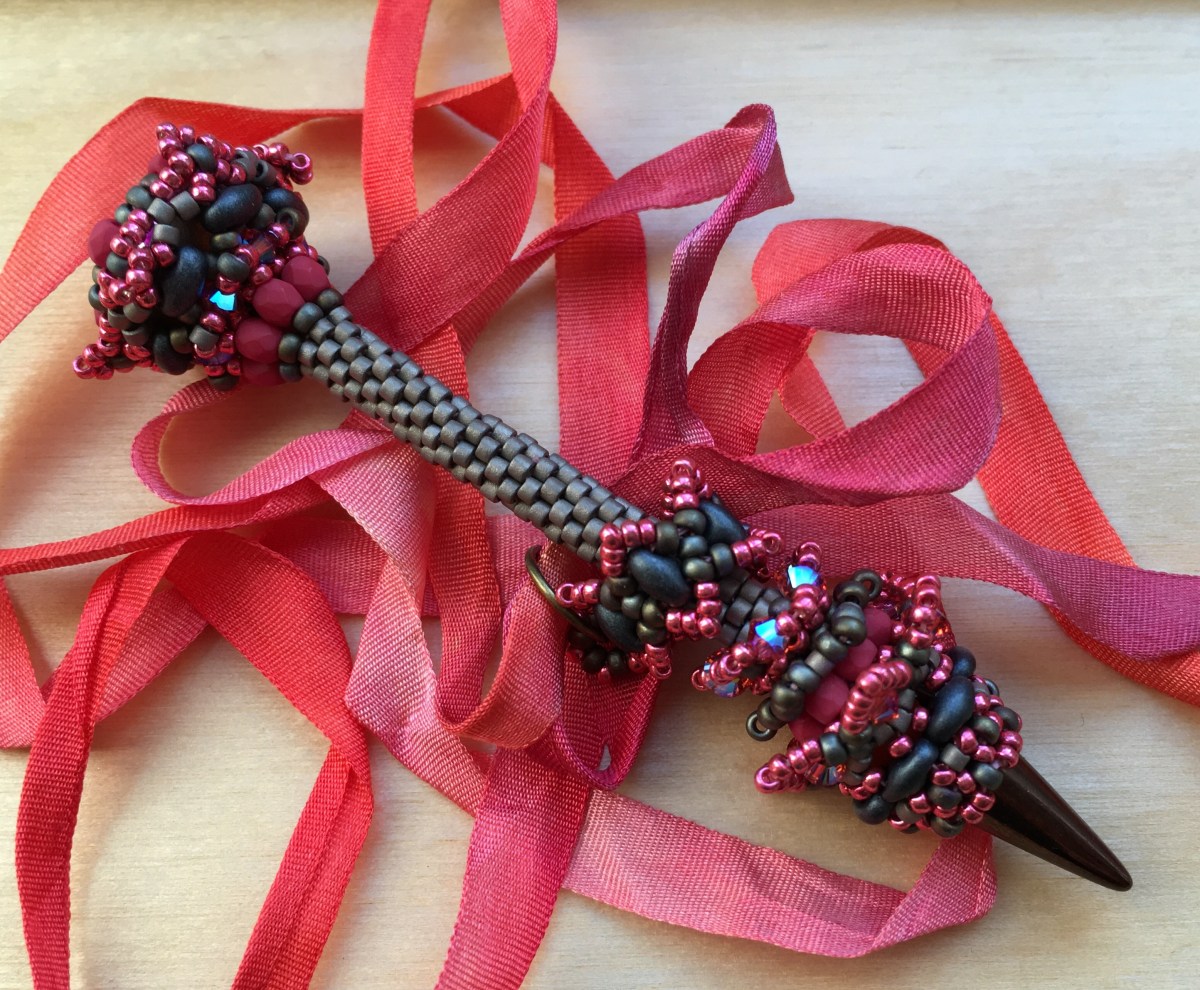
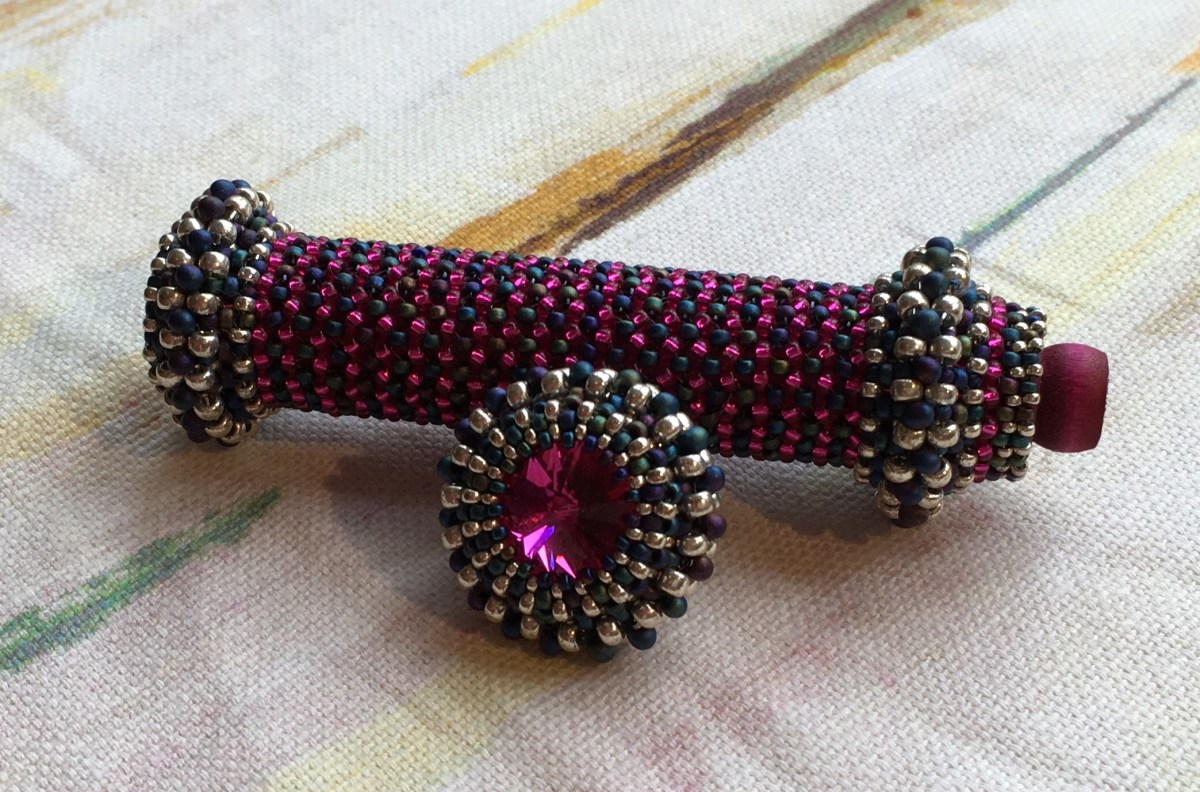
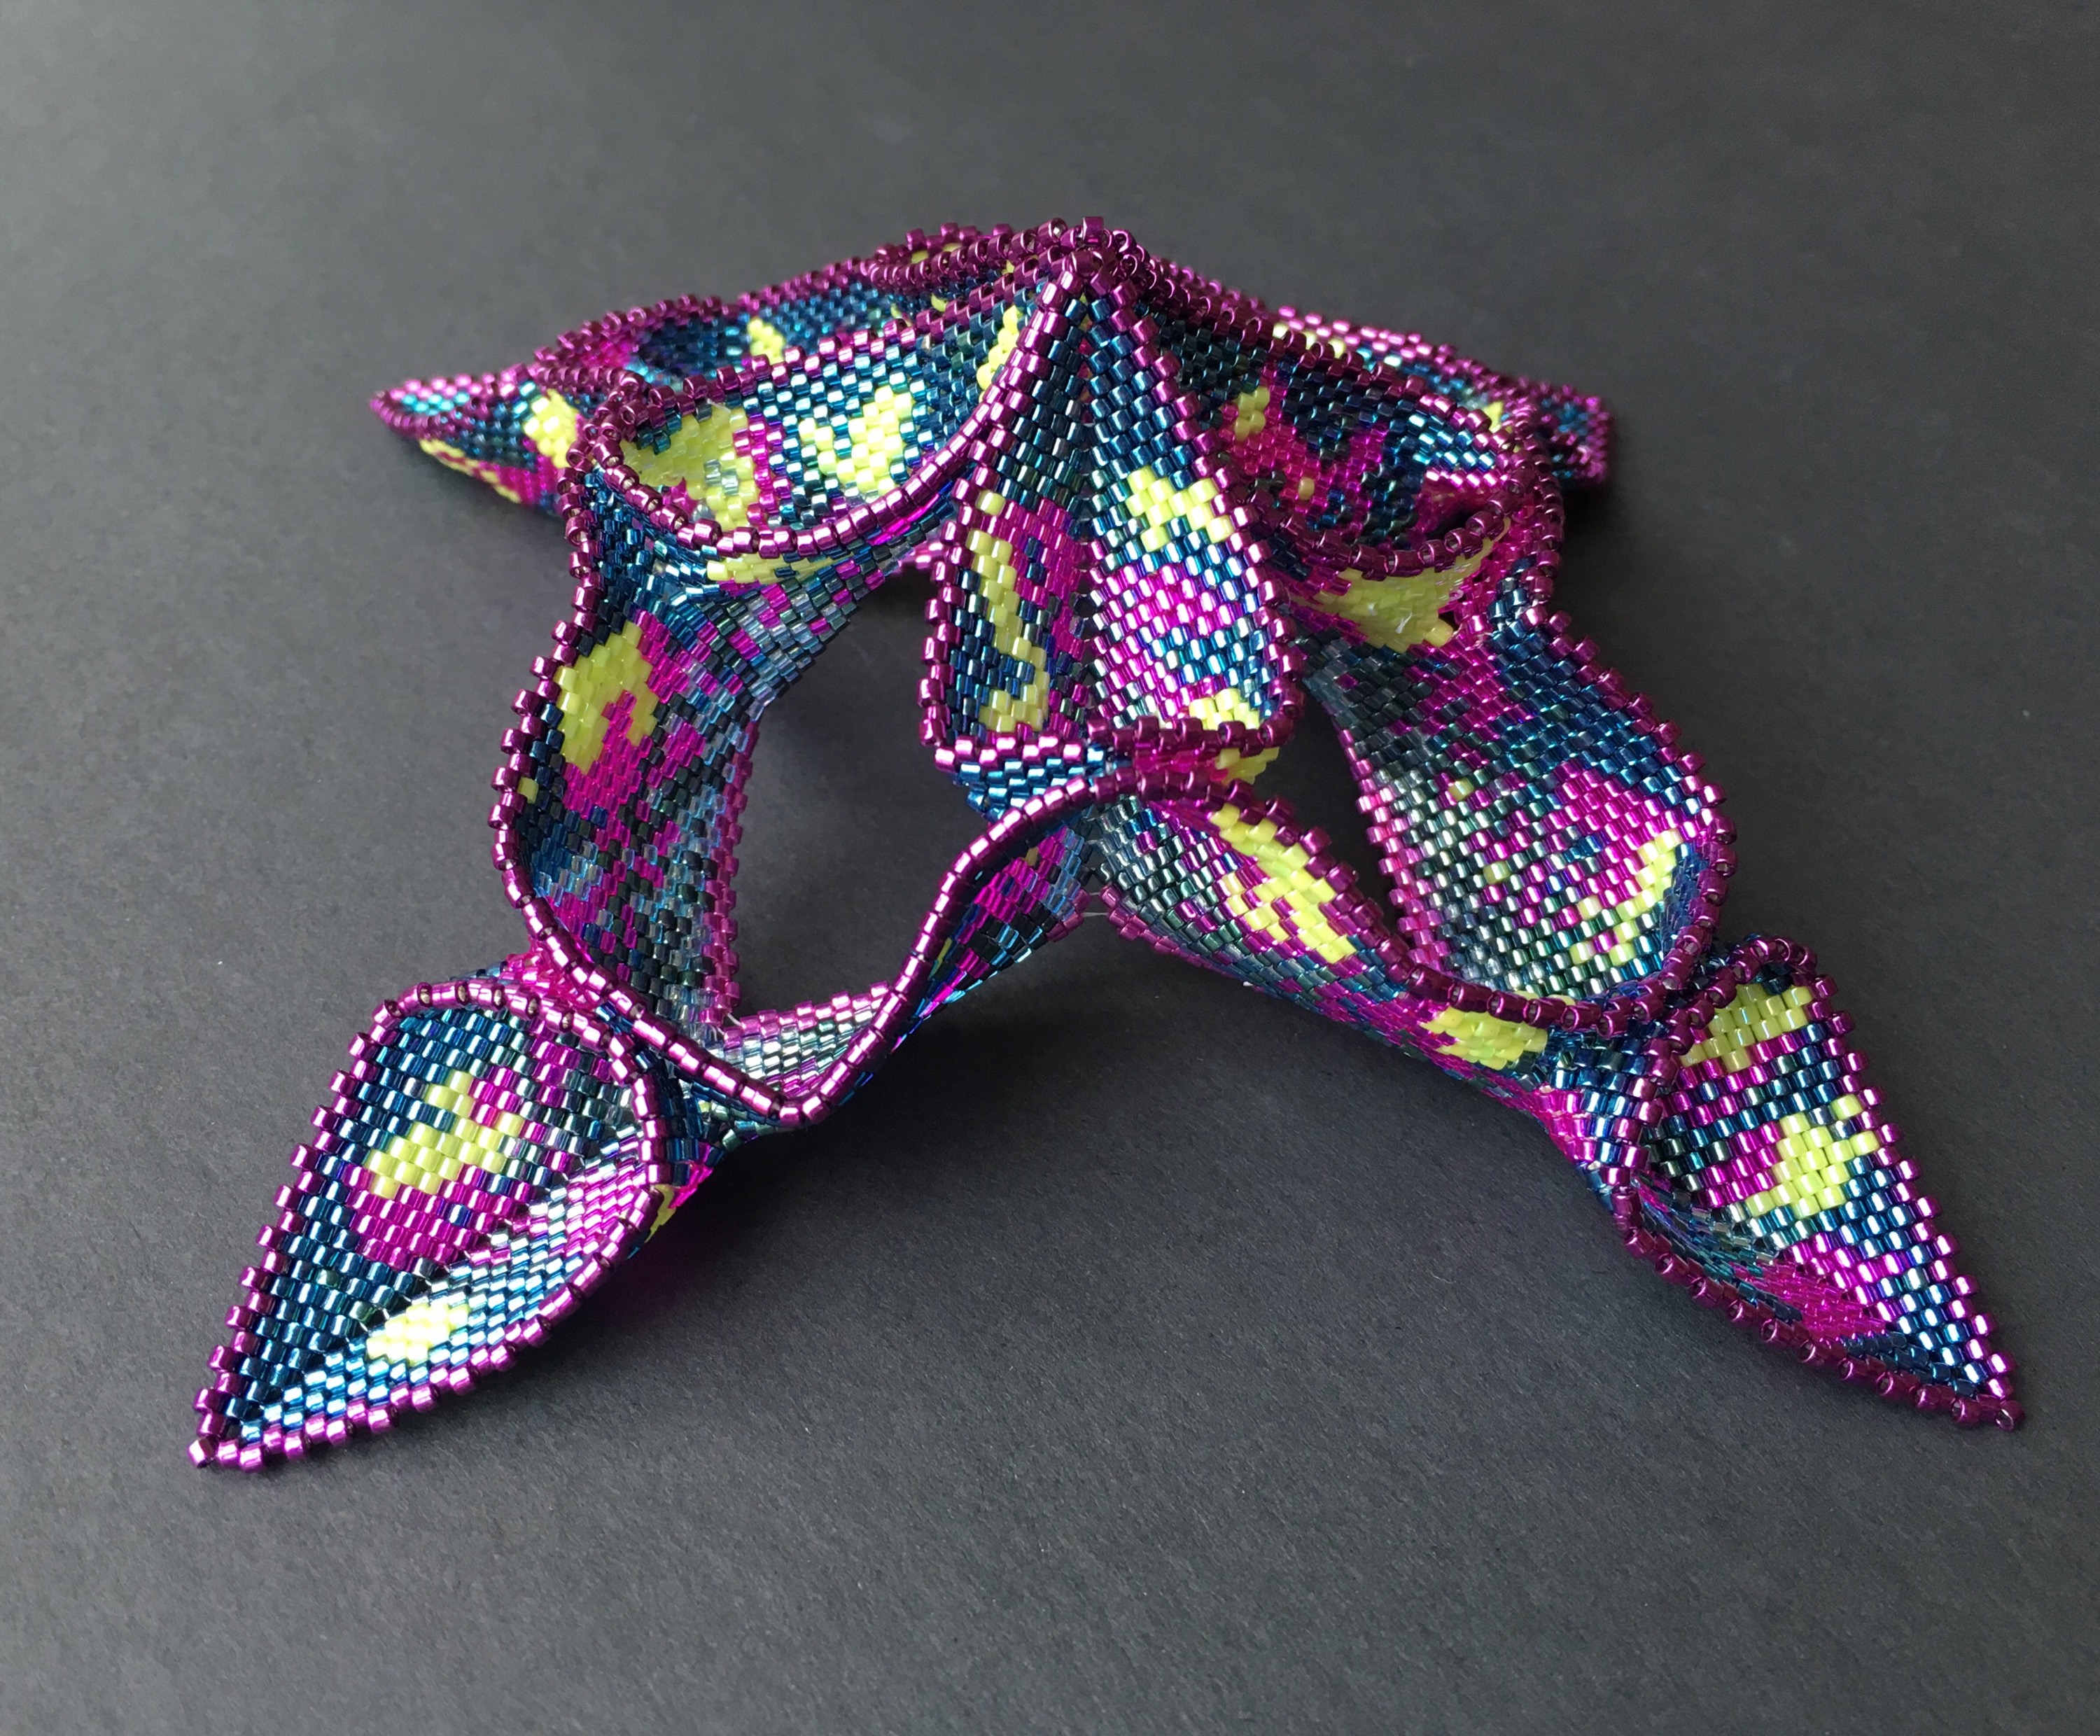
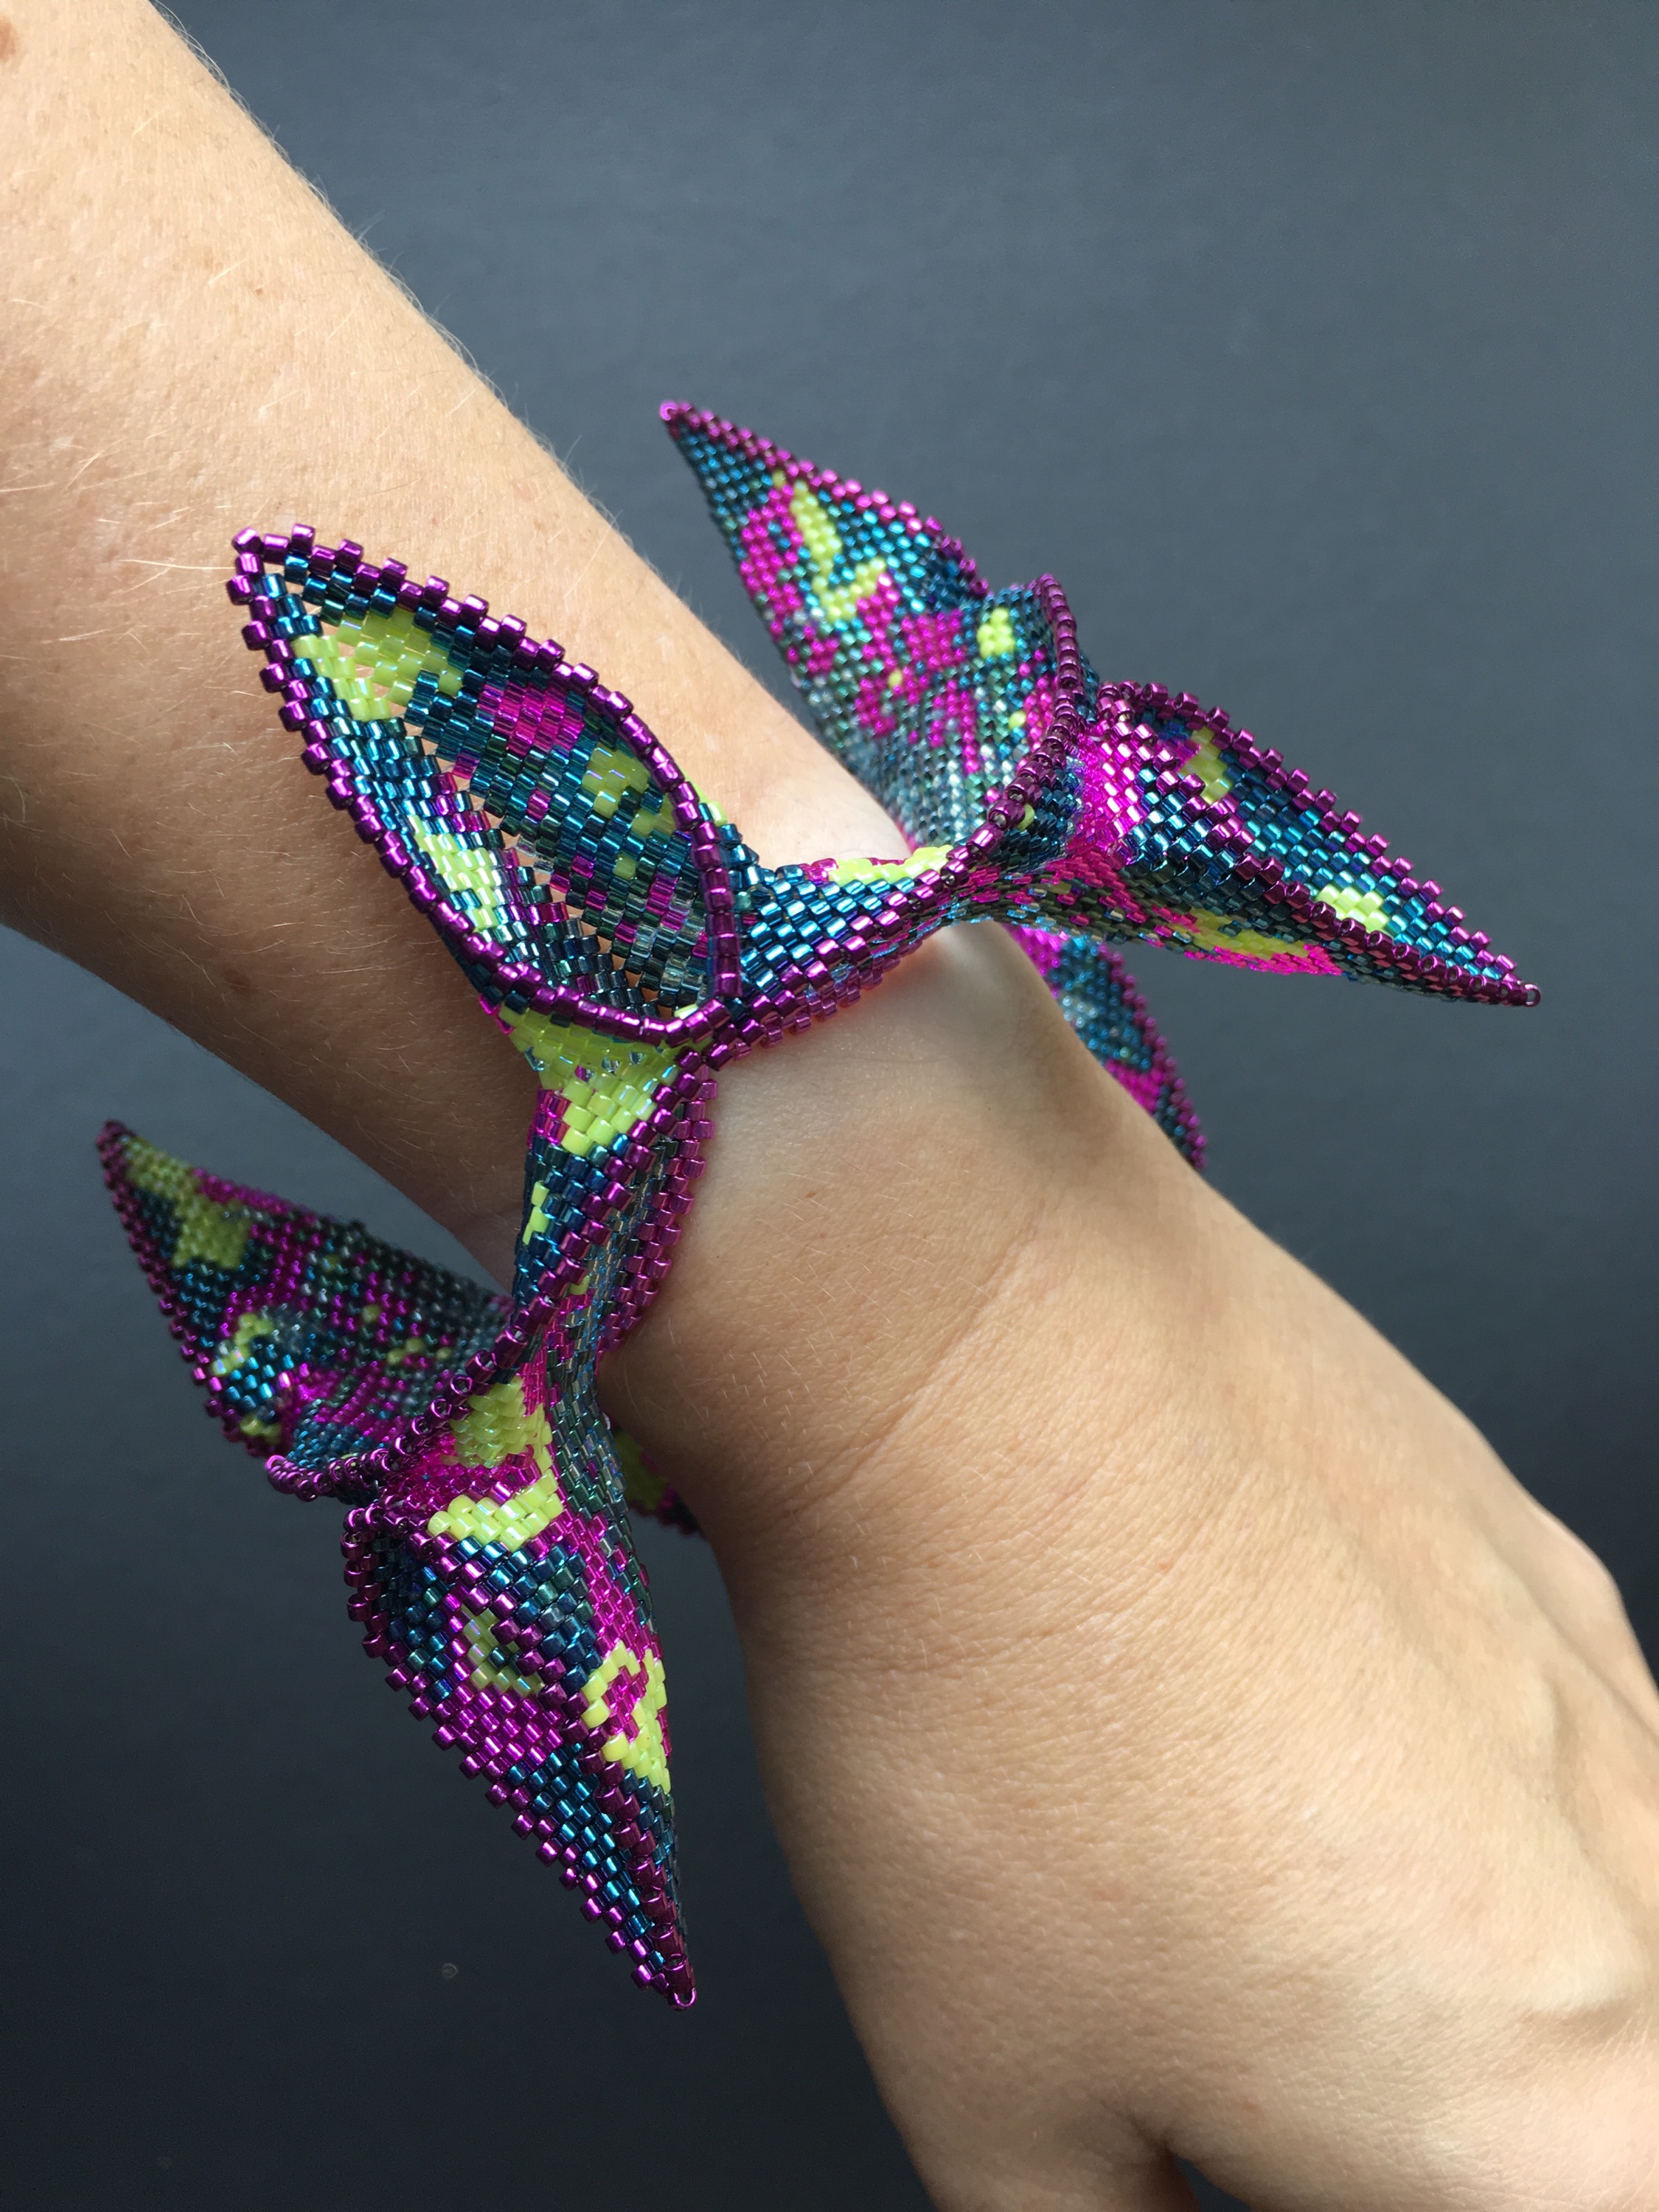
I’ve been working really hard on a competition piece recently, and after a month’s solid discipline I fell of the wagon last week and wandered off into other beading.  I’m sure the break will be good for me, but none of the other beading really worked and that made me rather antsy.  When this happens, there are two options – have a night off beading, or do something which can’t fail.  I didn’t want a night off, so I turned to my stash of digital patterns to find something by a designer who never lets me down – Sabine Lippert.  Just before Christmas she had a pattern sale, so I had a little splurge on a few patterns, including her pendant ‘Sting’.  This looked like something which would be achievable in an evening or two, so I pulled some beads and got going.

image

It was a good decision – as always with Sabine’s designs this piece went together very nicely.  It took around 3.5 hours – I’m used to Sabine’s designs so can usually work them up quite quickly, and I found this one pretty easy, with everything just slotting together perfectly for a contented evening’s beading.  It’s given me my beading mojo back, and with some child free time off the day job coming up, I feel refreshed and ready to get some of those long awaited tutorials finished and launched soon.

Recipe

image

  • 15 seed – Miyuki Duracoat Cranberry 4211
  • 11 seed – Miyuki Matte Silver Grey 2012
  • SuperDuo – Jet Gunmetal Pearl
  • Delica – Miyuki Matte Pewter 321
  • 3mm Crystals – Swarovski Paparadscha AB2 (slightly hard to find colour in 3mm – I got mine at a show from Gemstone Boutique)
  • Spikes – Dark Bronze.  I have no idea where they came from!
  • 3mm Round – I didn’t have any in the right colour, so I used some Saturated Fuchsia firepolisheds from Robin’s Beads, which worked well.
  • 6mm Round – I used an orange FP, this can’t really be seen so you just need something that tones in.
  • 14mm Rivoli – Chinese (not as fine a finish as Swarovski or Preciosa, so they don’t work with a tighter bezel, but a fantastic colour which neither of them offer and worked for this project – from the Southampton Bead Shop)

image

The ribbon (I know it needs a press, it’s been lurking in my stash for ages) was hand dyed by Stef Francis, a fantastic space dyer who I came across in my sewing days.

Tips

I usually find my tension too tight for Sabine’s pieces, because of the 3D embellishments and layering.  So I relaxed things a bit, but unfortunately I shouldn’t have done as this is one which requires stiff tension to create a solid rod of peyote, so it came out a bit floppy.  However, I have stuck a head pin down the middle and it’s fine!

Sabine does warn you about this in the blurb on her site, but not in the pattern.  Because I’d bought the pattern a while ago, I’d forgotten what the blurb said, but to be honest a beader of my experience should know that if you want to make a peyote tube rigid you’ve got to do some pretty solid stitching, and use a suitable thread – Sabine recommends Fireline explicitly in the materials list (which should have been another clue) but I’ve gone off it a bit, so I used KO which is clearly not going to give the same rigidity.  So entirely my fault, but a useful learning experience (just when you think you have things sussed…..), and it still looks fine.  If I make this design again, which I probably will, I might perhaps stick a cocktail stick down the middle for extra stiffness anyway (the head pin I used is after all flexible).

Sting - Sabine Lippert - beaded by Sarah Cryer

Colours

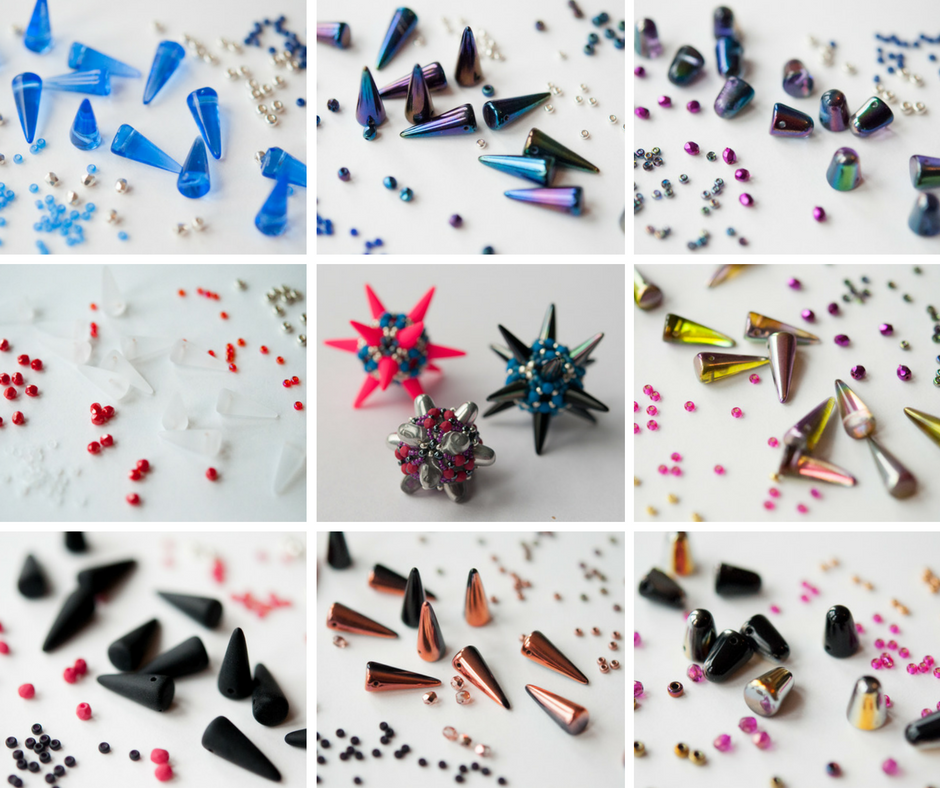
One of my resolutions this year is to include more neutral colours in my beadwork – I have a tendency to chuck colour at things, which sometimes gives me an amazing looking piece which is completely unwearable.  I try to avoid beading with black as it’s hard work, and anyway I wear a lot of navy blue rather than black, so I’ve been using a lot of 401FR and similar to give me a navy base.  I’m also getting really into pewter, and other matte, mid greys, as they work well with the etched beads I’m currently obsessed with, so for this piece I chose a selection of those tones for the base beads, and variations on a dark salmon pink for the main colour.  I toyed with a few different spikes (which you can see in the materials picture), but in the end the dark metallic chocolate worked best. This was going against my instincts, which were to pick out the fuschia and orange of the stone, and maybe chuck in some zest, but I think it’s worked well and given me a striking but wearable piece, proving that this is a good resolution!

Conclusion

A lovely piece, well worth buying and trying.  Rock hard tension and the correct thread would have helped keep the main shaft rigid, so always read the instructions.  I’m going to get back to my own work for now, but next time I need a break I’ve got Sabine’s Toggle Ring tutorial to try.


Playing with forms

For years now I’ve been eyeing up my children’s tiny plastic toy animals – surely I could bead around one and make something really funky?  But I’ve been put off by two things- firstly they are really small and it would be fiddly (I know this is ironic coming from a beadweaver) and the ‘spare’ ones here are all creepy crawlies and I really don’t like them. We do have a giant octopus just crying out to be beaded but he is much too big.

So when I was in the local art shop (gorgeous Cass Arts) the other day and saw some small Decopatch creatures I thought ‘aha – they look fun’.  So I now own a lovely Brontosaurus – she’s small enough to be achievable, but big enough to allow me to work out some techniques in sensibly sized beads.  She’ll be an ornament rather than something to wear, but if she works I can try a smaller form next time – I’m seeing a range of necklaces made of tiny beaded T-Rex’s already…………….


Our Solar System

One of the best bits of winning an Etsy Beadweavers Challenge is that you get to choose a future challenge topic.  The first time I won (with my Nasturtium Ring) I chose ‘Architecture’, which prompted some lovely entries.  My second win, with my Wings Bangle for the ‘Abstract Painting’ challenge was last October and my space mad family chose ‘Our Solar System’ as a theme.  Because we don’t run a challenge in December, and because January is always ‘Rising Star’ (for new members and those who haven’t won a challenge), the team have had plenty of thinking and beading time, and there have been a huge number of really fabulous entries.  I’ve not entered because I did a Planets necklace a while back and was a bit stumped for a new idea – looking at the entries I wouldn’t have stood a chance anyway!

So, the brief I gave them was:

The Solar System

In our house at the moment we are completely obsessed with our Solar System. My husband has a new telescope which we’ve been using to look at the moon and planets, so he’s constantly coming up with new activities (last week we all watched the International Space Station whizz over us). Recently we saw a wonderful harvest moon, followed the same night by the lunar eclipse (so much better than last year’s cloud covered solar eclipse), and last week I opened my newspaper to see some extraordinary new images of Jupiter’s storms from the Hubble Space Telescope, so when it came to choosing a theme it seemed like the whole universe was shouting at me!

Anyway, our Solar System seems like wonderful inspiration for beaders – how about beaded beads making a necklace of  planets, a scatter of rough natural crystals captured in freeform beadwork forming the Asteroid belt, or some bead embroidery inspired by the twisting stripes of Jupiter’s storms? And if you get stuck you can always watch our favourite song for inspiration, or if you are feeling more sensible have a look at the Hubble website’s gallery (don’t get distracted by the far off nebulae though, please stick to our own Solar System).

I gave them a link to Thomas (5) & Oscar’s (2) favourite song:

And to the Hubble Gallery.

And this is what they produced – extraordinary!

Etsy Beadweavers Feb 16 Solar System entries

Here are links to the Etsy listings:

Thomas (5) is completely in love with Kris’ Rocket (no.2) – who wouldn’t be, and dear husband loves the other Chris’ spiral galaxy (no.9).  Apparently the fact that our solar system is shown in red is astronomically significant and that (as well as its’ loveliness) pleases his pedantic heart.  Oscar (2) is far too young to choose a favourite (he just says ‘beads’), and I can’t really say because it would be a bit inappropriate (although I think those of you who know me could probably narrow it down to three based on past beady fawning).  I’ll tell you all when the voting is over…………….

Anyway please, please do have a proper look through and then swing by the team blog before February 16th and cast your vote for your favourite – it only takes a second, and there is something for everyone.   Follow us on Facebook or via the blog to keep up to date with all of our shops and to be inspired by the challenges (next month’s is ‘Masquerade’), and if you really love one of these fantastic pieces, why not buy it and have it forever?

2016 beady to do list part 2 – tutorials

So here we are again – next on the list some pieces which I’ve started the tutorials for:

Oscar’s Bauble

This is a variant on Oscar’s Rattle, which was my winter piece for the 2014 Stitch N Craft Challenge, and I think I’d started work on the instructions in late 2014 but abandoned them as it got too close to Christmas, thinking I’d get them done ready to launch in Sept 2015.  I didn’t, so it would be nice to get this done in time for Christmas 2016.

Oscar's Bauble - Sarah Cryer Beadwork


Art Deco Needle Case

From my 2013 Stitch n Craft Challenge Chatelaine.  I think I even started buying supplies for the materials packs for this one!  This is the one I’m going to publish next, and the aim is to do it by the end of Feb.

Art Deco Needle Case - Sarah Cryer Beadwork

Triangles Bracelet

Not so sure about this one, it has many features that I’m proud of (such as the counter sunk catches in the second version), and I love the rounded spars of the hollow triangles.  I think this one may be changed to become part of a series of hollow geometrics, as I made a whole series of shapes a long while back which I’d like to write up and publish – to be honest the 3D ones maybe more interesting and unusual than this one?

image

And another pieces which I think would work as a tutorial with a bit of tweaking:

CRAW Ring

This was initially started for an Etsy Beadweavers Challenge with the theme ‘Game of Thrones’, but wasn’t done in time, and although I’m pleased with the design, the execution was flawed (mainly because I used too light a thread) so it wasn’t suitable for sale in this incarnation.  It’s all 15 seeds, so not for the faint hearted but will I think evolve into a tutorial as it’s a nice wearable piece and useful for those looking to improve their CRAW and add some new CRAW shapes.  It includes slightly tricky steps (such as splitting the CRAW), but I think if I work on them a bit more I can come up with some teachable thread paths.  Perhaps I’ll do my working out in 8s rather than 15s though……

CRAW Ring - Sarah Cryer Beadwork

My 2016 beady to do list

After my obligatory blogger’s 2015 review, here’s my equally obligatory 2016 look ahead!  Thank you to my sister Susie for the apposite mug – it is sadly true as I spend a worrying amount of time thinking about what I want to bead.  This is probably because I have so little time to actually bead, so this year I want to make a plan and sort of stick to it, so I can always have something on hand ready to work on (rather than sitting around waiting for inspiration to strike because I’ve forgotten that really good idea I had three months ago).

So to begin, the projects I started in 2014 and didn’t touch in 2015 – the dreaded ‘unfinished but not quite a UFO yet’ box.

Planned for me to wear at my friend Jane’s wedding in the smartest venue imaginable.  Abandoned when I decided the dress was too short for said venue.  This was going to be a series of arches to mirror the digital print of the Ted Baker dress, and I think I’ll continue trying to work it out as it’s a lovely dress.  That said, when I pulled the bits so far to take a snap I wasn’t very impressed…….so for now this is back in the ‘maybe’ pile.

Arches - in progress - Sarah Cryer Beadwork

Planned for me to wear at same  wedding with smarter outfit, just as a simple short necklace.   Abandoned when I realised said outfit now too small.  I have plans to turn this into a shoulder covering cape of bezelled stones, connected by a cobweb of antique gold 3mm fire polished beads, but it could take a while to bezel enough stones for that!  The stones are a mix of vintage and new Swarovski, and were a very good exercise in working up similar bezels in lots of shapes and sizes. I’m a lot more confident in this one though, so it’s high up the list to actually do.  It would be a good holiday project as I’d only need the gold beads and chatons (not my normal case full of random pulls).

Sapphires & Gold - in progress - Sarah Cryer Beadwork

These are a variant on Jean Power’s Geometric Secret vessels – only with triangles instead of hexagons.  They’re lovely shaped things, but the one in 15 delicas (at the front) is rather more succesful than the one in 11s as it holds it’s shape, but I’ve never quite known what to do with it as a triangle is not a very wearable shape – it sticks out rather.  It could make a nice pendant hanging below a suitable bosom I suppose?  Not sure what to do with the other one?  Back on the ‘maybe’ pile.

Stepped triangles - Sarah Cryer Beadwork

This one may not make it – I was playing with twin beads to make a flat weave, but I’ve run out of the twins and can’t remember where I got them.  Luckily I do in theory log all my purchases (so I can cost up work/kits), so I should be able to work it out.  If I finish this it will have a long or box clasp and sit as a snug cuff, and I’d like to as it is my colour.  I’d say there is no more than an hour’s beading left to do once I’ve sourced the beads, so stays on the ‘to do’ pile.

Cuff - in progress - Sarah Cryer Beadwork

Maybe I should have included a section on ‘pieces where I’ve run out of beads’ – this one qualifies as well……..it will be a necklace once I’ve worked out how to elegantly extend it to a normal length (or tracked down some more beads).  This would make a nice beginners tutorial as it is super easy, but I think there are already quite a few similar ones around.  On the ‘to do’ pile.

Collar - in progress - Sarah Cryer Beadwork

This is a barely started Jean Power Affinity Bangle – using very cool rubber coated rondelles from my now defunct local bead shop.  I think I have enough to get me through it (I kept buying more in their drawn out closing sale), and I’ve made one before which was a joy, so I want to get going on this soon as the colours are more winter than summer and I think it will be lush!

Affinity Bangle - designed by Jean Power, beaded by Sarah Cryer Beadwork

So, that’s the really old stuff out of the way – just tutorials, last year’s unfinished pile, my long list of unstarted patterns and of course a ‘to try’ inspiration list to go.  This could be the longest set of New Year’s resolutions I’ve written (hopefully I’ll be better at sticking to them than I normally am).  Tune out if you get bored………….

Craft not chaos

The lovely people over at Folksy are running an alternative take on the Black Friday/Cyber Monday phenomenon called ‘Craft not Chaos’, with lots of gorgeous shops offering discounts today or over the weekend. So if you’re looking for gorgeous hand made gifts, toys, clothes, jewellery, furniture or just things that are generally lovely why not pop over and have a look here?

Jean Power Bangle

And I’m taking part by offering 10% off finished beadwork until Monday 30th, using the discount code BLACKFRIDAY. Because Folksy can only discount my whole shop, I’ve had to hide my tutorials and materials packs while the discount is in place, but beaders don’t panic, you can still buy them via my Etsy and PayHip shops, and they’ll be back on Folksy on Tuesday.

Kissing Piggies - Sarah Cryer Beadwork
Kissing Piggies – Sarah Cryer Beadwork

Wings……

I’ve finished my latest Contemporary Geometric Beadwork influenced piece – a large pointy bangle.  The idea with this piece was to work with the ideas from CGB, but for the first time to ignore their finished pieces and patterns and see where I ended up.   I also wanted to work with a tube of sweepings from Stitch & Craft, to free myself up from the hours I tend to spend selecting colours!

  
I started with a MRAW band which I thought would be roughly the right size for a bangle (I was wrong – it was huge), then added some increases and decreases to form a zig zag.  I beaded that for a while, then added some increases halfway along each side to start to form peaks which I thought I could join together to start to shrink the piece down and make it human (rather than elephant sized)!  I planned to add some crystals to join the peaks together, but when I tried it they didn’t work, and left the piece a bit too wobbly.  After some unpicking I decided to stick to delicas, joined the peaks and beaded across either side of the join to make continuous lines and curves, surrounding the whole piece with a dark magenta metallic outline.

  
At that point I decided the original MRAW band wasn’t sitting correctly – the alternating zigs and zags meant that it needed to point in different directions so I couldn’t turn it into a CGB skirt to firm up the shape and make it smaller.  So that got unpicked from the inside out, and I added a couple of rows of peyote in fuchsia metallics, and the decreases sorted the sizing out.

  
So it’s all done, and available in my Etsy shop.  It’s also my entry for the Etsy Beadweavers Team October Challenge – ‘Abstract Painting’.  If you’ve got a moment pop over to our blog and have a look at the other entries (or search ‘EBWC’ on Etsy).  And if you could take a few seconds to vote for your favourite we’d really appreciate it.

Time……..

I don’t know about you, but I always feel like I don’t have enough time – enough time to work, clean, play with the boys, rest, relax, and above all, I don’t feel like I spend enough time beading in a productive way.  When I’m at my day job, I start a task, move through it, maybe edit my outputs a bit, but generally I can just get on with it.  And at home, I can just get on with things, albeit with the distractions of two small children to contend with.

Four Seasons Thomas

But when I’m beading, even after years of practise, I still seem to spend more time unpicking than creating, and this bothers me.  But why – as I unpick and redo endlessly surely I’m learning something, making my design repeatable for others (rather than bodging to make it work once), improving my own knowledge and technique?  So why do I find it so frustrating?  At this point I should say, if you’re reading this hoping for the answer to avoiding re-work, or learning from your mistakes, I don’t have it – I’m just putting the question out there for now.

Some things I do know though which can help with this:

  • If you bead tired you will mess up.  I always bead tired as I only get to bead in the evenings once the boys are asleep and I’ve cleaned up, cooked dinner and faffed around for a bit deciding what to do.  This could be why I always mess up.
  • Get a good light.  Then you won’t get quite so tired.
  • Don’t bead in front of University Challenge – you will either get an embarrassing number of questions wrong, or mess up your beading.
  • Don’t expect every piece to turn into a repeatable unit – I made a lovely bezel base for a neon pink Lunasoft cab last weekend.  I then used that base to make a ring using gorgeous daggers and another Lunasoft cab, and it went together like a dream.  When I returned to the original pink cab ready to add some dinky spikes to my oh so clever bezel I realised that they wouldn’t fit.  After an evening going backwards and forwards I finally finished with a pretty clever arrangement only to realise that the spikes are far too small for the cab.  I have of course learnt from this experience, and will no doubt dig out a smaller cab but how annoying, and don’t I wish now I’d gone to bed an hour earlier?

image

  • Have a place to keep nearly finished pieces – the brooches waiting for a brooch back, the components looking for an inspired construction.  Then when you have a quick 30 minutes you can batch finish several – yesterday I remembered where I had put the glue and completed two brooches, a bracelet and a ring!  OK, I finished the actual beadwork on them ages ago, but the real sense of achievement kicks in once they are done (and not sitting at the back of your mind nagging you).

image

  • If you feel like you’re not getting stuff done, keep track.  This morning I grabbed all of my recently finished pieces and .was very pleasantly surprised.  OK many of them were started many months ago, but they are done now so I can move on.

image

  • If it’s not working, stop, go to bed.  Yes it may be better to carry on straight away if you can see a possible solution, but then again it might not, so you may as well get some sleep and try again fresh tomorrow. Or indeed try again next month.
  • And finally, unpicking is OK.  Beading is way too slow a process to put up with something you aren’t happy with, particularly in the big pieces.  I started my latest CGB work with a MRAW band which then didn’t work as the piece started to fold, and really started to vex me.  So I finished the outside of the piece, put it away for a bit and then when I felt strong enough, took a deep breath and unpicked the beginning.  I then added a new inside which also then began to annoy me, so I put that away for a bit longer, got it out again yesterday, unpicked it again, tried something slightly different (and a lot less clever) and now at last the damm thing is finished.  Third time lucky – hopefully the luck will hold out as it’s my entry for the Etsy Beadweaver’s Team October Challenge!  You can see more pictures in the Etsy listing (click on the image below).
Abstract Reflections - beadwoven statement bangle
Abstract Reflections – Beadwoven Statement Bangle Sarah Cryer Beadwork

Of course the test of all this is going to be whether I can take my own advice.  Reading it through again I’d have to say it seems unlikely……